Get 5 recipes to simplify your life:

easy, delicious, real food recipes

Latest Recipes

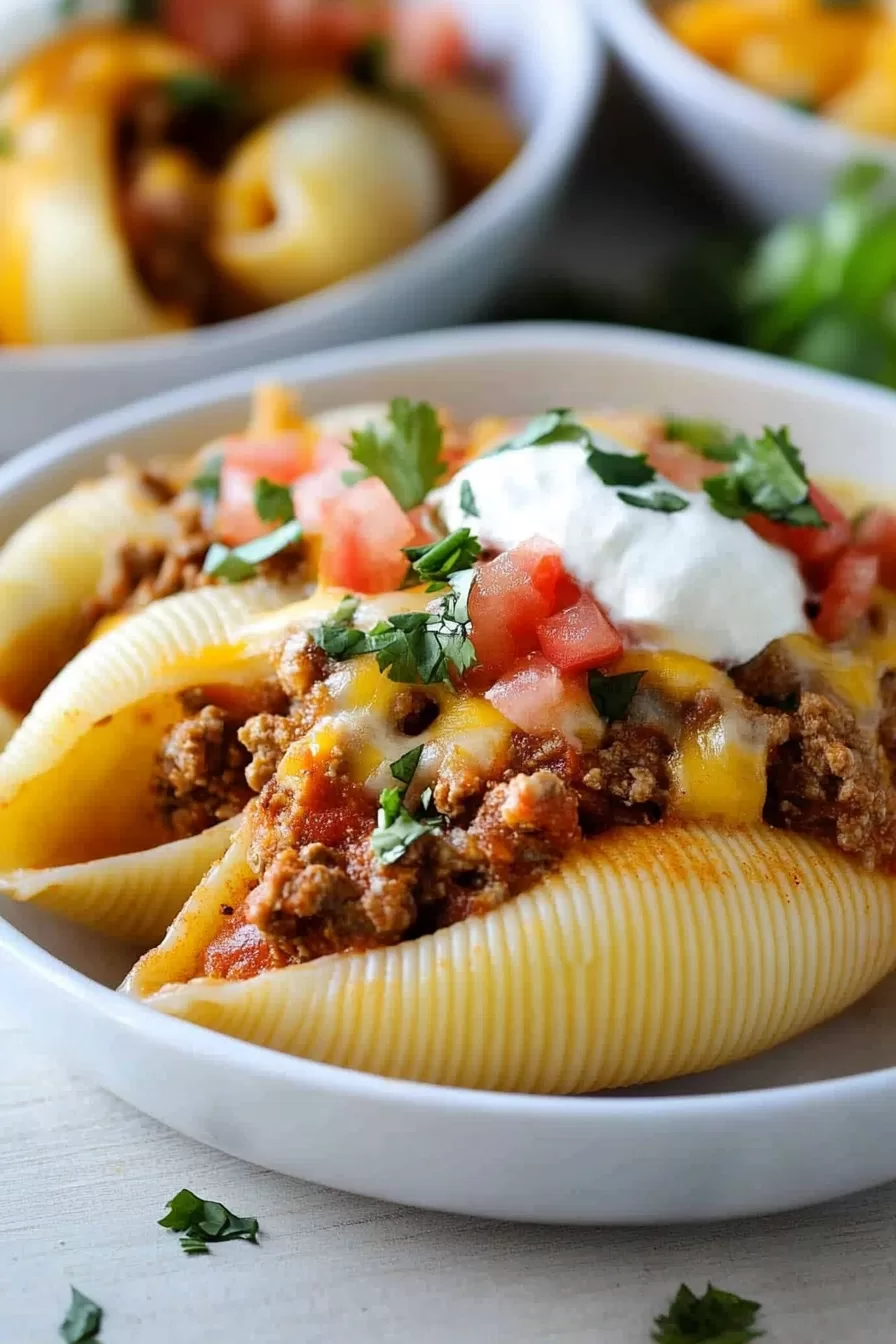
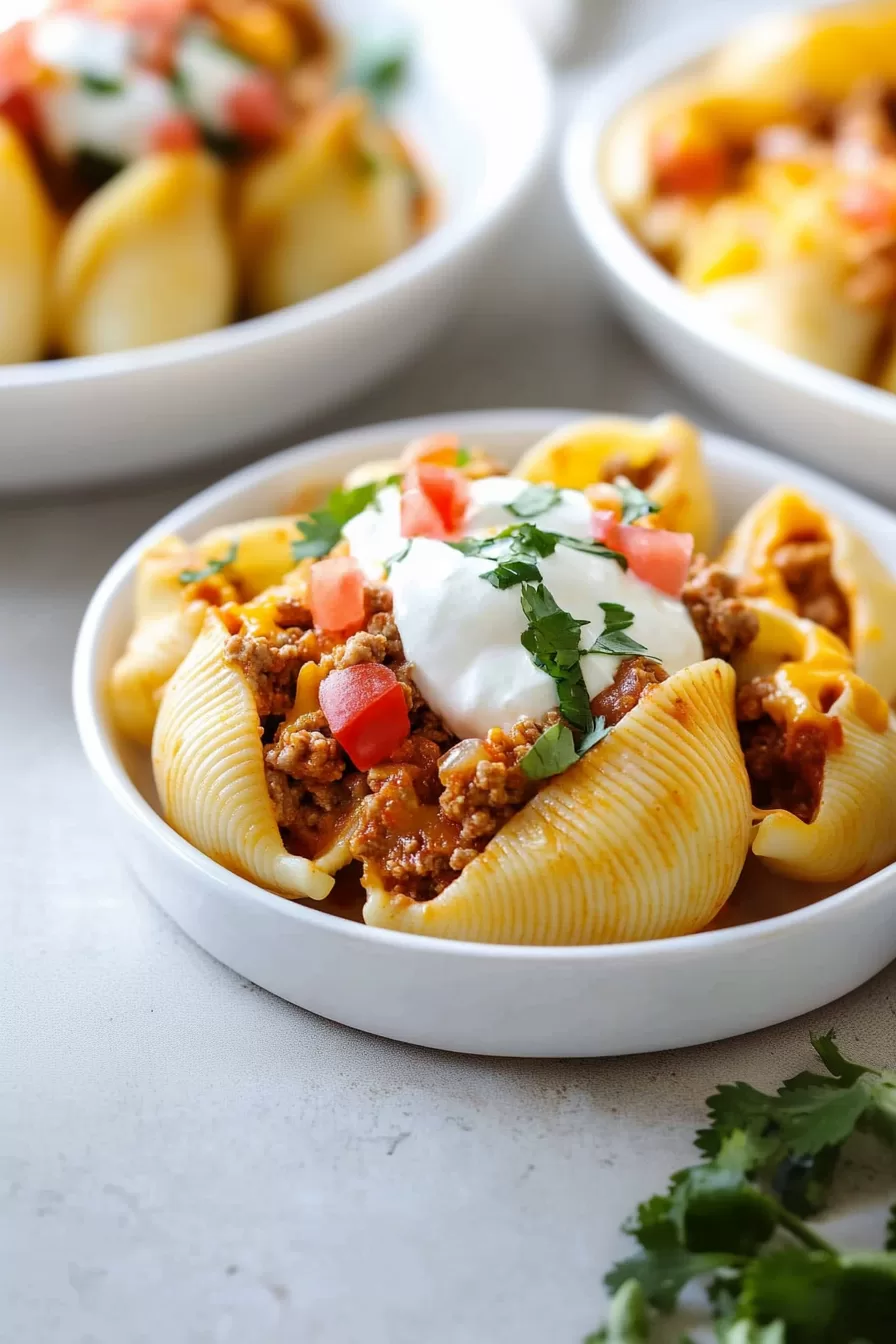
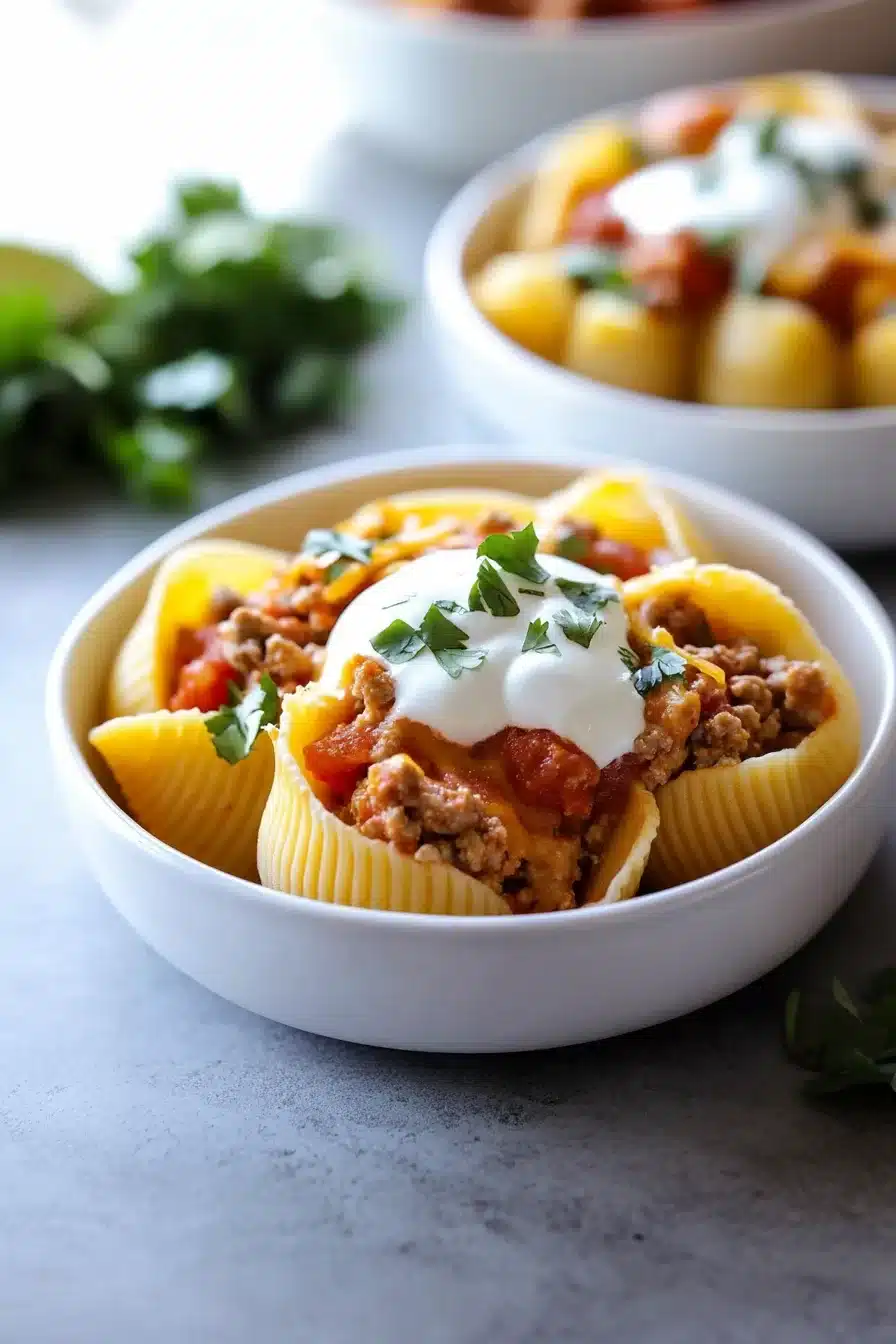
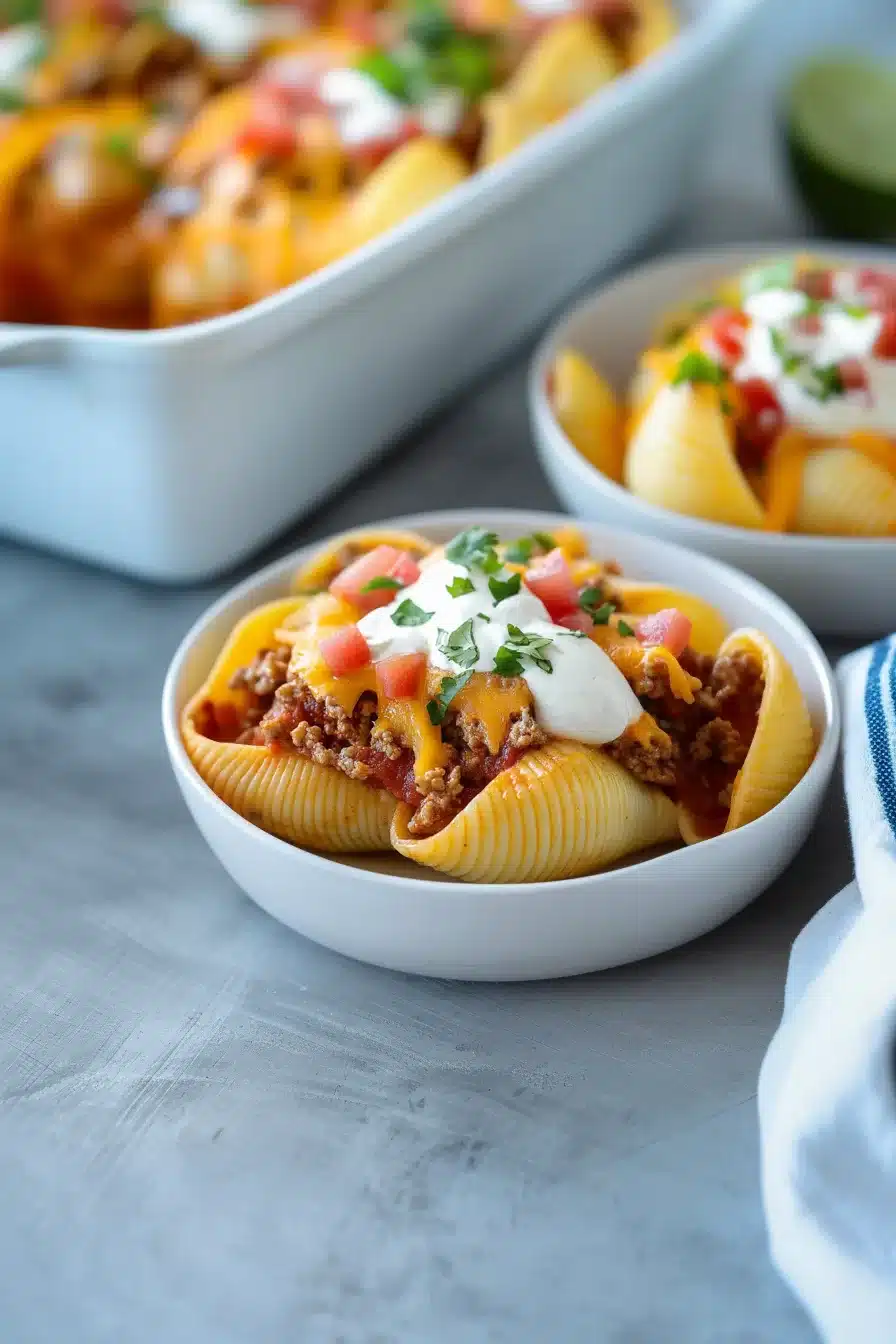
Creamy, cheesy, and just a teeny bit spicy, these taco stuffed shells combine savory ground beef, onions, taco spices, and melty cheese, tucked into tender pasta. It’s like taco night stumbled into pasta night, got cozy, and never left.

There’s pasta. There’s taco filling. There’s a bubbly layer of gooey cheddar and Monterey Jack on top. It smells like taco Tuesday and Italian comfort food had an edible baby, and I’m not mad about it. Serve it straight from a hot dish on a crisp evening or when your brain can’t decide between tacos and something baked. Bonus: it reheats like a dream.

Table of Contents

Taco Stuffed Shells

Why You’ll Love this Taco Stuffed Shells Recipe

No need to overthink this one—just one of those fun, slightly quirky mashups that just works. Like salsa on scrambled eggs, or dipping fries into a Wendy’s Frosty.

  • Ridiculously simple to make: You just cook, stir, stuff, and bake. A bit like making lasagna’s extroverted cousin.
  • Stretch-your-dollar kind of meal: One pound of meat and a package of pasta go surprisingly far once stuffed and sauced.
  • Make ahead friendly: Assemble earlier, pop it in the fridge, and bake when it’s go-time.
  • Super customizable: Spice it up, swap the cheeses, or sneak in some veggies—no shell police here.
  • Cozy and impressive: It looks fancy-ish without actually requiring effort. Your guests won’t know.
  • Leftovers are glorious: Reheat ‘em for lunch and suddenly Tuesday is looking pretty good.

Taco Stuffed Shells

Ingredient Notes

Just a handful of familiar players pulling more than their weight here.

  • Jumbo pasta shells: These big boys are perfect for stuffing. Just don’t overcook, or they’ll tear like overzealous wrapping paper.
  • Ground beef: A good ol’ 80/20 blend does the job nicely. Leaner works, though you may lose a bit of richness.
  • Onion: Adds flavor and sweetness once softened. Yellow onion works best, but white will do in a pinch.
  • Garlic: Yes, three cloves. No, that’s not too much. It mellows as it cooks.
  • Taco seasoning: Grab a packet or make your own if you’re feeling fancy. I won’t judge either way.
  • Red enchilada sauce: Smooth, smoky, and just the right amount of tang. Adds sauciness without weighing things down.
  • Cheddar cheese: Sharp cheddar gives a rich melt. Mix it in while the beef’s still warm to help it melt evenly.
  • Monterey Jack cheese: Optional but highly encouraged. It’s creamy, mild, and melts like a charm.
  • Optional toppings: Sour cream, cilantro, guac—pile ‘em on or keep it low-key. Totally your call.

Taco Stuffed Shells

How To Make This Taco Stuffed Shells Recipe

Once your ingredients are lined up, the kitchen practically does the work for you. You’ll simmer, stuff, and bake your way to a bubbly, cheesy tray of comfort.

  • Prep the oven and baking dish: Preheat your oven to 350°F and give that 9×13-inch baking dish a quick mist of nonstick spray. Set it aside so it’s ready for your cheesy creations.

  • Boil the pasta shells: Salt that pasta water like the sea, then boil the shells until they’re about two minutes shy of al dente. You want them sturdy enough to hold filling. Drain, rinse with cold water (so they stop cooking), then set them aside on a towel or tray—single file, like little soldiers.

  • Brown the beef and onion: Heat up a large skillet over medium-high. Toss in the ground beef and chopped onion; cook until the beef browns up a bit. Stir frequently so nothing sticks or browns too fast.

  • Add garlic and taco seasoning: A few minutes in, stir in the minced garlic and taco seasoning. Your kitchen’s gonna smell like magic. Keep cooking until the beef’s fully browned and everything’s well mixed.

  • Stir in enchilada sauce and simmer: Pour in the enchilada sauce and give it a stir. Let it bubble gently for 5–10 minutes. Some of the liquid will cook off, thickening things up beautifully.

  • Add cheese and mix: Take the skillet off the heat. Let it cool just a touch so the cheese doesn’t freak out, then fold in 1 cup of shredded cheddar until it’s nice and melty.

  • Stuff the shells: Grab your cooled pasta and start spooning that cheesy taco mixture into each shell. It’s messy but fun. Arrange them in your baking dish as you go, snuggling them in close.

  • Top and bake: Sprinkle the rest of the cheddar and all the Monterey Jack over those plump little shells. Cover with foil and pop into the oven for 15 minutes.

  • Uncover and finish baking: Remove the foil and let the top bake uncovered for another 15 minutes. That’s when things get properly golden and melty.

  • Cool and serve: Let it sit for 5–10 minutes before serving (it’s molten lava straight from the oven). Add sour cream, guac, or whatever your taco heart desires.

Taco Stuffed Shells

Storage Options

So you made a mountain of taco stuffed shells (hard not to, honestly), and now you’ve got leftovers teetering on your countertop. No panic—this dish holds up like a champ.

In the fridge, slide the cooled shells into an airtight container or just wrap the entire dish with foil or tight plastic wrap. They’ll keep happily for 3 to 4 days. When reheating, you can microwave a couple of shells on a plate (start with 1 minute and go from there), or reheat a whole dish in the oven at 350°F for about 15–20 minutes until warmed through and bubbly.

Wondering about freezing? Yes, absolutely. These freeze beautifully. You can freeze them fully baked or right before baking. I like to line a baking pan with foil, freeze the shells individually until solid, then transfer to a ziptop bag. To bake from frozen, give them a bit more time in the oven (keep the foil on for longer before removing it to brown).

Variations and Substitutions

Feel like switching things up? Let’s make these shells your own. It’s a flexible little recipe once you get the hang of it.

  • Ground turkey or chicken: Swap the beef for a leaner protein if that’s how you roll. Add a splash of oil if it seems dry while cooking.

  • Beans or veggies: Stir in black beans, corn, or diced bell peppers to the meat mixture. It bulks things up and adds texture.

  • Greek yogurt topping instead of sour cream: Tangy and protein-packed. I almost always have a tub in the fridge anyway, don’t you?

  • Use homemade enchilada sauce: Got a trusty recipe? Pour it on. Either way, you can even check out these bacon basil cornbread muffins if you’re making a Tex-Mex night out of it.

  • Different cheeses: Pepper jack? Cotija sprinkled on top? You’ve got options here. Basically, grab whatever cheese your heart whispers to you.

  • Spice level: Add hot sauce or diced jalapeños to the filling if you like a kick—or tone it down for picky eaters.

Taco Stuffed Shells

What to Serve with Taco Stuffed Shells

Want to round out the meal? These warm, cheesy shells play well with others—and bring out the best in a proper spread.

  • Crisp green salad: Something super low-effort works well here (I’m talking lettuce, cucumber, lime vinaigrette). Helps cut through all that gooey richness.

  • Mexican-style rice or cilantro-lime rice: A small scoop on the side takes the whole meal into “mini fiesta” territory. It also helps if you’ve got extra filling and no shells left.

  • Cornbread muffins: Not gonna lie—these bacon basil cornbread muffins are a dreamy partner to this dish. Sweet, salty, and crumbly enough to mop up any leftover sauce.

  • Roasted veggies: Try spiced zucchini, bell peppers, or some charred broccoli. It brings balance… and color. Bonus: no one ever complains about roasted veg. Or maybe they do, but I tune it out.

  • Something cold and sweet afterwards: Like these peanut butter banana ice cream sandwiches. Rich, nostalgic, and an easy make-ahead dessert.

Taco Stuffed Shells

Frequently Asked Questions

Can I make taco stuffed shells ahead of time?

Yes! This dish is practically begging to be prepped in advance. Assemble everything right up to the baking stage, then cover and refrigerate for up to 24 hours. When you’re ready to bake, just add 5–10 extra minutes to the cooking time since it’s starting cold. That cheesy top will still get bubbly and golden, promise.

Can I freeze taco stuffed shells?

Absolutely, and this one’s a freezer all-star. You can freeze stuffed shells before or after baking. If freezing unbaked, just assemble in a freezer-safe dish, cover tightly, and freeze. When it’s time to cook, move it straight to the oven and bake a little longer while covered. Already baked? Cool completely, wrap it well, and thaw before reheating for best results.

What if I can’t find jumbo pasta shells?

Honestly, that happens to me more often than I’d like. You can swap in manicotti or even layer the taco filling and cheese between lasagna noodles in a pinch. It becomes more like a taco lasagna vibe, which is just as dreamy and fork-friendly.

How spicy is this recipe?

Mild to medium, with just a little warmth from the taco seasoning and enchilada sauce. If you like heat, add chopped jalapeños, hot sauce, or spicy cheese like pepper jack. Making it for kids or sensitive palates? Go mild on the sauce and skip the hot stuff.

Taco Stuffed Shells

Taco Stuffed Shells

Prep Time 25 minutes
Cook Time 30 minutes
Total Time 1 hour
Creamy, cheesy, a little bit spicy—these taco stuffed shells combine savory ground beef, onions, taco seasoning, and melty cheese tucked into tender pasta. It’s like taco night met pasta night and never left. Cozy, customizable, and perfect for leftovers!
6 servings

Ingredients

Pasta Shells

  • 24 jumbo pasta shells about two-thirds of a 12oz box

Taco Filling

  • 1 lb (450 g) ground beef 80/20 blend preferred
  • 1 medium yellow onion diced
  • 3 cloves garlic minced
  • 1 packet taco seasoning about 2–3 tbsp or homemade
  • 1 can (300 ml) red enchilada sauce 10 oz (about 300 ml); more for extra sauciness, if desired

Cheese & Topping

  • 2 cups (200 g) cheddar cheese shredded, divided
  • 1 cup (100 g) Monterey Jack cheese shredded (optional but recommended)
  • Optional toppings: sour cream, cilantro, guacamole

Equipment

  • 9x13 inch Baking Dish
  • Large pot
  • Large skillet
  • Aluminum foil

Instructions
 

  1. Preheat your oven to 350°F (175°C). Lightly grease a 9x13-inch baking dish with nonstick spray and set aside.
  2. Bring a large pot of salted water to a boil. Cook the jumbo pasta shells for 2 minutes less than package directions (so they're slightly undercooked/sturdy). Drain and cool under cold running water, then arrange on a towel or tray.
  3. Heat a large skillet over medium-high. Add ground beef and onion. Cook, stirring often, until beef is mostly browned and onions are softened, about 5–6 minutes.
  4. Add minced garlic and taco seasoning to the skillet. Stir well and cook for 1–2 minutes until fragrant and the beef is fully cooked.
  5. Stir in the enchilada sauce. Let the mixture simmer gently for 5–10 minutes until slightly thickened. Remove from heat.
  6. Add 1 cup of shredded cheddar cheese to the beef mixture while still warm. Stir to combine until melted and evenly mixed.
  7. Spoon the cheesy taco filling into each cooled shell (about 1–2 tablespoons per shell) and arrange in the prepared baking dish.
  8. Sprinkle remaining 1 cup cheddar and all the Monterey Jack cheese evenly over the stuffed shells.
  9. Cover the dish with foil. Bake for 15 minutes, then remove the foil and bake for another 15 minutes, until the cheese is browned and bubbly.
  10. Let the shells cool for 5–10 minutes before serving. Garnish with sour cream, cilantro, or guacamole if desired.

Notes

You can assemble the shells up to the baking step and refrigerate overnight. Freeze fully baked or unbaked for meal prep. Add beans, corn, or diced bell peppers to the filling for extra texture and nutrition. For a spice boost, use hot taco seasoning, spicy cheese, or add jalapeños!

Nutrition

Calories: 486kcal | Carbohydrates: 36g | Protein: 33g | Fat: 23g | Saturated Fat: 12g | Cholesterol: 93mg | Sodium: 846mg | Potassium: 594mg | Fiber: 3g | Sugar: 3g | Vitamin A: 740IU | Vitamin C: 4mg | Calcium: 350mg | Iron: 3.2mg

Crispy, buttery crescents wrapped around melty cheddar and savory ham—can you even resist? These ham and cheese crescent rolls, loaded with cheddar, deli ham, and brushed with a sweet-savory butter glaze, are golden, gooey, and deeply snackable. One whiff from the oven and suddenly everyone’s “just popping in” for a visit.

Something wildly satisfying happens when melty cheese meets flaky pastry. Combine that with a little salty ham and the faint yeasty tang of buttery crescent rolls? It’s comfort food with a wink. Low effort, big reward—the kind of thing you can toss together for breakfast, a low-key dinner, or a “should we open a bottle of wine?” type of night. Plus, the glaze? Oh, the glaze. Don’t skip it. It’s everything in one brush: sweet, tangy, garlicky, cozy. Basically, it’s a little golden blanket for your roll.

Table of Contents

Ham and Cheese Crescent Rolls

Why You’ll Love this Ham and Cheese Crescent Rolls Recipe

Let’s be real—this is not a fussy recipe. If you can roll up a sleeping bag, you can make these. The ingredients are humble, the process is weirdly satisfying, and the end result feels way fancier than the sum of its parts.

  • Ridiculously simple to make: You just roll, layer, brush, and bake. Dare I say you could do it in your sleep? (Please don’t.)
  • Melty-cheesy-gooey-goodness: That layered cheddar melts into little lava pockets of joy. It even bubbles a bit if you’re lucky.
  • Perfect balance of salty and sweet: The butter-honey-Dijon glaze hits all the right notes. It’s unexpectedly addictive.
  • Customizable for picky eaters: You can swap cheeses, skip the glaze, or use turkey… but honestly, try it as-is at least once.
  • Portable, shareable, snackable: These little golden spirals are grab-and-go friendly. Perfect for potlucks or pajama brunches.
  • Freezer-friendly: Make a batch, freeze a few, then smugly reheat when the snack craving hits.

Ham and Cheese Crescent Rolls

Ingredient Notes

We’re working with basics here, which is why every ingredient needs to pull its weight. Here’s what you’re tossing in the ring:

  • Crescent roll dough: The kind in the can with the satisfying “pop.” They bake up golden and buttery without lifting a finger.
  • Cheddar cheese: Go for sharp cheddar for a stronger flavor punch, or mild if you’re playing it safe. Pre-sliced makes assembly easy.
  • Deli ham: Thin-sliced is the way to go. It heats through quickly and wraps up neatly inside the dough. Black forest ham is especially dreamy.
  • Unsalted butter: This is our glaze base. Melt it low and slow so it doesn’t scorch or separate.
  • Honey: Adds a mellow sweetness to balance the saltiness of the ham and cheese. A little goes a long way.
  • Dijon mustard: Gives the glaze that faint heat and zip that makes people go “hey, what’s in this?”
  • Garlic powder: Just a pinch. It cozies things up without being too bossy.

Ham and Cheese Crescent Rolls

How To Make This Ham and Cheese Crescent Rolls Recipe

This is the kind of uncomplicated kitchen moment I live for. You’ll get your hands a little buttery, your counters a little flaky, and your kitchen filled with a golden, savory smell that’ll make everyone a little grabby.

  • Preheat and prep your baking sheet: Start by heating the oven to 375°F and lining your baking sheet with parchment paper. This means easy cleanup and no sticking—thank me later.

  • Unroll the dough and separate triangles: Pop open that beautiful tube (brace yourself for the jump scare), then gently unravel the dough and separate it into triangles along the perforated lines. Try not to tear them—although if one looks “creatively shaped,” just embrace it.

  • Layer the cheese and ham: Place half a slice of cheddar near the wide end of each triangle. Top it with a nice fold of ham, then the other half of the cheese. This zig-zag layering helps things melt evenly and stay mostly inside the dough.

  • Roll ‘em up: Starting at the wide end, roll each triangle toward the tip. Tuck the skinny tail underneath so it doesn’t flip up while baking. Place each roll on the baking sheet with a little space in between—your future self will appreciate it when they puff.

  • Mix and brush the glaze: In a small bowl, stir together the melted butter, honey, Dijon, and garlic powder. The smell is oddly satisfying, like warm garlic bread took a sweet vacation. Brush this mixture over all the rolls.

  • Bake to golden perfection: Pop them in the oven for 12 to 15 minutes. They should be puffed, golden brown, and starting to ooze slightly at the seams (in a charming way). Peek during the last couple minutes—crescent dough goes from “golden” to “whoops” real quick.

  • Cool slightly and serve: Let them cool for about 5 minutes on the pan so nobody scalds their mouth on molten cheese. Then dig in.

Ham and Cheese Crescent Rolls

Storage Options

So, let’s say you made a batch—maybe even a double batch—and now you’ve got leftovers (wild, but go with me here). Here’s how to keep those beauties fresh and reheat them without sadness.

For short-term storage, just pop any cooled rolls into an airtight container and refrigerate. They’ll stay tasty for up to 4 days, though they’ll lose a little crispness. A quick zap in the microwave (15–30 seconds) brings back the gooey magic, but the outside might go a little soft.

If you want that bakery-style crisp again, reheat them in a toaster oven or conventional oven at 350°F for 5–7 minutes. That brings the flake back to life.

And yes, absolutely—you can freeze them. Wrap each roll individually in plastic wrap or foil, then stash them all in a freezer bag. When you’re ready, reheat straight from frozen at 350°F for 10–12 minutes. Or if you’re patient (who is though?), thaw overnight in the fridge and rewarm from there.

Variations and Substitutions

Got picky eaters or random odds and ends in the fridge? These rolls are super flexible. Here are a few easy swaps that totally work:

  • Swiss or Gouda cheese: Sharp cheddar is fab, but a nutty Swiss or creamy Gouda turns it into something a little more European picnic-y.

  • Turkey instead of ham: Turkey slices are milder but still tasty. Especially if you’ve got some leftover from earlier in the week.

  • Add sliced jalapeños or pickles: A little heat or vinegar zing tucked inside with the ham makes them extra zippy.

  • Use spicy brown mustard instead of Dijon: It adds a bolder punch. Just watch the salt level—it can get assertive fast.

  • Veggie twist with sautéed mushrooms or spinach: Fold in a few spoonfuls of cooked veggies under the cheese. Great for mixing things up (and sneaking in greens).

  • Gluten-free dough options: If you’re avoiding gluten, there are decent refrigerated gluten-free crescent doughs that work just as well here.

Ham and Cheese Crescent Rolls

What to Serve with Ham and Cheese Crescent Rolls

These are surprisingly versatile, and depending on your vibe, can lean toward brunch, lunch, or cozy dinner snackround.

  • A warm, lightly dressed salad: Something green and tangy like arugula with lemon vinaigrette cuts right through the buttery-ness. Plus, it makes your plate look like you totally planned dinner.

  • Tomato soup or potato leek: Soup and crescent rolls are a match made in melty comfort heaven. Dip ’em. Dunk ’em. Double up.

  • Fruit and cheese platter: If you’re serving these at a party, a little side of grapes, sliced apples, and sharp cheese leans it elegantly snacky without much effort.

  • Louisiana dirty rice: Sounds like a weird combo? Try it. Hearty, spiced rice plus ham and cheese just works—especially if you’re not into “dainty.”

  • Bacon basil cornbread muffins: If you’re going full brunch board, throw these on the side and let people graze. Sweet, savory, and deeply Southern.

Ham and Cheese Crescent Rolls

Frequently Asked Questions

Can I make these ham and cheese crescent rolls ahead of time?

You bet. You can fully assemble them, cover tightly, and refrigerate for up to a day before baking. When you’re ready, just brush on the glaze and pop them in the oven. If they’re going in cold, add another minute or two to the bake time.

What kind of ham works best in this recipe?

Look for thin-sliced deli ham, since it folds nicely and heats through quickly. Black forest or honey ham are solid choices. You could even chop up leftover baked ham if it’s all you’ve got—just go thinner so it layers well inside the crescent dough.

Can I freeze these after baking?

Absolutely! Wrap the baked and cooled rolls individually, then stash in a freezer-safe bag. When a craving hits, you can reheat them straight from frozen at 350°F for about 10–12 minutes. The texture stays surprisingly great.

How do I keep the cheese from oozing out while baking?

A little ooze is part of the charm, honestly, but if you’d like to rein it in, try placing the cheese fully inside the ham rather than at the edges. Also, tightly rolling the dough and tucking the ends underneath keeps things more contained.

Ham and Cheese Crescent Rolls

Ham and Cheese Crescent Rolls

Prep Time 10 minutes
Cook Time 15 minutes
Total Time 25 minutes
Crispy, buttery crescents wrapped around melty cheddar and savory ham—these golden rolls feature a sweet-savory glaze, making them irresistible for breakfast, lunch, snacks, or a cozy, shareable dinner. Easy to assemble and deeply comforting, they deliver big flavor with minimal effort.
8 rolls

Ingredients

Rolls

  • 1 8-ounce can (226 g) refrigerated crescent roll dough
  • 4 ounces (113 g) cheddar cheese sliced, preferably sharp
  • 4 ounces (113 g) deli ham thinly sliced

Glaze

  • 2 tablespoons (28 g) unsalted butter melted
  • 1 tablespoon (21 g) honey
  • 1 teaspoon (5 ml) Dijon mustard
  • 1/4 teaspoon (1 g) garlic powder

Equipment

  • Baking sheet
  • Parchment paper
  • Small bowl
  • Pastry brush

Instructions
 

  1. Preheat the oven to 375°F (190°C). Line a baking sheet with parchment paper.
  2. Unroll the crescent dough and separate it into 8 triangles along the perforated lines.
  3. Place half a slice of cheddar near the wide end of each triangle, top with 1-2 slices of ham, then finish with the remaining half of the cheddar slice.
  4. Starting at the wide end, roll each triangle toward the tip, tucking the point underneath. Place rolls seam-side down on the prepared baking sheet, spacing them slightly apart.
  5. In a small bowl, stir together the melted butter, honey, Dijon mustard, and garlic powder. Brush this glaze generously over the tops of the rolls.
  6. Bake for 12–15 minutes, until golden brown and the cheese is bubbly at the edges. Let cool for 5 minutes before serving.

Notes

Customize with different cheeses, swap turkey for ham, or add sliced jalapeños for heat. For best results, use thinly sliced ham and tuck cheese inside the ham to minimize oozing. Rolls freeze well—wrap and store in a freezer-safe bag, then reheat from frozen at 350°F (175°C) for 10–12 minutes.

Nutrition

Calories: 220kcal | Carbohydrates: 18g | Protein: 8g | Fat: 12g | Saturated Fat: 6g | Cholesterol: 32mg | Sodium: 480mg | Potassium: 60mg | Sugar: 4g | Vitamin A: 215IU | Calcium: 110mg | Iron: 1.2mg

Bold and savory, this Louisiana Dirty Rice brings together beef, sausage, chicken livers, vegetables, and Cajun spice for an irresistibly hearty dish. You’ll catch a whiff of smoky spice, sizzling meat, and the deep aroma of seasoned rice that’ll basically drag you into the kitchen.

It’s sizzling, steamy, and unapologetically rich—every spoonful loaded with personality and just the right amount of mischief.

This is Louisiana Dirty Rice the way it oughta be: warm, meaty, and confident. Not fancy, but proud. The mix of hearty ground meats, finely chopped veggies, and a bit of chicken liver (don’t click away) gives it that signature “dirty” texture and color. It’s cozy but bold—like your favorite hoodie, if it were dusted with paprika and smelled like happiness.

Whether dished up hot for a weeknight dinner or scooped onto a party platter next to hot sauce bottles and cornbread muffins, it just works.

Table of Contents

Louisiana Dirty Rice

Why You’ll Love this Louisiana Dirty Rice

No overhype here, just a super solid dish that knows exactly what it’s doing. It’s satisfying, full of flavor, and comes together with no drama—unless you count fighting over seconds.

  • One-pot magic: It starts on the stovetop and ends there too. Fewer dishes, more time to hover and taste-test.
  • Big flavor, little fuss: The combination of sausage, beef, and liver punches way above its weight with basic pantry spices.
  • Good for gatherings or hoarding: Make a batch for a crowd or hide it in the back of the fridge labeled “organic kale.”
  • Custom spice levels: Add more cayenne if you like a kick in the nostrils, or keep it mellow for the spice-shy crowd.
  • Hearty enough for a meal: No side dish duties here. This rice could file its own taxes, it’s so grown-up.
  • Leftovers? Even better: Tastes even deeper and more developed the next day. If it lasts that long.

Louisiana Dirty Rice

Ingredient Notes

There’s not a ton of guesswork here, but a few ingredients pull heavy weight, so let’s talk about them.

  • Low sodium chicken broth: It keeps everything savory and flavorful without going salt-overload. You’ll use it in stages to cook both the rice and the meat mixture.
  • Long-grain rice: You want those fluffy, separate grains—not mushy or clumped. Rinse it well so it cooks up clean.
  • Bay leaf: It’s subtle, but adds that background warmth and just a hint of something-herbal.
  • Olive oil or bacon grease: Your choice depends on your mood. Bacon grease adds smokiness, but olive oil keeps it a little lighter.
  • Ground sausage and beef: They team up for a hearty, meaty base. The sausage brings spice and the beef adds depth.
  • Chicken livers: I know. Stay with me. They’re chopped or puréed so they melt right in, adding that signature dirty rice vibe with extra richness.
  • Cajun or Creole seasoning: Pick your fave blend. Some are punchy with salt, others bring the heat—taste and tweak as needed.
  • Smoked paprika, cayenne, salt & pepper: These layer in the smoky heat and round out the dish. Use cayenne with caution (or full intention).
  • Celery, onion, bell pepper, garlic: The holy trinity plus garlic. Classic creole aromatics that give the dish its backbone.
  • Green onions or parsley & hot sauce: For garnish and a sharp, fresh lift right at the end. Don’t skip them.

Louisiana Dirty Rice

How To Make This Louisiana Dirty Rice

Okay, let’s get comfy. Apron on, playlist queued, and stove ready? This one moves fast once you start, so get everything prepped first.

  • Cook the rice: Bring 4 cups of broth to a boil in a large pot. Meanwhile, rinse that long-grain rice until the water runs clear (you’ll thank yourself later). Toss in the rice and bay leaf, give it a good stir, and simmer for 15–20 minutes until just tender. Take it off the heat, cover, and let it steam quietly for 3–4 more minutes. Fluff it with a fork and set it aside like the organized cook you are.

  • Brown the meat: Grab your biggest skillet or Dutch oven (don’t skimp on surface area). Add your fat of choice and toss in the ground sausage and beef. Cook until it’s halfway browned, breaking it into crumbles. Then stop! Let it sit still for a minute or two so it gets those crusty brown bits and sizzling edges. A splash of broth helps deglaze those bits back into the mix.

  • Toss in the veg and livers: Add the chopped chicken livers, celery, onion, and bell pepper. Stir often and cook until your kitchen smells amazing and the veggies have softened (about 5–7 minutes).

  • Spice it up: Add garlic, Cajun seasoning, smoked paprika, and cayenne if you’re feeling fancy. Let the spices bloom for 30 seconds, just until they smell warm and toasty—not burnt.

  • Finish it off: Pour in the remaining broth and fold in the cooked rice. Let everything mingle for a few minutes until almost all the liquid is soaked up and the whole mixture looks like it could win a chili cook-off.

  • Top and serve: Fork-fluff one last time, then scatter chopped parsley or green onions over the top. A few dashes of hot sauce? Absolutely. Now dig in.

Louisiana Dirty Rice

Storage Options

Let’s talk leftovers. Because this Louisiana Dirty Rice? Arguably better the next day.

Once cooled to room temp, scoop the rice into an airtight container and pop it in the fridge. It keeps well for up to four days. You might even catch your sleepy future self thanking past-you for the lunch goldmine you created.

Reheating is easy. Just warm it in a nonstick skillet over medium heat with a splash of broth or water to revive it a little. Microwave works fine too—cover it with a damp paper towel to bring back that fluffy texture.

And yes, you can definitely freeze it. Package it flat in freezer bags so it thaws quicker, then reheat gently on the stovetop or in the microwave. I’d finish it with a fresh sprinkle of green onions or parsley to liven it back up.

Variations and Substitutions

Dirty rice might have a classic structure, but it’s flexible. If you want to freestyle a bit, here’s how:

  • No chicken livers: Sub finely chopped mushrooms or skip them entirely. You’ll lose some richness, but it’s still mighty tasty.

  • Spicy sausage: Want a little zap of heat? Use hot Italian sausage or even andouille. Just dial down the cayenne if it gets aggressive.

  • Vegetarian version: Skip the meats and double up on mushrooms and lentils. Add a splash of soy sauce for umami, and you’re good to go.

  • Swap the rice: Short on long-grain? Try basmati or jasmine. Avoid sticky rice though, unless you’re cool with a clumpy vibe.

  • Add extras: A handful of chopped okra, diced tomatoes, or corn could add a little freshness and fun.

Louisiana Dirty Rice

What to Serve with Louisiana Dirty Rice

You could totally eat this solo, curled up on the couch with a spoon and zero regrets. But if you want to go all-in, here’s what plays nice with it.

  • A crisp slaw brings balance. Something vinegary and tangy cuts through the richness of the rice. Think shredded cabbage with a little apple cider vinaigrette, maybe even a hint of hot honey.

  • A side of warm, crumbly bacon cornbread muffins? Now that’s a Southern double down. The sweet, smoky corn pairs beautifully with the savory rice.

  • Need some greens? Rainbow chard sautéed with garlic and a drizzle of lemon hits the spot. If you’re curious, try this dish of pan-seared cod and rainbow chard for a lighter side combo.

  • For a zingy contrast, a bowl of pickled onions or jalapeños brings brightness without bulk.

  • Dessert? It’s gotta be indulgent. Something like these chocolate almond croissants could be a wild, buttery finale… just sayin’.

Louisiana Dirty Rice

Frequently Asked Questions

Do I have to use chicken livers in this dish?

Technically, no—but here’s the thing: they’re what give Louisiana Dirty Rice that unmistakable depth and richness. Once chopped or blended, they melt right in. Still not convinced? You can swap in finely chopped mushrooms for a similar earthy flavor, or just leave them out for a milder version. No one’s inspecting your plate, I promise.

Can I make this in advance?

Yes, absolutely. Dirty rice not only holds up well in the fridge, it almost improves after a day. The flavors meld, the seasonings sink into every grain—it’s the MVP of make-ahead meals. Just store it airtight and reheat gently to keep that soft but slightly toasty texture going strong.

What type of sausage works best?

Mild or spicy pork sausage is classic, but if you’re feeling bold, go for hot Italian or andouille for an extra kick. Just watch the seasoning levels—some sausages are pre-salted within an inch of their lives, so you might need to ease up on additional salt in the recipe.

Can I freeze Louisiana Dirty Rice?

Yes, and it freezes like a champ. Let it cool completely first, then pack into freezer bags or a sturdy container. When you’re ready to eat, thaw overnight or microwave straight from frozen in a pinch. Add a splash of broth as you reheat to wake it up, and maybe a flourish of fresh herbs to seal the deal.

Louisiana Dirty Rice

Louisiana Dirty Rice

Prep Time 15 minutes
Cook Time 35 minutes
Total Time 50 minutes
Bold, savory, and authentically Southern, this Louisiana Dirty Rice marries beef, sausage, veggies, chicken livers, and Cajun spice into one irresistible, meaty, and confident rice dish. One-pot magic, huge flavor, and just the right touch of smoky heat—perfect for family dinners or parties, and the leftovers are even better.
6 servings

Ingredients

Rice & Broth

  • 4 cups (1 liter) low sodium chicken broth divided use
  • 2 cups (370 g) long-grain white rice well-rinsed
  • 1 bay leaf

Meat & Aromatics

  • 2 tbsp (28 g) olive oil or bacon grease
  • 1 lb (450 g) ground sausage mild or spicy
  • 1 lb (450 g) ground beef
  • 4 oz (115 g) chicken livers chopped or puréed
  • 1 cup (150 g) yellow onion finely diced
  • 1 cup (100 g) celery finely diced
  • 1 cup (120 g) green bell pepper finely diced
  • 3 cloves garlic minced

Spices & Seasoning

  • 2 tbsp (16 g) Cajun or Creole seasoning more or less to taste
  • 1 tsp (2 g) smoked paprika
  • 1/4 tsp (0.5 g) cayenne pepper optional, to taste
  • 1 tsp (5 g) kosher salt or to taste
  • 1/2 tsp (1 g) black pepper

To Finish

  • 1/2 cup (30 g) green onions or parsley chopped, for garnish
  • hot sauce for serving

Equipment

  • Large pot
  • Large Skillet or Dutch Oven
  • Knife
  • Cutting board

Instructions
 

  1. Cook the rice: Bring 4 cups of broth to a boil in a large pot. Rinse rice until the water runs clear. Add rice and bay leaf, stir, and simmer for 15–20 minutes until just tender. Remove from heat, cover, and steam for 3–4 minutes. Fluff with a fork and set aside.
  2. Brown the meat: In a large skillet or Dutch oven over medium-high heat, add oil or bacon grease. Add sausage and beef, cook until halfway browned and crumbled. Let it sit to form crusty brown bits, then deglaze with a splash of broth and scrape up those bits.
  3. Add veggies and livers: Add chicken livers, celery, onion, and bell pepper. Cook, stirring often, until vegetables soften and everything smells amazing, about 5–7 minutes.
  4. Spice it up: Add garlic, Cajun seasoning, smoked paprika, cayenne, salt, and pepper. Stir and let spices bloom for about 30 seconds, until fragrant.
  5. Finish: Pour in remaining broth and fold in the cooked rice. Stir and let it cook for a few minutes until most liquid is absorbed and rice is deeply flavored.
  6. Top and serve: Fluff with a fork, garnish with green onions or parsley, and hit with hot sauce if desired. Serve warm.

Notes

Storage: Once cooled, store Louisiana Dirty Rice in an airtight container in the fridge for up to 4 days. Reheat in a skillet with a splash of broth, or cover and microwave with a damp paper towel. For freezing, place in freezer bags, flatten, and freeze for up to 3 months.
Variations: Swap in chopped mushrooms for chicken livers (for a milder earthy flavor) or skip them entirely. Use hot sausage or andouille for more spice. For a vegetarian version, use lentils and mushrooms instead of meat and add a splash of soy sauce for richness.

Nutrition

Calories: 495kcal | Carbohydrates: 44g | Protein: 22g | Fat: 26g | Saturated Fat: 9g | Cholesterol: 120mg | Sodium: 1040mg | Potassium: 540mg | Fiber: 2g | Sugar: 2g | Vitamin A: 620IU | Vitamin C: 18mg | Calcium: 54mg | Iron: 4.7mg

Buttery croissants meet dark chocolate, almond filling, and a light sprinkle of sugar in these chocolate almond croissants. With almond flour, dark chocolate, and day-old croissants, they’re rich, flaky little wonders just waiting to be devoured.

Imagine shuffling into the kitchen, hair a little wild, coffee in hand, and finding a tray of these beauties fresh from the oven. The smell alone—nutty, sweet, a touch toasty—does half the work waking you up. These chocolate almond croissants walk that delightful tightrope between pastry-shop fancy and low-lift home comforting. It’s a cozy weekend bake or a Tuesday something-extra (because you found a bag of croissants that are a liiittle past their prime).

Table of Contents

Chocolate Almond Croissants

Why You’ll Love this Chocolate Almond Croissants Recipe

This isn’t a “reinvent-the-wheel” kind of breakfast. It’s croissants, but glow-up mode. That said, let’s be real—any excuse to use almond extract and eat chocolate for breakfast, right?

  • Ridiculously simple to make: You just squish, smear, melt, and drizzle. Minimal angst, maximum payoff.
  • Cozy with a crunchy twist: The sliced almonds on top get toasty and golden, adding that crunch with each bite.
  • Uses what you probably already have: Got some sad croissants from two days ago? This is their redemption arc.
  • Decadent but not too sweet: Balanced by the dark chocolate and almond filling—sweet without going full dessert.
  • Satisfies those bakery cravings: But you’re in slippers, at home, and your oven did all the work.

Chocolate Almond Croissants

Ingredient Notes

Before you get too whisk-happy, let’s peek at what’s in this. Nothing fancy, but a few ingredients have specific roles that make the croissants shine.

  • Sugar and water: This is your simple syrup base. It softens the croissants just slightly and adds a whisper of sweetness.
  • Almond extract: A little goes far. It adds that unmistakable marzipan-like aroma without the density.
  • Salted butter: Go salted. The contrast with the sweet almond filling? Magic.
  • Almond flour: Gives the filling its texture and depth. It’s tender, rich, and perfectly nutty without being gritty.
  • Egg and egg yolk: These bind the filling and give it structure—plus instant fluff-factor.
  • Day-old croissants: Slightly stale ones work best because they soak up the syrup without getting soggy.
  • Dark chocolate: Rich and bittersweet, it offsets the sweet filling beautifully. Use something you’d eat on its own.
  • Sliced almonds: For texture and a toasty nutty finish.
  • Powdered sugar: Strictly for glamour, if we’re being honest. But it totally works.

Chocolate Almond Croissants

How To Make This Chocolate Almond Croissants Recipe

You don’t need a pastry degree or a laminating roller. Just a bowl, a spoon, and possibly the strength to not eat the filling with a spatula.

  • Start with the syrup: In a microwave-safe bowl, mix sugar and water. Microwave in 30-second bursts, stirring in between, until everything’s dissolved. Once done, stir in almond extract and let it chill off to the side. This step’s sneakily important—it wakes up the croissants and gives ’em a second life.

  • Whip up the almond filling: In a big bowl, cream the softened butter and sugar until airy and fluffy. Then scrape down the sides (yes, even that stubborn bottom corner), and beat in the almond flour until it turns into thick almond paste happiness.

  • Add the egg, yolk, flavors, and milk: Keep that mixer going and pour in the egg, that rogue extra yolk, vanilla, almond extract, and milk. What you get is a golden, nutty paste that smells so good, it’ll test your willpower.

  • Set the oven scene: Heat that oven to 350°F. Line a baking sheet with parchment unless you like your croissants welded to the pan (I’ve done that, not proud).

  • Construct the croissants: Halve them lengthwise like tiny buttery books. Brush both insides with the almond syrup. Next, slather or pipe (but seriously, spread works fine) a generous layer of filling on the bottom half. Top with chopped chocolate.

  • Give them their hats back: Place the tops on gingerly—not all the chocolate will behave, but that’s okay. Pipe or dab a little almond filling across the top and press in those sliced almonds.

  • Bake to golden wonderland: Bake for 12–16 minutes. The top should puff a little and the almonds should toast. Your house will genuinely smell like a pastry shop.

  • Finishing touches: Let them cool for about 10–15 minutes (trust me, molten chocolate tongue burns are no joke). Melt the rest of the chocolate in short microwave bursts, then drizzle with reckless joy. Dust with powdered sugar just before you serve!

Chocolate Almond Croissants

Storage Options

These croissants are best slightly warm, but don’t stress if your batch lasts longer than brunch. Pop leftovers in an airtight container at room temp for a day or two; just don’t let ’em hang out on the counter too long or they’ll turn on you.

If you’re saving them for a rainy Tuesday or a late-night snack situation, wrap them tightly and freeze. Do it before drizzling with chocolate if you can—that way they stay fresher and mess-free.

To reheat, the oven’s your best friend. Skip the microwave (sog-factor risk is real). Toss in a 300°F oven for about 8–10 minutes, enough to re-crisp and cozy them back up. Then drizzle with fresh melted chocolate and carry on with your very good day.

Variations and Substitutions

Got slightly different ingredients on hand or want to play around with flavors? You’ve got options.

  • White chocolate instead of dark: It’s sweeter and milder. You could even sprinkle in a bit of freeze-dried raspberries for contrast (fancy but so good). There’s a whole sweet tooth universe to explore if you’re also eyeing these white chocolate cupcakes.

  • Hazelnut extract for almond extract: Totally different flavor profile, but equally rich and cozy. Like if Nutella had a posh cousin.

  • Croissants not super stale? Toast them in a 300°F oven for 5 minutes so they dry out a bit first. You want them thirsty for that syrup.

  • Swap almond flour for finely ground walnuts: Brings an earthy tone that’s great in fall or with cinnamon sprinkled on top.

  • Add citrus zest to the filling: Orange especially plays nice with almond and dark chocolate. Just a pinch, not the whole orange, unless chaos is what you’re going for.

Chocolate Almond Croissants

What to Serve with Chocolate Almond Croissants

These cozy, flaky treats absolutely shine on their own, but if you’re turning this into a full breakfast or brunch spread, here are a few friends they like to hang out with:

  • A good strong cup of coffee or espresso. The bitterness pairs beautifully with the melty dark chocolate. Especially if your croissants are still slightly warm and the chocolate’s just gooey enough to smudge the napkin.

  • Fresh berries or citrus slices on the side, for a little burst of acidity. Strawberries and oranges break up the richness in the best way, and they also make things look fancy without trying.

  • A fried egg and a whisper of greens, like arugula with lemon. It adds a savory anchor to balance the pastry parade. Bonus points if you’re channeling your inner brunch café.

  • If you’re going big: a small plate of something savory like these bacon basil cornbread muffins. Salty, herby, and an excellent counterweight to buttery sweetness.

Chocolate Almond Croissants

Frequently Asked Questions

Can I use fresh croissants instead of day-old ones?

Yes, you can, but they’re a little trickier to work with. Fresh croissants are softer, so they might get soggy when you brush on the syrup. If you only have fresh ones, give them a quick toast in the oven to dry them out slightly—that gives them better structure and helps absorb the filling without falling apart.

What kind of chocolate works best in this recipe?

Go with a dark chocolate around 60–70% cacao. It cuts through the sweetness of the almond filling and adds that rich, bittersweet balance. I like to chop it up so you get uneven pieces that melt at slightly different rates—some gooey, some still a little chunky. Chocolate chips can work too, though they don’t melt quite as dramatically.

Can I make them ahead of time?

You sure can! You can assemble them the night before (minus the top filling and almonds), cover them, and store in the fridge overnight. In the morning, top with filling and almonds, then bake fresh. You can also go full prep and bake completely, then reheat in the oven before serving. Just leave the chocolate drizzle for last-minute flair.

Do I need a piping bag for the filling?

Nope, not at all! You can totally spoon and spread the filling with a butter knife or small spatula. Piping might give you slightly neater results, but honestly, I like the rustic look. Plus, less dishes to wash. Win-win.

Chocolate Almond Croissants

Chocolate Almond Croissants

Prep Time 20 minutes
Cook Time 15 minutes
Total Time 40 minutes
Buttery croissants meet dark chocolate, almond filling, and a light sprinkle of sugar in these chocolate almond croissants. With almond flour, dark chocolate, and day-old croissants, they’re rich, flaky little wonders just waiting to be devoured.
8 croissants

Ingredients

Almond Syrup

  • 1/2 cup (100 g) granulated sugar
  • 1/2 cup (120 ml) water
  • 1/2 tsp (2 ml) almond extract

Almond Filling

  • 1/2 cup (113 g) salted butter softened
  • 2/3 cup (135 g) granulated sugar
  • 1 cup (100 g) almond flour finely ground
  • 1 large egg
  • 1 egg yolk
  • 1/2 tsp (2 ml) vanilla extract
  • 1/2 tsp (2 ml) almond extract
  • 2 tbsp (30 ml) milk

Assembly & Topping

  • 8 day-old croissants
  • 4 oz (115 g) dark chocolate chopped, divided
  • 1/3 cup (30 g) sliced almonds
  • powdered sugar for dusting

Equipment

  • Mixing bowls
  • Microwave-safe bowl
  • Electric mixer
  • Baking sheet
  • Parchment paper
  • Spatula
  • Knife

Instructions
 

  1. Make the almond syrup: In a microwave-safe bowl, combine the sugar and water. Microwave in 30-second bursts, stirring between each, until sugar is dissolved. Stir in the almond extract and set aside to cool.
  2. Prepare almond filling: In a mixing bowl, cream softened butter and sugar until light and fluffy. Add almond flour and mix until just combined. Beat in egg, egg yolk, vanilla, almond extract, and milk until smooth and creamy.
  3. Preheat oven: Heat oven to 350°F (175°C). Line a baking sheet with parchment paper.
  4. Assemble croissants: Slice each croissant in half horizontally. Brush the cut sides of each half lightly with almond syrup. Spread a generous layer of almond filling on the bottom half and sprinkle with half of the chopped dark chocolate. Place the top half back on, then spread a small dab of filling on top and press in sliced almonds.
  5. Bake: Place assembled croissants on the prepared baking sheet. Bake for 12–16 minutes, until almonds are golden and tops are slightly puffed.
  6. Finish: Let croissants cool for 10–15 minutes. Melt remaining chopped chocolate in short microwave bursts and drizzle over the croissants. Dust with powdered sugar just before serving.

Notes

Make Ahead: Assemble croissants the night before (except for topping with almonds and extra filling), then add toppings and bake fresh in the morning.
Storage: Best enjoyed warm. Store leftovers in an airtight container at room temp for up to 2 days or freeze un-drizzled croissants, then reheat in the oven and add chocolate drizzle before serving.
Variations: Sub white chocolate or use hazelnut extract, add orange zest, or swap almond flour for finely ground walnuts.

Nutrition

Calories: 390kcal | Carbohydrates: 31g | Protein: 7g | Fat: 27g | Saturated Fat: 14g | Cholesterol: 62mg | Sodium: 285mg | Potassium: 168mg | Fiber: 3g | Sugar: 13g | Vitamin A: 480IU | Calcium: 57mg | Iron: 2.2mg

Dreamy, pillowy cupcakes meet creamy, silky ganache in these white chocolate cupcakes. With real white chocolate, fluffy butter, and a whisper of vanilla, each bite is sweet, soft, and smells like your kitchen put on perfume.

There’s something quietly luxurious about a white chocolate dessert. Maybe it’s the pale gold color. Maybe it’s how mellow it tastes, like sugar and cream got cozy and decided not to shout. Whatever it is, these cupcakes lean into it. You’ve got tender vanilla cake, a hidden white chocolate ganache center (I know), and a swirly, shiny buttercream frosting that’s basically happiness with a spatula.

Table of Contents

White Chocolate Cupcakes

Why You’ll Love this White Chocolate Cupcakes Recipe

These aren’t trying to be the loudest dessert at the table. They just quietly show up and impress everyone with their buttery charm. And they smell like a candy shop’s kitchen—not in a cloying way, more like you walked in while someone was melting chocolate and sugar and everything felt right.

  • Ridiculously simple to make: You don’t need a pastry degree or seven mixing bowls. Just a few steps and a little patience while they cool.
  • That melted-center surprise: Cutting into one reveals a soft ganache belly. It’s very satisfying, both visually and emotionally.
  • Soft but not mushy: The cake texture is fluffy yet holds its own. No sad soggy bottoms here.
  • White chocolate galore: It’s in the ganache, the frosting, and gently infused in the cake. Not overpowering, just… everywhere in the best way.
  • Customization-friendly: Sprinkle with shavings, add raspberries, drizzle a little caramel if you’re feeling wild.
  • Light enough for a second: Trust me, people will eat one and then do that “well, maybe just half of another” thing. It’s inevitable.

White Chocolate Cupcakes

Ingredient Notes

Let’s talk ingredients. You don’t need anything exotic, but a few thoughtful choices make all the difference when white chocolate is the star.

  • White chocolate: Use the good stuff—real cocoa butter, no waxy mockolate. It melts smoother and actually tastes like something other than sugar.
  • Heavy cream: This helps melt the chocolate into that dreamy ganache filling and fluffs up the frosting. Don’t sub with milk here.
  • All-purpose flour: Simple and sturdy. Stick with it unless you know your way around cake flour swaps.
  • Unsalted butter: Get it nice and soft so it aerates into the batter like a cloud. Salted butter could work, but you’d want to dial back the added salt.
  • Egg whites: Just the whites means extra fluff without extra richness. Whip them to soft peaks if you really want to up the lift, but it’s not mandatory here.
  • Whole milk: Adds enough fat to keep things tender without tipping into richness overload. Skim milk won’t cut it.
  • Powdered sugar: Sift it, sift it again, and then put it in. Nobody wants a lumpy buttercream surprise.
  • Vanilla extract: Balances the white chocolate’s sweetness with a little depth. Don’t skip it; even fake vanilla extract will do if that’s what’s in the pantry.
  • Vegetable oil: Helps with tenderness and shelf life. Just a tablespoon goes a long way.

White Chocolate Cupcakes

How To Make This White Chocolate Cupcakes Recipe

Okay, sleeves up, apron on (or not, it’s your kitchen). Here’s how it all comes together without needing a bakery certification.

  • Start with the ganache filling: Chop the white chocolate, then stir it into warm heavy cream. Nuke it in 30-second bursts, stirring each time, until you’ve got a glossy puddle of joy. Press plastic wrap onto the surface so it doesn’t crust over while cooling.

  • Preheat and prep your pans: Oven to 350°F, liners in muffin pan. You don’t want to scramble for these once your batter’s ready and you’re already dusted in flour.

  • Mix the dry stuff: Flour, baking powder, salt. Easy. Give it a good whisk to evenly disperse the leavening. Set it aside where you won’t accidentally scatter it across the counter.

  • Cream the butter and sugar: Beat them with an electric mixer until it looks like fluffy snow. This takes about 3 minutes. Put on a podcast or hum awkwardly like I do.

  • Add the wet ingredients: Egg whites go in one at a time, then oil and vanilla. It might look curdled. That’s fine. It smooths out later, trust.

  • Combine wet and dry: Alternate flour with milk, starting and ending with flour. Mix by hand once the wet’s in there to avoid overmixing. This is a cupcake, not bread dough.

  • Fill and bake: Spoon the batter into your liners, about 2/3 full. Bake for 15 to 18 minutes. Use the noble toothpick test: if it comes out clean, they’re done.

  • Cool completely: Like, fully. Ganache will melt right through if you rush this step. Put them on a rack and give them time.

  • Make the frosting: Blend softened butter, sifted powdered sugar, vanilla, and heavy cream. Then drizzle in your cooled melted white chocolate and beat until it fluffs up like frosting should.

  • Fill and frost: Pop a hole in each cupcake (a paring knife or cupcake corer works well). Spoon or pipe in the ganache. Top with buttercream—pipe it fancy or just swirl with a spoon.

White Chocolate Cupcakes

Storage Options

Storing these white chocolate cupcakes is surprisingly low drama. If you have any left, that is.

You can stash them in an airtight container at room temp for a day or two. Although, because of the ganache and buttercream, I prefer to refrigerate them if they’re hanging around longer than overnight. The fridge keeps the filling from going too soft and slump-prone.

Just know, cold cupcakes aren’t their best selves. They’re a little stiff. Let them sit at room temp for at least 30 minutes before serving so the butter and chocolate can relax into their creamy selves again.

Freezing? Totally doable. Frosted or unfrosted, just freeze them on a tray first so they don’t all fuse together, then wrap in plastic and tuck into a freezer bag. Thaw at room temp (unwrapped or lightly tented) and they’ll perk right back up.

Variations and Substitutions

Love a good twist? Me too. Here are a few ways to remix these while keeping the white chocolate cupcake base strong and lovely.

  • Add fresh berries: A few raspberries or blueberries tucked into the batter before baking gives a tart-sweet contrast that loves that white chocolate.
  • Swap the frosting flavor: Try a raspberry or lemon buttercream for a bright, fruity spin. Even whipped cream cheese frosting works beautifully if you lean more tangy than sweet.
  • Use dark chocolate instead: If you’re feeling moody (I get it), a dark chocolate ganache inside gives more depth with the same fluffy cupcake base.
  • Try almond extract: Swap half the vanilla extract with almond for a fancy pastry-shop edge.
  • Top with crunchy bits: White chocolate curls are classic, but chopped pistachios, dried rose petals, or even toasted coconut all have major flair.
  • Make it mini: Use mini muffin tins for bite-sized versions. Adjust the bake time to around 10–12 minutes and watch ’em close.

White Chocolate Cupcakes

What to Serve with White Chocolate Cupcakes

These little guys definitely hold their own—but pairing them with complementary bites or sips can turn the whole affair into something extra special.

  • If you’re doing a dessert spread, add something fruity and tart. Like maybe these peanut butter banana ice cream sandwiches. They’re cold, nutty, and play well with the creamy sweetness of these cupcakes.

  • Coffee is a no-brainer. Serve them alongside a strong cup of espresso or cold brew. That slight bitterness cuts the white chocolate sweetness and gives you a little perk with each bite.

  • Bubbly drinks (hello, Prosecco) make these feel even more like a celebration. The bubbles clear your palate between bites… so you can keep grabbing “just one more.”

  • If savory is your thing before sweet, I highly recommend something like these easy shrimp fajitas. Bold, spiced, and then—boom—cool down with a cupcake for dessert.

  • For afternoon tea? Absolutely. Add some fresh berries, lemon wedges, dainty sandwich slices. Then let the cupcakes shine as the grand finale.

White Chocolate Cupcakes

Frequently Asked Questions

Can I make these cupcakes ahead of time?

Yep, totally. You can bake the cupcakes the day before and store them in an airtight container at room temp. You can even make the ganache and frosting ahead too—just keep them in the fridge, tightly covered. Let the frosting warm up a bit before using so it’s spreadable again. Then assemble and frost just before serving, or up to several hours ahead if you’re hosting or prepping for a party.

What’s the best kind of white chocolate to use?

Go with real-deal white chocolate—check the package for cocoa butter. Brands like Ghirardelli, Lindt, or Valrhona are great if you can swing it. Avoid anything labeled “white baking chips” or “white morsels.” Those often use palm oil instead of cocoa butter and they don’t melt well or taste like… much of anything, honestly.

Can I make them gluten-free?

Sure, just use a good 1-to-1 gluten-free flour replacement that includes xanthan gum or another binder. The texture might come out slightly different—maybe a tad more crumbly—but the flavor will still shine, especially with all that white chocolate action.

Do I have to use a cupcake corer?

Nope, not at all. A small paring knife works just fine. Just slice a little cone out of the center, scoop or pipe in the ganache, then try to resist eating all the top bits you just carved off. (No judgment if you cave.)

White Chocolate Cupcakes

White Chocolate Cupcakes

Prep Time 30 minutes
Cook Time 18 minutes
Cooling Time 30 minutes
Total Time 1 hour 30 minutes
Dreamy, pillowy cupcakes meet creamy, silky ganache in these white chocolate cupcakes. With real white chocolate, fluffy butter, and a whisper of vanilla, each bite is sweet, soft, and smells like your kitchen put on perfume. Tender vanilla cake, a hidden white chocolate ganache center, and swirled buttercream frosting make these a quietly luxurious treat for any occasion.
12 cupcakes

Ingredients

White Chocolate Ganache Filling

  • 4 oz (115 g) white chocolate chopped, use real cocoa butter
  • 1/3 cup (80 ml) heavy cream

Cupcakes

  • 1 1/2 cups (188 g) all-purpose flour
  • 1 1/2 tsp (1.5 tsp) baking powder
  • 1/4 tsp (1.25 ml) salt
  • 1/2 cup (113 g) unsalted butter softened
  • 1 cup (200 g) granulated sugar
  • 3 egg whites large, room temperature
  • 1 tbsp (15 ml) vegetable oil
  • 1 tsp (5 ml) vanilla extract
  • 1/2 cup (120 ml) whole milk room temperature

White Chocolate Buttercream

  • 1/2 cup (113 g) unsalted butter softened
  • 2 cups (240 g) powdered sugar sifted
  • 1/4 cup (60 ml) heavy cream
  • 1/2 tsp (2.5 ml) vanilla extract
  • 3 oz (85 g) white chocolate melted and cooled

Equipment

  • Muffin pan
  • Cupcake liners
  • Mixing bowls
  • Electric mixer
  • Microwave or Double Boiler
  • Paring knife or cupcake corer
  • Piping Bag (optional)

Instructions
 

  1. Make the White Chocolate Ganache Filling: Place chopped white chocolate in a bowl. Heat heavy cream until steaming, then pour over chocolate. Let sit 2 minutes, then stir until smooth. Microwave in 15–30 second increments if needed to melt fully. Press plastic wrap directly on top and set aside to cool and thicken.
  2. Prepare for Baking: Preheat oven to 350°F (175°C). Line a 12-cup muffin pan with cupcake liners.
  3. Mix Dry Ingredients: In a medium bowl, whisk together flour, baking powder, and salt. Set aside.
  4. Cream Butter & Sugar: In a large bowl, beat softened butter and sugar with an electric mixer for about 3 minutes, until fluffy and light. Scrape down the bowl as needed.
  5. Add Wet Ingredients: Mix in egg whites one at a time, then add oil and vanilla. Beat until mostly smooth (it may look slightly curdled; that's okay).
  6. Combine Dry and Wet: On low speed, add flour mixture in three additions, alternating with milk (begin and end with flour). Mix gently, just until combined. Do not overmix.
  7. Bake: Divide batter evenly among lined cupcake wells, filling each about 2/3 full. Bake for 15–18 minutes, or until a toothpick comes out clean and tops spring back lightly.
  8. Cool: Let cupcakes cool in pan 5 minutes, then transfer to wire rack to cool completely—this is important so the ganache doesn’t melt inside.
  9. Make the White Chocolate Buttercream: Beat butter until creamy. Add sifted powdered sugar, cream, and vanilla. Mix on low to start, then on high for 2 minutes. Drizzle in cooled melted white chocolate and beat until fluffy and smooth.
  10. Fill & Frost the Cupcakes: Using a paring knife or corer, make a small hole in the center of each cupcake. Fill with a spoonful or piped swirl of ganache. Pipe or swirl buttercream frosting on top. Decorate with white chocolate curls, berries, or sprinkles if desired.

Notes

Store cupcakes in an airtight container at room temperature for up to 1 day, or refrigerated for up to 4 days (let come to room temp before serving). Freeze unfrosted or fully decorated cupcakes by wrapping tightly and storing for up to 2 months. Variations: try adding berries, swapping frosting flavors, or using dark chocolate ganache for a twist.

Nutrition

Calories: 370kcal | Carbohydrates: 46g | Protein: 4g | Fat: 19g | Saturated Fat: 11g | Cholesterol: 47mg | Sodium: 93mg | Potassium: 102mg | Sugar: 34g | Vitamin A: 594IU | Calcium: 59mg | Iron: 1.1mg

Juicy bell peppers, snappy red onion, and spice-kissed shrimp—these shrimp fajitas bring chili powder, cumin, and garlic powder together in one sizzling skillet.

Between the smoky paprika, warm tortillas, and that cloud of sizzling savory steam filling your kitchen, these shrimp fajitas basically cook themselves while you snack on shredded cheese. (No judgment here.)

There’s something ridiculously satisfying about cooking fajitas. It’s the sizzle, right? That dramatic pan moment when the onions hit the heat and puff up with steam, and you smell the cumin doing its thing. These shrimp fajitas are built for that kind of moment. Quick marinade, lots of color (hello, traffic light peppers), and just enough spice to make your tongue tingle without blowing your taste buds off your face. Great for weeknights, sure, but just as good when friends swing by and you don’t want to be chained to a stove all night.

Table of Contents

Shrimp Fajitas

Why You’ll Love this Shrimp Fajitas

Let’s not overthink it. These are sizzling, spicy, colorful, and wrapped in a warm tortilla. What could possibly go wrong?

  • Ridiculously simple to make: You just marinate, sizzle, stir, and wrap—it’s basically a stir-fry with tortillas.
  • Fast as heck: Shrimp cook in something like five minutes, so dinner’s on the table before you finish your first chip.
  • Customizable toppings: Got picky eaters? Fine, let them make their own. You do sour cream, I’ll do cheese and pico.
  • Perfect for weeknights or hosting: It’s low effort but still gives “I cooked this on purpose” energy.
  • Satisfyingly smoky and juicy: The paprika and seared edges of the shrimp bring that restaurant-style flavor you secretly hoped for.

Shrimp Fajitas

Ingredient Notes

Here’s the good stuff, broken down just enough to make you feel like a fajita wizard.

  • Olive oil: The first coat for everything. Helps with searing, adds richness, and gets those edgey delicious crusts.
  • Chili powder: Brings depth, not just heat. It’s warm, earthy, and kinda mysterious (in a smoky cowboy sort of way).
  • Smoked paprika: If chili powder is the base note, this is the guitar solo. Adds a deep, smoky aroma that makes your kitchen smell like magic.
  • Garlic powder: For a clean, sharp pop of garlicky goodness. You could use fresh, but I like the consistency here.
  • Ground cumin: Just a whisper it’s enough—it rounds the other spices out without shouting.
  • Raw shrimp: Go big or go home. I go for large, tail-off, peeled shrimp—less fiddling at the table, more tacos in your mouth.
  • Bell peppers: A trio of red, green, and yellow gives color and a little sweetness and some slight bitterness to balance the shrimp.
  • Red onion: Sliced thin and cooked until it just starts to char. Adds both texture and savory bite.
  • Flour tortillas: The cozy blanket that wraps it all up. Warm them before serving. Don’t skip this, please.
  • Optional toppings: Fresh cilantro wakes up the flavor, lime juice cuts through the fat, and sour cream is just… right.

Shrimp Fajitas

How To Make This Shrimp Fajitas

You’re less than 30 minutes away from fajita bliss. Just clear some counter space and let’s do this.

  • Marinate the shrimp: In a bowl, mix up a tablespoon of olive oil, lime juice (from one juicy lime if you’ve got it), chili powder, smoked paprika, garlic powder, and cumin. Toss in the shrimp and let them hang out in that spicy little bath for about 15 to 30 minutes. Don’t skip this—it’s flavor time.

  • Cook the veggies: Grab your biggest skillet and get 2 tablespoons of olive oil shimmering over medium-high heat. Add the sliced peppers and red onion. Let ‘em sizzle and char at the edges, stirring now and then. You’re aiming for softened but still a little crisp. Takes around 7-8 minutes. Transfer them to a plate and keep them warm (foil tent? Back of the stove? Up to you).

  • Sear the shrimp: Same skillet, now empty but beautifully seasoned with veggie scratchings. Drop in the shrimp in a single layer, marinade and all. Cook for 2-3 minutes per side, just until they turn pink and opaque. No more, or they’ll get rubbery. You want tender, juicy—not tire tread.

  • Combine it all: Dump the veggies back into the skillet and toss everything together. Taste it—does it need salt or pepper? Add a little squeeze of lime if you’re feeling fancy.

  • Serve it up: Arrange the mix on a warm platter or keep it all in the skillet for rustic vibes. Bring out warmed tortillas and all the fixings and let everyone build their own pile of joy.

Shrimp Fajitas

Storage Options

Got leftovers? Lucky you. Pop the shrimp and veggie mix into an airtight container and stash it in the fridge. It’s best within two days, because shrimp’s delicate and doesn’t like to lounge too long.

Reheating is easy—toss everything back into a hot skillet for a few minutes until warm. Avoid the microwave if you can; it tends to overcook shrimp and make them a tiny bit tragic.

As for freezing, eh… technically yes, but honestly? Shrimp doesn’t love the freezer after being cooked. The texture changes, and not in a good way. If you do freeze it, wrap tightly, and use it within a month. Reheat gently and re-season it if it tastes flat.

Variations and Substitutions

This shrimp fajita situation is super flexible. Here’s how to riff on it without destroying the magic.

  • Chicken instead of shrimp: Sliced boneless chicken breast or thighs work great. Just increase the marinating time to at least 30 minutes.
  • Use corn tortillas: For a gluten-free option or just because they have that toasty nuttiness. Warm them with a damp towel in the oven.
  • Spice it up: Add a pinch of cayenne to the marinade or sliced jalapeños to cooking vegetables for more kick.
  • Add beans or corn: Stir them in with the veggies for a heartier feel (and bonus fiber).
  • Make it a bowl: Skip the tortilla and pile everything over rice or quinoa with some lime crema. Boom, fajita bowl.

Shrimp Fajitas

What to Serve with Shrimp Fajitas

Now let’s talk fixin’s. Keep it simple or go full-taqueria, your call.

  • Mexican rice or cilantro-lime rice: Either one is a soft, cozy base for soaking up that extra marinade juice. You can even tuck a spoonful right inside your tortilla. It’s not cheating, it’s efficient.

  • Refried beans or black beans: Creamy beans on the side bring balance and richness. A little salty cotija on top? Yes please. They also reheat beautifully, unlike me before coffee.

  • Tortilla chips with guac or salsa: Crunchy, citrusy, and totally snackable while you’re cooking. Or just eat an entire bowl while pretending you’re still “prepping.”

  • Something sweet to finish: After a plate of sizzling shrimp? Maybe follow it with one of these sweet-and-chewy snickerdoodle cupcakes. Total mood shift and perfect dessert finale.

  • A fresh salad or slaw: Just something light and crisp on the side, with lime juice and maybe shredded cabbage. Brightens the whole meal and keeps you from falling into a tortilla coma.

Shrimp Fajitas

Frequently Asked Questions

Can I use frozen shrimp for fajitas?

Yes, but defrost them properly. Stick ‘em in the fridge overnight or run them under cold water if you’re in a hurry. Just make sure they’re fully thawed and patted dry before marinating, or the seasoning won’t stick and they’ll steam instead of sear.

What’s the best way to warm tortillas?

Right on the burner (if you’ve got a gas stove) for that toasty edge. Or wrap them in foil and warm in the oven at 350ºF. If you’re really in a pinch, microwave with a damp towel, about 20 seconds. Just don’t serve them cold—they’re like sad little blankets otherwise.

Can I make these ahead of time?

Sort of. You can prep the marinade and slice the veggies earlier in the day and store them separately. Cook everything right before serving for the best texture. Reheated shrimp are okay, but you lose that sizzling magic.

Are these shrimp fajitas spicy?

Mild-to-medium at most. The chili powder and paprika give warmth, not searing heat. If you’re heat-adverse, skip any cayenne or jalapeño. If you like it hotter, go wild with some hot sauce or spicy salsa on top.

Shrimp Fajitas

Sizzling Shrimp Fajitas

Prep Time 15 minutes
Cook Time 15 minutes
Marinating Time 15 minutes
Total Time 30 minutes
Juicy bell peppers, snappy red onion, and spice-kissed shrimp come together in one irresistibly smoky skillet. Bursting with colorful peppers, seared shrimp, and bold Mexican flavors, these shrimp fajitas are spicy, quick, and perfect for customizing with your favorite toppings. Skip the restaurant—this weeknight-friendly, crowd-pleaser is just as good at home.
4 servings

Ingredients

For the Fajitas

  • 1 lb (450 g) raw large shrimp peeled and deveined, tails removed
  • 1 red bell pepper sliced into thin strips
  • 1 green bell pepper sliced into thin strips
  • 1 yellow bell pepper sliced into thin strips
  • 1 medium red onion halved and sliced thin

For the Marinade

  • 3 tbsp (45 ml) olive oil divided
  • 2 tbsp (30 ml) lime juice juice of 1 lime
  • 2 tsp chili powder
  • 1 tsp smoked paprika
  • 1 tsp garlic powder
  • 1 tsp ground cumin
  • salt and black pepper to taste

To Serve

  • 8 flour tortillas warmed
  • fresh cilantro chopped, optional
  • lime wedges for serving, optional
  • sour cream optional
  • shredded cheese optional
  • sliced jalapeños optional, for heat

Equipment

  • Large skillet
  • Mixing bowl
  • Tongs

Instructions
 

  1. Marinate the shrimp: In a bowl, whisk together 1 tablespoon olive oil, lime juice, chili powder, smoked paprika, garlic powder, cumin, and a pinch of salt and pepper. Add the shrimp and toss to coat. Let marinate for 15-30 minutes.
  2. Cook the vegetables: In a large skillet, heat the remaining 2 tablespoons of olive oil over medium-high heat. Add sliced peppers and onions; cook, stirring occasionally, until slightly charred and just tender but still crisp, about 7-8 minutes. Transfer to a plate and keep warm.
  3. Sear the shrimp: In the same skillet, add marinated shrimp in a single layer. Cook for about 2-3 minutes per side, or until shrimp is just pink and cooked through. Do not overcook.
  4. Combine: Return veggies to skillet and toss everything together for a minute to heat through. Taste and adjust seasoning if needed. Squeeze fresh lime juice over for brightness.
  5. Serve: Spoon shrimp and veggies onto warm tortillas. Top as you like with cilantro, sour cream, cheese, and extra lime. Serve immediately and enjoy!

Notes

For extra heat, add cayenne to the marinade or sliced jalapeños to the skillet.
Swap in chicken for shrimp (increase marinating and cook time).
Warm tortillas for best flavor and texture.
Best eaten fresh! Store leftovers in the fridge up to 2 days.

Nutrition

Calories: 320kcal | Carbohydrates: 32g | Protein: 27g | Fat: 9g | Saturated Fat: 1.5g | Cholesterol: 182mg | Sodium: 920mg | Potassium: 550mg | Fiber: 3g | Sugar: 5g | Vitamin A: 2100IU | Vitamin C: 95mg | Calcium: 120mg | Iron: 3.1mg

Let's Get Cooking!

100+ Recipes for Busy Nights

In a time crunch? Take a look around and browse plenty of recipes to help you get dinner ready and on the table on those busy nights!

Sweet Recipes

Pumpkin Banana Muffins

Pumpkin Banana Muffins Recipe

Strawberry Pie Bars

Strawberry Pie Bars Easy Oven Recipe

White Chocolate Raspberry Muffins

White Chocolate Raspberry Muffins Recipe

Snickerdoodle Muffins

Snickerdoodle Muffins Recipe for Oven

PIN NOW

Follow KitchenetteBlog on Pinterest

Love cozy recipes that actually make it to the table? On Pinterest, I share new comfort-food ideas every week—desserts, dinners, and those little snack cravings that hit at midnight. Come pin with me and never run out of kitchen inspo.

Savory Recipes

Turkey Tetrazzini

Turkey Tetrazzini Baked Pasta Recipe

Grilled Chicken Panini Sandwich

Grilled Chicken Panini Sandwich Recipe

Sweet Potato Cornbread

Sweet Potato Cornbread Recipe Oven Baked

Classic Waldorf Salad

Waldorf Salad Simple Classic Recipe

Get 5 Recipes to Simplify Your Life!

Delicious, versatile recipes you can make over and over.