Get 5 recipes to simplify your life:

easy, delicious, real food recipes

Latest Recipes

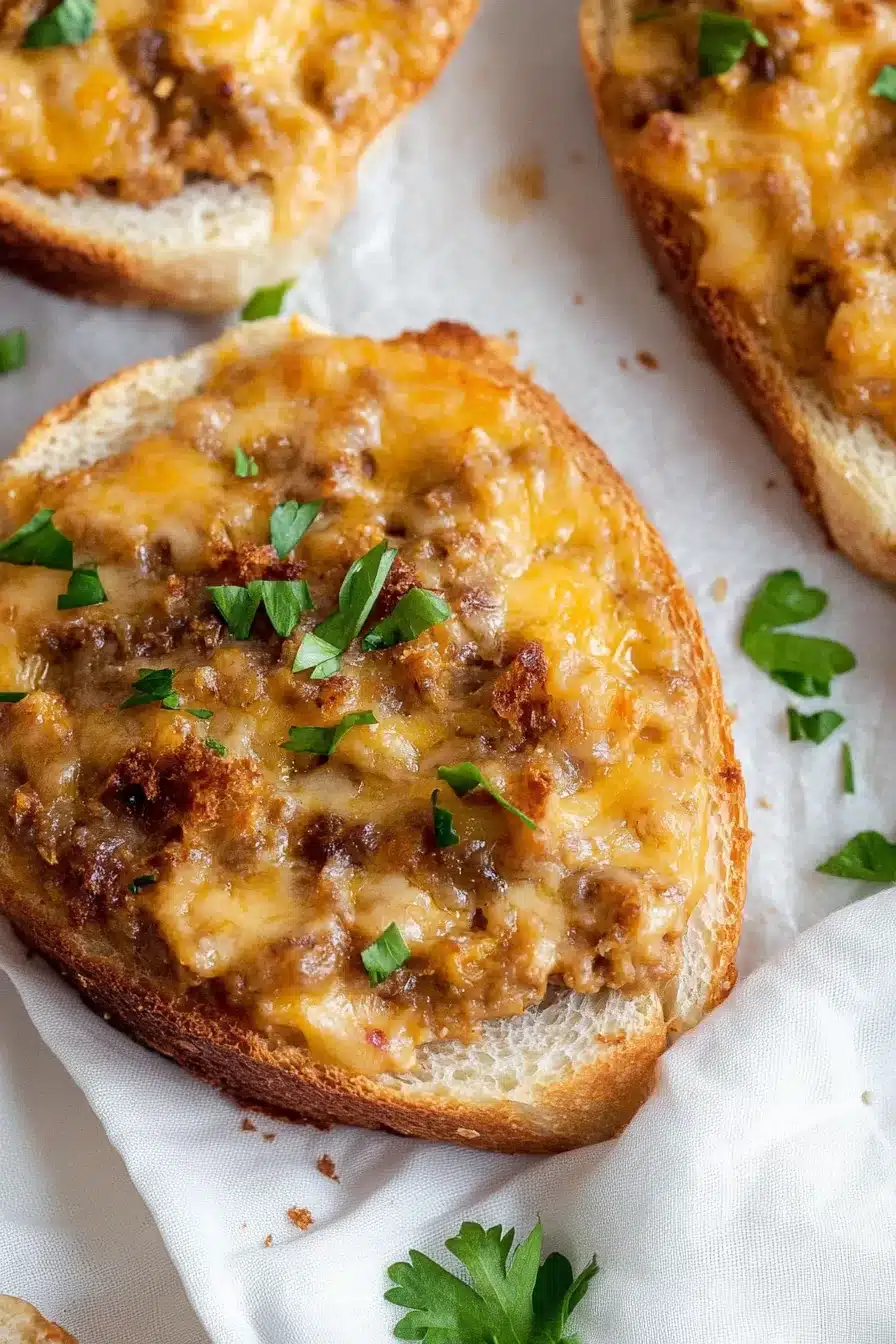
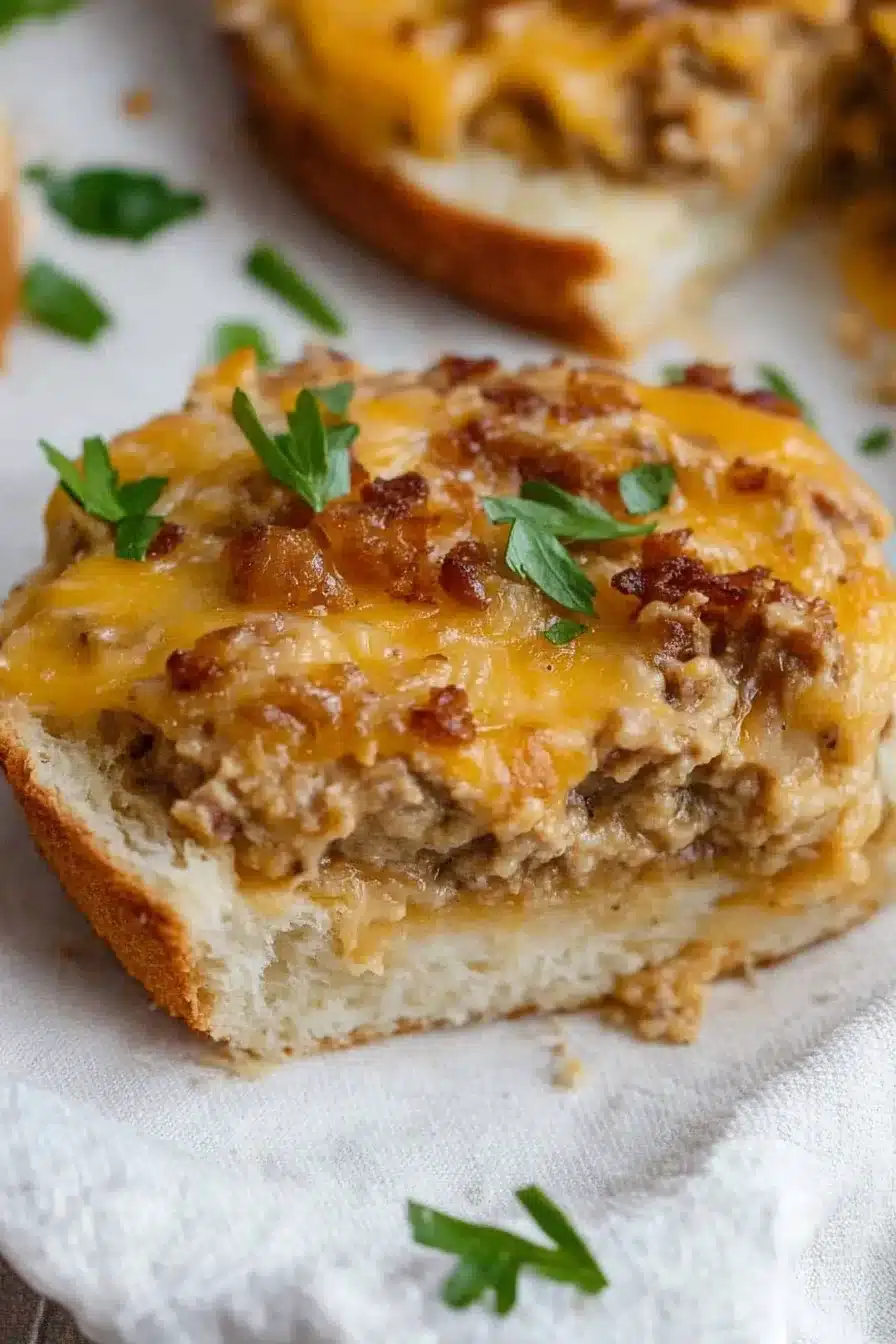
Sizzling ground beef, spicy sausage, melty Velveeta… this cheesy hanky panky appetizer is warm, savory, and ready to party on crusty rye bread.

Smoky, meaty, cheesy goodness all heaped onto little toasty rye rounds—this is the snack you bring out when everyone is hovering near the oven, sniffing. A little messy? Sure. But also kind of perfect in a cozy, slightly chaotic midweek way.

Look, I’m not saying this cheesy hanky panky recipe is your next dinner (though hey, no judgment). But it’s ideal when you want a bite of something salty and satisfying, something that slaps with savory meatiness and gooey cheese. The spicy kick from the sausage and pepper flakes is optional… but recommended. After all, it’s called hanky panky. There’s supposed to be some mischief in there.

Table of Contents

Cheesy Hanky Panky Recipe

Why You’ll Love this Cheesy Hanky Panky Recipe

This is one of those things I make when I’m hungry, impatient, and low on energy but still want Everyone to Be Impressed.

  • Ridiculously simple to make: You just brown some meat, melt some cheese, and scoop it onto bread. Ding, done.
  • Perfect balance of heat and creaminess: Between the spicy sausage, cayenne, and mellow Velveeta, it’s a flavor seesaw (in a good way).
  • Little bites, big flavor: These aren’t shy; each one packs a salty, cheesy punch.
  • Freezer-friendly for future cravings: You can prep these ahead and pop them into the oven straight from the freezer.
  • Great party food or snack supper: They’re strong contenders for any football Sunday… or a Thursday junk-food-for-dinner moment.
  • Unfussy ingredients: No need for fancy steps or hard-to-pronounce cheese. It’s Velveeta’s moment to shine.

Cheesy Hanky Panky Recipe

Ingredient Notes

You’ll only need a few grocery staples, plus restraint to not eat all the filling with a spoon.

  • Ground beef: I use 80/20 for a good meaty flavor. You’ll drain it after cooking so things won’t get greasy.
  • Ground hot pork sausage: This brings smoky heat and savory oomph. If you prefer milder vibes, swap for sweet Italian sausage.
  • Onion: Use a small one, finely diced. It melts into the mix but adds lovely savory depth.
  • Velveeta cheese: Yes, Velveeta. It melts like a dream and makes the whole thing feel retro and right.
  • Worcestershire sauce: Just a splash gives it that “what is that?” kind of savory twang.
  • Cayenne pepper and red pepper flakes: Add as much or little as your tongue can handle. I like a little nose-tingle.
  • Rye cocktail bread: These mini loaves are snack-sized perfection. Sturdy, a little tangy, and they crisp up in the oven like champs.

Cheesy Hanky Panky Recipe

How To Make This Cheesy Hanky Panky Recipe

This isn’t the kind of recipe that asks a lot from you. As long as you don’t walk away during the melting phase (looking at you, phone scrollers), it’s smooth sailing.

  • Brown the meats and onion together: Toss the ground beef, pork sausage, and diced onion into a big ol’ skillet over medium-high heat. Stir it around until there’s no pink left and your kitchen smells like a football stadium snack bar (in the best way). Drain the grease; you don’t need the extra shine.

  • Turn the heat down low and season it up: Add your Worcestershire sauce, then toss in some cayenne and red pepper flakes. Adjust it to match your current spice tolerance, which might vary hourly depending on how brave you’re feeling.

  • Melt the cheese into the meat: Cube up the Velveeta and drop it into the hot pan. Stir constantly while it melts into a dreamy, molten, meat-slicked lava. This part smells like Saturday night. Resist the spoon.

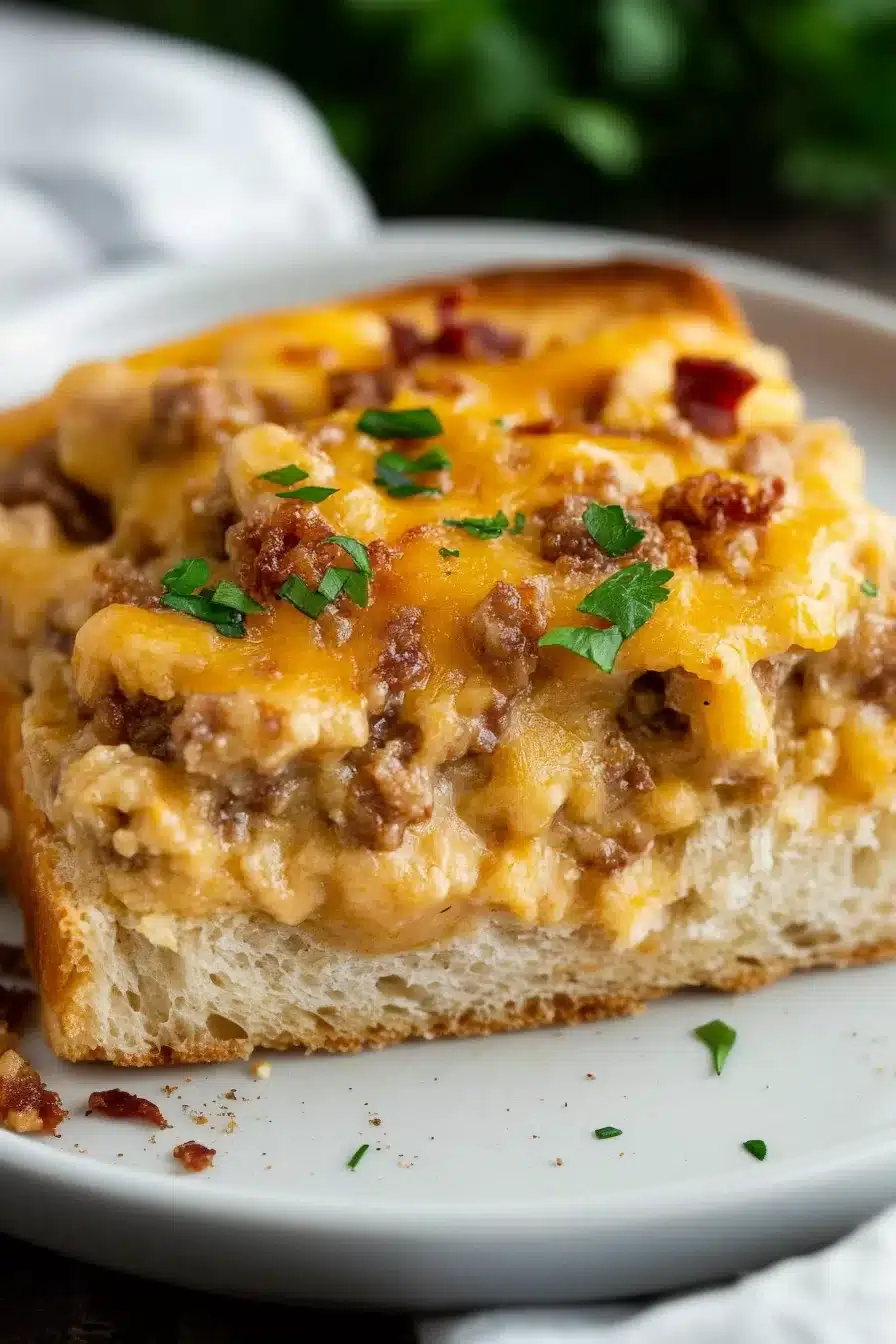
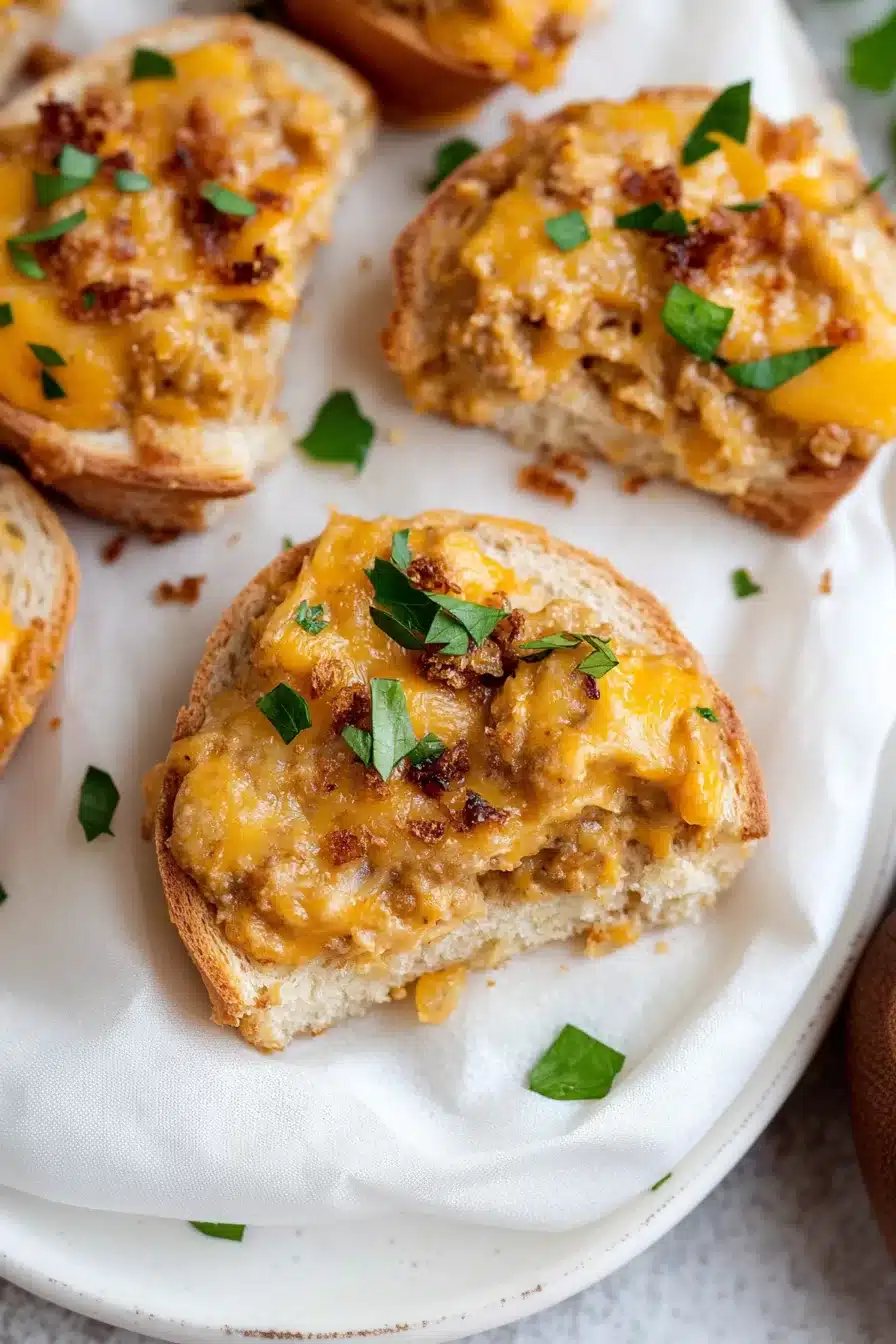
  • Assemble on rye bread: Lay out your cute rye cocktail slices on a baking sheet. Spoon a generous dollop of the cheesy meat mixture onto each one. Messiness is part of the charm.

  • Bake until bubbly and toasty: Pop the tray into a 350-degree oven for 10 to 12 minutes. The cheese will bubble like it just got great news and the edges of the bread will start to get golden and crisp.

  • Serve hot and try not to inhale them: That’s it. Just maybe let them cool for 45 seconds so you don’t melt your face.

Cheesy Hanky Panky Recipe

Storage Options

So, you made a batch of cheesy hanky pankies. Now what?

If you’ve got leftovers (unusual… but possible), just pop them into an airtight container and store them in the fridge. They’ll stay good for about 3 days, though the bread may soften a bit. Still tasty. Reheat in the oven or toaster oven for best results. Microwaving works too, in a pinch, but you might trade crispness for speed.

For longer storage, freeze them! Assemble everything just like you would before baking, then lay the unbaked pieces on a baking sheet and freeze until solid. Once frozen, stash ’em in a zip-top freezer bag. When you’re ready to party again, no need to thaw—just bake straight from the freezer at 350°F for about 15 to 18 minutes.

So yes—you absolutely can freeze them, and future-you will be thrilled.

Variations and Substitutions

Want to put your own twist on this cheesy mischief? You’ve got options. The base is flexible, so tinker away.

  • Different cheese: Not everyone keeps Velveeta on hand. Try American cheese slices (they melt similarly), or a combo of cheddar and cream cheese if you’re feeling ambitious.

  • Milder meat: You can tone down the heat with regular breakfast sausage or sweet Italian sausage. Still tasty, less spicy.

  • Vegetarian twist: Use a plant-based ground meat swap (like Beyond or Impossible) and skip the sausage. Add a teaspoon of smoked paprika for depth.

  • Different bread: Rye is classic, but little sourdough or baguette slices work too. Even an open-faced English muffin will do in a pinch.

  • Fancy it up: Add a sprinkle of chopped fresh chives or a squiggle of Dijon mustard before serving for a slightly shnazzy finish.

Cheesy Hanky Panky Recipe

What to Serve with Cheesy Hanky Panky Recipe

These little bites are rich and savory, so pairing them with fresh, crunchy, or sweet sides helps round things out without sending everyone into full Food Nap Mode.

  • A simple green salad with vinegar-forward dressing is your best friend here. It cuts through the richness and gives your mouth a reset between bites. Bonus points for peppery greens like arugula.

  • For something cozy and complete, serve them alongside a mug of tomato soup. The combo is warm, satisfying, and proudly low-effort. Comfort food, activated.

  • You could easily toss a tray of roasted veggies in the oven at the same time. Think crispy brussels sprouts or cauliflower. As a side bonus, it feels like a small nod to balance.

  • Want to round things out with pure indulgence? Follow it up with something sweet like these peanut butter & banana ice cream sandwiches. Total nostalgic throwback vibes.

  • If you’re throwing a party (or just pretending to), a few bacon basil cornbread muffins next to these are chef’s kiss. No prizes for subtlety, but plenty for flavor.

Cheesy Hanky Panky Recipe

Frequently Asked Questions

Can I make cheesy hanky panky ahead of time?

Absolutely! You can make the meat and cheese mixture ahead, let it cool, and keep it in the fridge for a day or two. When you’re ready to serve, just spoon onto the bread and bake as directed. You can even assemble them entirely and pop them in the freezer to bake later. Handy for surprise guests or late-night cravings.

Can I use a different type of cheese instead of Velveeta?

You totally can, but know that things might get a little less smooth. Velveeta melts like a dream with zero effort, which is part of the nostalgia magic. But shredded cheddar with a splash of milk, or a mix of cream cheese and Monterey Jack, can work if you stir patiently over low heat.

Is rye cocktail bread necessary, or can I use something else?

Not necessary, just traditional. Rye bread adds a tangy contrast and holds up beautifully. But if you’re out of it, go for any small, toasty bread with some bite—like sliced baguette, sourdough rounds, or even toasted English muffins cut into quarters. Just aim for firm and bake-ready.

Are these spicy? Can I make them milder?

They can have some heat, depending on how much hot sausage and pepper you use. To make it milder, swap in regular ground pork or sausage without added spice and skip the cayenne and flakes. You’ll still get lots of flavor from the meat and cheese without setting off any fire alarms.

Cheesy Hanky Panky Recipe

Cheesy Hanky Panky

Prep Time 10 minutes
Cook Time 22 minutes
Total Time 32 minutes
Sizzling ground beef, spicy sausage, melty Velveeta... this cheesy hanky panky appetizer is warm, savory, ridiculously simple, and ready to party on crusty rye bread. Salty, cheesy, zippy, and a guaranteed hit at your table.
36 pieces

Ingredients

Main Ingredients

  • 1 lb (450 g) ground beef 80/20 recommended
  • 1 lb (450 g) ground hot pork sausage or mild Italian sausage
  • 1 small onion finely diced
  • 1 lb (450 g) Velveeta cheese cubed
  • 1 tbsp (15 ml) Worcestershire sauce
  • 1/4 tsp (0.5 g) cayenne pepper or to taste
  • 1/2 tsp (1 g) red pepper flakes or to taste (optional)
  • 1 loaf rye cocktail bread about 36 small slices

Equipment

  • Large skillet
  • Baking sheet
  • Knife and cutting board
  • Wooden spoon or spatula

Instructions
 

  1. Preheat your oven to 350°F (175°C). Line a baking sheet with parchment paper or foil if desired.
  2. In a large skillet over medium-high heat, add the ground beef, sausage, and diced onion. Cook, stirring, until the meat is browned and onion is softened, about 7–9 minutes. Drain off excess grease.
  3. Reduce the heat to low. Stir in the Worcestershire sauce, cayenne pepper, and red pepper flakes. Mix well to combine.
  4. Add the cubed Velveeta cheese. Stir constantly while the cheese melts, creating a thick, cheesy meat mixture. Remove from heat once melted and smooth.
  5. Lay rye bread slices on the prepared baking sheet. Top each slice with a generous spoonful of the hot cheesy meat mixture, spreading to cover.
  6. Bake for 10–12 minutes, until cheese is bubbly and bread edges are crisp. Serve hot.

Notes

For milder bites, use regular sausage and leave out the cayenne and pepper flakes.
To freeze: Assemble unbaked pieces and freeze on a baking sheet until solid. Store in zip-top bags. Bake straight from the freezer at 350°F (175°C) for 15–18 minutes.
Try switching up the cheese or bread as you like, or add fresh chives before serving for a fancy touch.

Nutrition

Calories: 160kcal | Carbohydrates: 7g | Protein: 9g | Fat: 10g | Saturated Fat: 5g | Cholesterol: 38mg | Sodium: 340mg | Potassium: 130mg | Sugar: 1g | Vitamin A: 210IU | Calcium: 86mg | Iron: 1mg

Sweet cinnamon swirls, gooey brown sugar, and buttery biscuit bites all cozied up in your slow cooker—it smells like magic in here. This crockpot monkey bread is loaded with refrigerated biscuits, brown sugar, melted butter, and vanilla. It’s the kind of sticky, pull-apart treat that makes forks totally unnecessary.

You know I love a shortcut. This ooey-gooey beauty is it. Minimal prep, no oven, and cleanup is basically a non-issue (parchment paper is your BFF). Bonus: it makes your kitchen smell like a sticky bun dream while it cooks—rich vanilla, toasty sugar, and melty bakery goodness. It’s like taking your nose to the fair without leaving your slippers.

Table of Contents

Easy Crockpot Monkey Bread

Why You’ll Love this Crockpot Monkey Bread

This isn’t fancy. It’s sticky, warm, soft-in-the-middle, caramelized-around-the-edges comfort food. And it kind of smells like nostalgia—if nostalgia were laced with cinnamon.

  • Ridiculously simple to make: You just squish, smear, melt, and drizzle. Great for low-energy days when baking feels too ambitious.
  • No oven drama: Let your crockpot do the heavy lifting while you do literally anything else. Or nothing. That’s valid too.
  • Dreamy textures galore: Crispy caramel edges, soft doughy centers, and that gooey, sugary glaze dripping into all the corners.
  • Sweet with a hint of spice: The cinnamon sugar isn’t overpowering, just quietly humming in the background like a comforting tune.
  • Customizable with zero stress: Add pecans (or don’t). Toss in mini chocolate chips if you live on the wild side.
  • Easy cleanup situation: Parchment paper liner. That’s it. Say goodbye to deeply scrubbing sticky pans at 9 PM.

Easy Crockpot Monkey Bread

Ingredient Notes

Everything here is pantry-friendly—or at least grocery-store-around-the-corner friendly. No fancy flours or yeast anxiety.

  • Granulated sugar: Helps form that classic cinnamon-sugar coating on every biscuit bite. It gets slightly crisp around the edges as it cooks.
  • Ground cinnamon: A must for the classic monkey bread flavor. Warm, cozy, and smells like fall (even if it’s June).
  • Refrigerated biscuits: The unsung hero. Just pop a can, chop ‘em up, and you’re halfway to dessert. I use the 16.3-ounce tube—the one with 8 biscuits.
  • Butter (melted): Two sticks feel generous, but you want that gooey, glossy caramel layer at the bottom. Trust the process.
  • Brown sugar: Dark or light—either works. It melts with the butter into a thick, sweet glaze that trickles down through each layer.
  • Vanilla extract: Adds depth and rounds out the sugary sweetness so it feels cozy instead of over-the-top.
  • Chopped pecans (optional): For a little nutty crunch and some extra texture contrast if you’re into that.

Easy Crockpot Monkey Bread

How To Make This Crockpot Monkey Bread

Get comfy. Maybe put on a podcast. This recipe only takes 15ish minutes to prep, and then it’s hands-off from there. You’re gonna love that.

  • Line your slow cooker: Grab parchment paper or a slow cooker liner—it makes cleanup stupidly easy. Spray lightly with nonstick spray if you’re extra cautious (I usually do, just in case).

  • Mix the cinnamon sugar: Toss the granulated sugar and cinnamon together in a bowl or large zip-top bag. Doesn’t matter how—just make sure it’s well mixed.

  • Cut up your biscuits: Open the can (brace for the pop), separate the dough, and cut each biscuit into quarters. Bite-sized is the goal here so the glaze coats each piece.

  • Toss biscuit pieces in cinnamon sugar: Drop them into the sugar mix and give them a good shake or stir so they’re evenly coated. They’ll look like little cinnamon pillows.

  • Whisk together the glaze: Melt the butter first, then stir in brown sugar and vanilla until it’s mostly smooth and you don’t see grainy clumps.

  • Layer it all in the crockpot: First half of the biscuit pieces go in, then drizzle over half the butter mixture. Repeat with the second half of both. Drizzle slowly if you can—it makes the gooeyness magic more even. Sprinkle pecans on top if you’re using them.

  • Add a towel under the lid: Use 3–4 paper towels (or a clean dish towel) across the top so condensation doesn’t drip down into the bread. Secure with the lid, but make sure nothing’s touching the food.

  • Cook low and slow… or not that slow: 1.5 to 2 hours on HIGH, or 2.5 to 3 on LOW. Keep an eye on it around the 1-hour mark because crockpots like to improvise. You want golden edges and cooked-through centers.

  • Flip it out and eat warm: Once it’s done, lift it out using the parchment paper, give it a few minutes to cool (not too long!), then invert onto a serving plate. Pull-apart heaven awaits.

Easy Crockpot Monkey Bread

Storage Options

So you’ve got leftovers? Miraculous. Let’s talk storage.

Room temp isn’t its best friend, so if it’s going to hang around longer than a couple hours, pop it into an airtight container and refrigerate it. It’ll stay good for about 3 days. Just know the texture will soften a bit in the fridge—it loses that crisp caramel edge, but stays sweet and chewy in a nice way.

Reheating is easy. If you’re doing just a piece or two, microwave it for about 15 to 20 seconds until warm and gooey again. For a crowd-serving (or one very committed fork), reheat in the oven at 300°F for 10 to 15 minutes, covered loosely in foil to prevent over-browning.

And yes, you can freeze it—though I’ll say it’s best fresh. Let it cool completely, wrap tightly in plastic wrap, then foil, and freeze for up to 2 months. Defrost in the fridge overnight before reheating. But I’d wager it won’t last long enough to make it to the freezer.

Variations and Substitutions

There’s room for play here. If you’ve got a sweet tooth with opinions, this crockpot monkey bread understands.

  • Canned cinnamon rolls instead of biscuits: Go extra cinnamon-y and skip the added sugar bath—just cube ’em and layer in plenty of glaze.
  • Add mini chocolate chips: Sprinkle some between layers of biscuit pieces for a melty, fudgey contrast that wins over every chocoholic.
  • Use chopped walnuts instead of pecans: Slightly earthier and a bit crunchier. And hey, they’re what I had last time I made this.
  • Swap vanilla for maple extract: It gives the glaze a breakfasty pancake vibe that’s weirdly addictive.
  • Toss in some dried cranberries: Adds a teeny pop of tartness that cuts through the sweet. Plus, it feels holiday-ish if you’re into that.
  • Go savory (kinda?): Hear me out. Use plain biscuits, skip the sugar mix, and toss in cheddar, scallions, and bacon bits. Monkey bread rebels unite.

Easy Crockpot Monkey Bread

What to Serve with Crockpot Monkey Bread

Now technically this is dessert… but is it, really? Feels more like all-day treat energy to me. Here are a few things that pair surprisingly well.

  • If you’re making this for brunch, pair it with something savory like eggs or a slice of bacon and basil cornbread muffins. That sweet and salty balance? Major win. Also balances out the sugar-soaked biscuit carbs. Kinda.

  • For a cozy movie night or game day hang, set this monkey bread out next to cranberry meatballs. It sounds weird at first, I know. But trust me, the contrast in flavors works, especially during fall or holiday gatherings.

  • Summer afternoon? Serve a chunk of monkey bread with a scoop of vanilla—or better yet, peanut butter banana ice cream. Everything starts melting into everything else, and it’s beautiful.

  • Want to balance the richness a bit? Add a cup of plain Greek yogurt with a drizzle of honey on the side. It’s simple and oddly elegant next to such a sticky mess.

Easy Crockpot Monkey Bread

Frequently Asked Questions

Can I prep the monkey bread the night before?

Yes, but with a few tweaks. Coated biscuit pieces can get soggy if they sit too long, so I recommend prepping all your components separately. Chop the biscuits, mix your sugar and cinnamon, and whisk your glaze. Store everything separately in the fridge, then assemble in the morning. Fresh assembly = best texture.

What size slow cooker should I use?

Stick with a 5 to 7-quart Crockpot. If you’re scaling up the recipe or using a deeper model, just be sure to check doneness around the 90-minute mark. Too small and the biscuit pieces will overcrowd and stay doughy in the middle.

My monkey bread came out soggy. What went wrong?

This usually means there was too much liquid-to-dough ratio or it wasn’t cooked long enough. Be sure to layer the glaze in evenly without drowning it, and don’t skip the towel trick—it absorbs steam so you don’t get condensation dripping back into the sugar glaze.

Can I double the recipe?

You can, sort of. If your slow cooker’s deep enough, go for it—but be aware the center may take longer to cook through. Alternatively, use two slow cookers or do two batches back-to-back. Monkey bread is never too much.

Easy Crockpot Monkey Bread

Easy Crockpot Monkey Bread

Prep Time 15 minutes
Cook Time 2 hours
Total Time 2 hours 15 minutes
Sweet cinnamon swirls, gooey brown sugar, and buttery biscuit bites all cozied up in your slow cooker—it smells like magic in here. This crockpot monkey bread is loaded with refrigerated biscuits, brown sugar, melted butter, and vanilla. It’s the kind of sticky, pull-apart treat that makes forks totally unnecessary. Minimal prep, no oven, and hands-off cooking. Comfort food at its best!
8 servings

Ingredients

Main

  • 3/4 cup (150 g) granulated sugar
  • 2 tsp (8 g) ground cinnamon
  • 1 refrigerated biscuits (8-count, 16.3 oz tube) such as Pillsbury Grands! or similar
  • 1 cup (225 g) unsalted butter melted (2 sticks)
  • 1 cup (210 g) brown sugar packed, light or dark
  • 2 tsp (10 ml) vanilla extract
  • 1/2 cup (60 g) chopped pecans optional

Equipment

  • Slow Cooker (5–7 quart)
  • Parchment Paper or Slow Cooker Liner
  • Mixing bowls
  • Whisk

Instructions
 

  1. Line your slow cooker: Line a 5–7 quart slow cooker with parchment paper or a slow cooker liner for easy cleanup. Lightly coat with nonstick spray if desired.
  2. Mix the cinnamon sugar: Combine granulated sugar and cinnamon in a bowl or large zip-top bag. Stir or shake well to blend.
  3. Cut the biscuits: Open the can of biscuits, separate, and cut each biscuit into quarters for bite-size pieces.
  4. Coat biscuits: Drop biscuit pieces into the cinnamon-sugar mixture and toss until evenly coated.
  5. Make the glaze: In a separate bowl, whisk together the melted butter, brown sugar, and vanilla extract until smooth and blended.
  6. Layer in the slow cooker: Add half of the coated biscuit pieces to the slow cooker. Drizzle with half of the butter-brown sugar mixture. Repeat with remaining biscuits and glaze. Sprinkle pecans on top, if using.
  7. Add a towel under the lid: Lay 3–4 paper towels or a clean dish towel across the top to catch condensation, then secure the lid. Make sure towel does not touch the food.
  8. Cook: Cook on HIGH for 1.5 to 2 hours, or on LOW for 2.5 to 3 hours. Check at the one-hour mark—bread is done when edges are golden and center is cooked through.
  9. Cool and serve: Lift the monkey bread out by the parchment paper, allow to cool a few minutes, then invert onto a serving plate. Pull-apart and enjoy warm!

Notes

Easy cleanup tip: Parchment paper or a slow cooker liner is your best friend!
Variations: Use canned cinnamon rolls instead of biscuits, add mini chocolate chips or swap pecans for walnuts, or swap vanilla for maple extract.
Storage: Store leftovers in an airtight container in the refrigerator for up to 3 days. Reheat single portions in the microwave for 15–20 seconds or cover with foil and reheat in the oven at 300°F for 10–15 minutes. Freeze for up to 2 months after fully cooled.

Nutrition

Calories: 540kcal | Carbohydrates: 68g | Protein: 4g | Fat: 29g | Saturated Fat: 16g | Cholesterol: 55mg | Sodium: 884mg | Potassium: 86mg | Fiber: 2g | Sugar: 37g | Vitamin A: 789IU | Calcium: 62mg | Iron: 2.2mg

Warm taco spices, tender spaghetti, and gooey melted cheese—this taco spaghetti is what happens when taco night and pasta night can’t decide who gets Tuesday. Made with ground beef, diced onion, bell pepper, and shredded Mexican cheese, it’s cozy, cheesy, and gloriously saucy.

Here’s the vibe: skillet simmering away, steam rising with the scent of spiced beef and peppers, and you, happily standing there with a wooden spoon and zero plans for a salad. It’s the kind of weeknight dinner that skips the fuss and jumps straight to comfort. And yes, if you want to eat it out of the pan with a fork (no judgment), I fully support your vision.

Table of Contents

Cheesy Taco Spaghetti

Why You’ll Love this Taco Spaghetti

This one’s a no-brainer. It’s a little quirky, kinda hearty, and a whole lot of cozy in one skillet.

  • Ridiculously simple to make: You just brown, stir, simmer, sprinkle. No fussy layers, nothing to bake, no sink full of dishes.
  • One pan magic: Everything cooks in the same skillet, even the spaghetti. Yes, the pasta goes right in the sauce. Trust the process.
  • Absolute flavor bomb: You’ve got taco seasoning, Rotel, and melted cheese. Come on, tell me your mouth isn’t already watering.
  • Works for picky and adventurous eaters alike: It’s familiar enough for kids but still fun for adults who impulse-buy three kinds of hot sauce.
  • Perfect for midweek moods: It comes together fast, tastes like effort, and reheats beautifully the next day (you’ll want leftovers, promise).
  • Customizable without heartbreak: Don’t like peppers? Leave them out. Want to use ground turkey? Be my guest.

Cheesy Taco Spaghetti

Ingredient Notes

This list keeps things simple but packs some cozy punch. No mystery items here—just pantry staples doing the heavy lifting.

  • Butter: Adds a touch of richness when browning the beef. You could use oil, but butter gives that savory backnote we love.
  • Ground beef: Choose 80/20 for good flavor without too much grease. Other proteins will work if you’re feeling inspired.
  • Yellow onion: Brings a mellow sweetness once cooked down. Dice it small so it melts right into the dish.
  • Green bell pepper: Adds a little texture and crunch. If green’s not your thing, swap for red or skip it altogether.
  • Taco seasoning: Store-bought is totally fine, but if you’ve got homemade stashed away, now’s the time to show off.
  • Rotel tomatoes: These little cans are flavor bombs—tomatoes and green chilies in one. They add just enough zip.
  • Spaghetti: Yup, the classic kind. Uncooked, it simmer cooks right in the skillet for full flavor absorption.
  • Chicken broth: Helps the spaghetti cook and adds deeper flavor than plain water would. Grab low-sodium when you can.
  • Shredded Mexican cheese: This is where the magic happens. Melty, gooey, and a little salty. Use a blend with cheddar and Monterey Jack.
  • Cilantro and green onions: Final flourishes. They bring fresh brightness that cuts through the savory bits.

Cheesy Taco Spaghetti

How To Make This Taco Spaghetti

This part is super forgiving, which we love. Everything comes together in one pan, and it’s basically stir, simmer, sprinkle your way to dinner.

  • Brown the beef and veggies: Melt the butter in a deep skillet over medium heat, then toss in the ground beef, onion, and bell pepper. Let it all sizzle until the beef’s browned, about five minutes. Don’t skip this step—it builds flavor. Then, drain off any extra fat hanging out in the pan.

  • Add the flavor makers: Sprinkle in the taco seasoning (inhale that aroma), then stir in the Rotel, uncooked spaghetti, and chicken broth. It’ll look like a saucy noodle soup at first—don’t panic, that’s exactly how it starts.

  • Simmer your way to glory: Bring the mixture up to a soft boil. Then lower the heat, cover the pot, and let everything simmer for about 15 minutes. Stir once or twice if you remember (no shame if you forget). The pasta will soak up the liquid and become beautifully coated.

  • Make it cheesy and melty: Once the pasta’s al dente and the sauce has thickened up, kill the heat. Sprinkle the cheese over the top so it’s blanketing the noodles, then cover the skillet again. Wait a minute or two until you lift the lid and see melty, stringy perfection.

  • Toppings and serve: Sprinkle with chopped cilantro and green onions. That little fresh bite on top? Don’t skip it. Then serve straight from the pan to plates—or the couch if it’s that kind of night.

Cheesy Taco Spaghetti

Storage Options

So, you’ve cooked a big skillet of taco spaghetti and somehow didn’t eat it all (honestly, kudos). The good news? It stores like a dream.

Pop leftovers into an airtight container and toss them in the fridge. They’ll be good for 3 to 4 days. The flavors actually get deeper after a day, in that magical spaghetti-leftover way. If you’re reheating it, add a tiny splash of broth or water and microwave in short bursts, stirring halfway. This keeps the pasta from drying out or turning into a weird clump.

And yep, you sure can freeze it. Just portion it out into freezer-safe containers, let it cool completely, then freeze for up to 2 months. Thaw overnight in the fridge, then warm it on the stovetop or in the microwave. It may need an extra sprinkle of cheese to wake it back up (just saying).

Variations and Substitutions

There’s plenty of wiggle room to make this your own. Whether you’re out of something or just feeling rebellious, you’ve got options.

  • Ground turkey or chicken: Lighter proteins work wonderfully here. Just add a tiny bit of olive oil if you’re using leaner meat so it doesn’t go dry.
  • Vegetarian twist: Skip the meat and bump up the veggies—zucchini, mushrooms, or even chickpeas play well here. Use veggie broth instead of chicken.
  • Different noodles: Don’t have spaghetti? Fettuccine, linguine, or even short noodles like penne can step in. Just adjust the cooking time slightly.
  • Homemade taco seasoning: If you like to DIY, a blend of chili powder, cumin, paprika, and garlic powder works beautifully.
  • Add-ins galore: Black beans, corn, or a scoop of salsa would all make fun additions. It’s hard to mess this one up.

Cheesy Taco Spaghetti

What to Serve with Taco Spaghetti

Okay, so you’ve got your skillet of cheesy taco spaghetti bubbling away. What do you serve with it? Glad you asked.

  • A crisp green salad with lime vinaigrette is a nice contrast to the richness of the spaghetti. I like to throw in avocado and crunchy romaine—it adds brightness and helps me pretend I’m balanced.

  • Cornbread or muffins are a solid move. These bacon basil cornbread muffins bring a smoky-sweet sidekick to the mix. Plus, cornbread is just fun to eat.

  • If you’re feeling extra festive, chips and guac wouldn’t be mad sitting next to this dish. I mean, it’s still taco-adjacent, right?

  • A light veggie side, like sautéed zucchini or grilled corn, goes well too. Something quick and not too overpowering so the spaghetti still gets the spotlight.

  • And for dessert? Something cool and creamy, like these peanut butter banana ice cream sandwiches, makes a sweet ending. Perfect for sharing or hoarding in the freezer.

Cheesy Taco Spaghetti

Frequently Asked Questions

Can I use a different type of pasta?

Totally. Spaghetti is classic here, but you’ve got wiggle room. Fettuccine, linguine, or even rotini will all work. Just keep an eye on cooking time and check for doneness as things simmer. You want the pasta tender but not overcooked to mush.

Is it spicy?

Not overly. The taco seasoning and Rotel give it a gentle kick, but it’s more of a warm spice than a tongue-scorcher. If you’re sensitive, you can use mild Rotel or add a dollop of sour cream on top. On the flip side, if you want heat, toss in some jalapeños or hot sauce.

Can I make this ahead of time?

You sure can. It reheats beautifully. Make the whole thing, let it cool, and store it in the fridge. When you’re ready to eat, warm it gently on the stove or in the microwave. Add a little broth or water to loosen it back up, and maybe throw on a fresh sprinkle of cheese for good measure.

How can I make it more veggie-forward?

Easy fix! Leave out the meat and double up on veggies. Sauté zucchini, mushrooms, even frozen corn or spinach. Toss in black beans or lentils for protein. Just keep the liquid ratio roughly the same so the pasta cooks right. It becomes a hearty, meatless skillet meal in no time.

Cheesy Taco Spaghetti

Cheesy Taco Spaghetti

Prep Time 10 minutes
Cook Time 25 minutes
Total Time 35 minutes
Warm taco spices, tender spaghetti, and gooey melted cheese—this taco spaghetti is what happens when taco night meets pasta night. Quick, comforting, and outrageously cheesy, it brings all the cozy vibes in just one skillet. Ground beef, peppers, Rotel, and Mexican cheese ensure maximum flavor with minimal effort. It’s customizable, family-friendly, and perfect for weeknight dinners (or eating straight from the pan—no judgment).
4 servings

Ingredients

Taco Spaghetti

  • 2 tbsp (28 g) unsalted butter
  • 1 lb (450 g) ground beef (80/20)
  • 1 yellow onion diced small
  • 1 green bell pepper diced
  • 1 oz (28 g) taco seasoning (store-bought or homemade) about 2-3 tbsp
  • 10 oz (284 g) Rotel tomatoes with green chilies 1 can, undrained
  • 8 oz (225 g) spaghetti uncooked, broken in half
  • 2 cups (475 ml) chicken broth low-sodium preferred
  • 2 cups (200 g) shredded Mexican blend cheese use cheddar & Monterey Jack for best melt
  • chopped fresh cilantro for garnish
  • sliced green onions for garnish

Equipment

  • Large Deep Skillet with Lid
  • wooden spoon

Instructions
 

  1. Melt the butter in a large deep skillet over medium heat. Add the ground beef, onion, and bell pepper. Cook, breaking up the beef, until browned and the veggies are softened, about 5 minutes. Drain excess fat.
  2. Sprinkle in the taco seasoning and stir until fragrant, about 1 minute.
  3. Add Rotel tomatoes (with their juices), uncooked spaghetti, and chicken broth. Stir to submerge the noodles. The mixture will look very soupy at first.
  4. Bring everything to a gentle boil. Reduce heat to medium-low, cover, and simmer for 12-15 minutes, stirring once or twice, until spaghetti is al dente and most of the liquid is absorbed.
  5. Turn off the heat. Sprinkle cheese evenly over the top. Cover again and let sit for 2 minutes so the cheese melts.
  6. Uncover, sprinkle with cilantro and green onions, and serve hot. Enjoy directly from the pan if the mood strikes!

Notes

  • To store: Place leftovers into an airtight container and refrigerate for 3-4 days. Reheat gently with a splash of broth or water for best texture.
  • To freeze: Portion cooled leftovers into freezer-safe containers and freeze up to 2 months. Thaw overnight, then reheat. Top with extra cheese to refresh.
  • Swap ground beef for turkey, chicken, or skip meat and add extra veggies for a vegetarian version (use veggie broth).
  • Spaghetti is classic, but substitute fettuccine, linguine, or even penne as needed; adjust simmer time for different shapes.
  • Customize with black beans, corn, jalapeños, or salsa as add-ins.

Nutrition

Calories: 590kcal | Carbohydrates: 48g | Protein: 33g | Fat: 30g | Saturated Fat: 15g | Cholesterol: 105mg | Sodium: 1160mg | Potassium: 820mg | Fiber: 4g | Sugar: 6g | Vitamin A: 950IU | Vitamin C: 38mg | Calcium: 360mg | Iron: 4.5mg

Bright, tangy cranberry sauce meets zesty chili sauce and juicy, ready-made meatballs in these cranberry meatballs. Just add orange juice and brown sugar!

If you like your food with a little sweet, a little savory, and zero drama, you’re about to meet your new best weeknight buddy. These cranberry meatballs are sticky, saucy, and ridiculously low-effort. Like… one skillet or a slow cooker could basically do the work for you while you pretend to clean. The aroma alone? Cozy with a capital C. Slightly citrusy from the orange juice, warmed up by the brown sugar, and that cranberry–chili sauce duo is weird in the best Midwestern potluck kind of way. I say that lovingly.

Table of Contents

Easy Cranberry Meatballs

Why You’ll Love this Cranberry Meatballs

These are cozy, fuss-free bites that come together without breaking a sweat. A sweet-saucy blanket over tender meatballs? Yes, please.

  • Ridiculously simple to make: You just stir a few things together and toss in some frozen meatballs. Boom, done.
  • Hello, three ways to cook: Whether you’re loyal to your skillet, crockpot, or oven, all roads lead to tasty town.
  • Sweet, tangy, AND savory: It’s like a party in your mouth where cranberry sauce and chili sauce become best friends.
  • Make-ahead magic: These hold up like champs and might even taste better the next day—perfect for leftovers or parties.
  • App or entrée, you decide: Serve ‘em with toothpicks or pile over rice. They clean up nicely in both roles.
  • Smells like the holidays (but in a chill way): That warm, fruity aroma cozies up the whole kitchen without trying too hard.

Easy Cranberry Meatballs

Ingredient Notes

We’re keeping things delightfully simple here—think store-bought sauces and pre-cooked meatballs meeting their saucy destiny.

  • Jellied cranberry sauce: This is the kind that shimmies out of the can in one glorious ploop. It melts into a glossy sweet base with a tart zing.
  • Chili sauce: Think Heinz or any similar bottle. Slightly spicy, tomato-y, and plays nice with the cranberry.
  • Orange juice: Gives everything a gentle citrusy lift. Fresh squeezed or the bottled stuff? Both work just fine.
  • Brown sugar: Optional but lovely. It softens the tang and rounds out the brightness with a caramel warmth.
  • Frozen, fully cooked meatballs: Choose your favorite—beef, turkey, even plant-based if that’s your thing. No judgment.
  • Chopped parsley or green onions: Totally optional garnish, but they add that fresh pop and a little fancy moment.

Easy Cranberry Meatballs

How To Make This Cranberry Meatballs

You barely need a game plan, to be honest. Just a spoon, a heat source, and a little patience while the sauce gets happy.

  • Pick your cooking method: You’ve got options! Stovetop if you’re short on time, oven for that slow-baked coziness, or slow cooker if you’d rather set-it-and-ignore-it. I’ll break ‘em each down.
  • For stovetop mavens: In a big skillet, stir together the cranberry sauce, chili sauce, orange juice, and brown sugar over medium heat. Don’t worry if it looks lumpy at first—it’ll smooth out as it warms up.
  • Add meatballs once sauce is smooth: Gently plop them in and stir so they’re all cosy in their sauce bath. Then lower the heat and simmer for 15 to 20 minutes. It’ll thicken up a bit and smell like cocktail party heaven.
  • Slow cooker crew, gather ‘round: Dump all the sauce ingredients into the pot first and stir until it looks relatively blended. Add meatballs, stir to coat, then cook on LOW for 4 to 5 hours. Give a lazy stir now and then if you remember.
  • Oven traditionalists, I got you: Preheat to 350°F and arrange frozen meatballs in a big baking dish. In a bowl, microwave the cranberry sauce in short bursts till it melts, then stir in the other sauce stuff. Pour over the meatballs, stir a little, then bake for 60 to 90 minutes. Stir halfway through so nobody gets left behind.
  • Finishing touches: Right before serving, sprinkle with chopped parsley or green onions for a tiny pop of freshness. Or skip it if you’re hungry and impatient. Same.

Easy Cranberry Meatballs

Storage Options

Oh yes, you can totally make these ahead—or stash leftovers for a lazy lunch later.

If you’ve got some extra, let the meatballs cool to room temp first. Then pop them in an airtight container and store them in the fridge. They’ll hold up beautifully for 3 or 4 days. The flavors even deepen a bit, in that mysterious “next-day better” kind of way.

Wanna freeze them? Go for it. Scoop into a container or freezer bag once cooled, get the air out (as much as you reasonably can), and freeze for up to 3 months. Let them thaw overnight in the fridge before reheating.

To reheat, use the microwave if you’re feeling fast and lazy—but do it in short bursts, stirring in between so things don’t detonate. Or warm gently on the stovetop over low heat, adding a splash of water or juice if the sauce gets too thick.

Variations and Substitutions

Feel like tweaking? Or just need to use what you’ve got? Here’s how to improvise without wrecking the deliciousness.

  • Swap the cranberry sauce: Try whole berry instead of jellied if you like it chunkier and a bit more tart. Works just as well.
  • BBQ crossover moment: Replace the chili sauce with barbecue sauce for a smokier vibe. It’s weirdly good.
  • Make it spicy: Add a splash of sriracha or throw in red pepper flakes if you want it to kick back a little.
  • Meatball alternatives: Turkey or chicken meatballs are lighter options, or go plant-based if you’re aiming vegetarian. The sauce doesn’t judge.
  • Fancy flavor boost: Stir in a splash of balsamic vinegar or add a pinch of garlic powder. Just enough to make people ask, “Ooh, what’s in this?”

Easy Cranberry Meatballs

What to Serve with Cranberry Meatballs

Depending on your mood (and maybe the size of your plate), you’ve got lots of pairing options coming your way.

  • White rice or jasmine rice: These saucy meatballs love a soft, starchy base to soak into. Jasmine rice brings a subtle floral note that plays nicely with the tangy sauce—and bonus, it’s quick.
  • Mashed potatoes: If you want comfort food energy, this is it. The sweet-savory sauce is dreamy pooled over smooth, creamy mash. Trust.
  • Toothpicks and napkins: Going full party appetizer mode? Just stick ’em on a platter, toothpicks at the ready, and watch them disappear. Works especially well alongside Grinch cake pops for a holiday spread that’s both weird and wonderful.
  • Roasted Brussels sprouts or green beans: Gotta have something green on the plate (or so I’ve been told). The veggie bitterness balances the sauce’s sweetness in a solid way.
  • Crusty bread: Just for sopping purposes. That sauce is gold, and you deserve every last drop.

Easy Cranberry Meatballs

Frequently Asked Questions

Do you need to thaw the frozen meatballs first?

Nope, that’s the beauty of it! Since you’re using fully cooked frozen meatballs, they go straight into the pan, slow cooker, or oven without thawing. Just make sure you give them enough time to heat all the way through—the sauce will help them stay juicy as they warm.

Can I use homemade meatballs instead?

Absolutely, as long as they’re cooked! This recipe is super flexible. If you’ve got meatballs from scratch hanging out in your freezer or fridge (go you), just swap ‘em in one-for-one. Just be gentle when stirring so they don’t fall apart in the sauce.

How do I prevent the sauce from burning in the slow cooker?

Slow cookers aren’t usually high-risk for burning, but stirring once or twice during the cooking time helps keep things even. Also, make sure you’re using LOW heat and not accidentally switching it to high—happens more than you’d think! If your cooker runs hot, you can add a splash of water or orange juice to thin things out.

Can I make this in the oven instead?

Yes, and it’s downright lovely that way. Actually, if you’re curious about baking them from start to finish, here’s the full scoop on cranberry meatballs in the oven. Longer cook time, but totally worth it for that baked-in flavor.

Easy Cranberry Meatballs

Easy Cranberry Meatballs

Prep Time 5 minutes
Cook Time 20 minutes
Oven Bake Time (optional method) 1 hour
Total Time 25 minutes
Bright, tangy cranberry sauce meets zesty chili sauce and juicy ready-made meatballs in these ultra-easy cranberry meatballs. Just add orange juice and a little brown sugar and let your stovetop, oven, or slow cooker do the work for you. Sweet, savory, slightly citrusy, and totally cozy!
6 servings

Ingredients

Sauce

  • 1 can (397 g) jellied cranberry sauce about 14 ounces
  • 1 bottle (340 g) chili sauce about 12 ounces, such as Heinz
  • 1/2 cup (120 ml) orange juice fresh or bottled
  • 2 tbsp (25 g) brown sugar optional, to taste

Meatballs

  • 2 lb (900 g) frozen, fully cooked meatballs beef, turkey, or plant-based

Garnish (optional)

  • chopped fresh parsley or green onions for serving

Equipment

  • Large Skillet or Sauté Pan
  • Slow cooker
  • Oven-safe Baking Dish
  • Mixing bowl
  • Microwave (optional)
  • Spoon or spatula

Instructions
 

  1. Choose your cooking method: Stovetop, oven, or slow cooker all work for this recipe (see details below).
  2. Stovetop Method: In a large skillet, combine cranberry sauce, chili sauce, orange juice, and brown sugar. Heat over medium, stirring until the mixture is smooth and starting to bubble.
  3. Add frozen meatballs and toss to coat. Bring to a simmer, then reduce heat and cook for 15-20 minutes, stirring occasionally, until meatballs are heated through and the sauce has thickened.
  4. Slow Cooker Method: Add cranberry sauce, chili sauce, orange juice, and brown sugar to the slow cooker and whisk to combine. Add frozen meatballs and stir to coat. Cook on LOW for 4-5 hours, stirring once or twice if possible, until heated through and saucy.
  5. Oven Method: Preheat oven to 350°F (175°C). Arrange frozen meatballs in a large baking dish. In a microwave-safe bowl, melt the cranberry sauce slightly, then stir in chili sauce, orange juice, and brown sugar until smooth. Pour sauce over meatballs and stir to coat. Bake for 60-90 minutes, stirring once or twice, until bubbly and hot.
  6. Finish & Serve: Garnish hot meatballs with chopped parsley or green onions if desired. Serve as an appetizer with toothpicks or as a main with rice, mashed potatoes, or crusty bread.

Notes

For make-ahead, cool meatballs to room temp and refrigerate up to 4 days or freeze up to 3 months. Serve over rice, mashed potatoes, or with roasted veggies. Swap in barbecue sauce for chili sauce, or use turkey, chicken, or plant-based meatballs for a twist. See post for more variations and serving tips.

Nutrition

Calories: 370kcal | Carbohydrates: 41g | Protein: 18g | Fat: 14g | Saturated Fat: 5g | Cholesterol: 40mg | Sodium: 800mg | Potassium: 400mg | Fiber: 2g | Sugar: 22g | Vitamin A: 200IU | Vitamin C: 7mg | Calcium: 35mg | Iron: 2.5mg

Creamy, rich, and just a little bit fancy, these truffle mashed potatoes are made with Yukon Golds, butter, cream, and a healthy drizzle of truffle oil. Dreamy.

Soft, buttery potatoes with a whisper of that earthy truffle aroma? Yes please. These mashed potatoes are smooth but not gluey, luxurious but not extra. And if you toss a few chives and maybe a shaving of real truffle on top, you’ve got side dish royalty with hardly any extra effort.

Right this way to cozy potato bliss.

You know those fancy little touches that feel like magic but are secretly so easy? That’s what’s going on here. Truffle oil or truffle zest bumps the humble mashed potato into “I seriously might eat the whole bowl” territory. It smells slightly woodsy, earthy, almost haunting, and melts right into the cream and butter mixture.

These are absolutely made for rich holiday spreads, but honestly? A cold Thursday night with roasted chicken or even a fried egg on top will do just fine. Truffle doesn’t need a red carpet—it’s perfectly at home in your cozy kitchen, steaming up the windows.

Table of Contents

Creamy Truffle Mashed Potatoes

Why You’ll Love this Creamy Truffle Mashed Potatoes

You don’t need to be a gourmet wizard to pull off this recipe, I promise. It’s much simpler than it sounds, plus it smells kind of incredible while you’re making it.

  • Ridiculously simple to make: You just squish, smear, melt, and drizzle, then suddenly you’re the fanciest person at the table.
  • Fancy but not fussy: Truffle oil brings sophistication without the stress of shaving actual truffles (unless you’re feeling dramatic).
  • Ultra creamy texture: Yukon Golds get buttery and smooth without ever turning gummy or sad.
  • Customizable to your vibe: Want Parmesan? Toss it in. No cream? Milk works. Minimalist? Do less.
  • Pairs like a dream: From roast chicken to grilled fish, this side works with basically anything except… maybe cereal?
  • Slightly addictive: That earthy, cozy flavor somehow makes you think “Just one more spoonful” five times in a row.

Creamy Truffle Mashed Potatoes

Ingredient Notes

At a glance, these are humble ingredients. The secret is giving each one a moment to shine (and letting the truffle oil absolutely steal the show).

  • Yukon Gold or Russet potatoes: Yukon Golds are buttery and lush. Russets go fluffier. Both mash beautifully, so use what you love or have.
  • Heavy cream (or whole milk): Cream makes it decadent. Milk works totally fine—just a little lighter. Don’t skip warming it up.
  • Unsalted butter: Let’s be real, melted butter stirred into hot potatoes is pure therapy. Cube it for easy melting.
  • Grated Parmesan (optional): Adds a salty, nutty boost. Not required, but deeply encouraged if you happen to have a block.
  • Truffle oil or truffle zest: Truffle oil is easiest to find. Start slow—a few drops go a long way. Truffle zest is more subtle but delightful.
  • Salt & black pepper: Don’t underestimate this final seasoning step—it pulls all the flavors together.
  • Chopped chives + shaved truffles (optional): These are your finishing flourish. The green pop is fresh and that truffle shaving? Bonus flair.

Creamy Truffle Mashed Potatoes

How To Make This Creamy Truffle Mashed Potatoes

Let’s mash. This is easy stuff here—no standing mixer, no special gadgets (unless you want to use a ricer and feel fancy).

  • Boil the potatoes: Peel and cube them, then toss into a big pot of cold, salted water. Bring it to a boil, then simmer around 15–20 minutes until fork tender—but not falling apart.

  • Steam off some of that moisture: Drain well, then pop the potatoes right back into the hot pot. Leave it off the heat and uncovered for a couple of minutes. That extra moisture will evaporate off and keep things fluffy, not soggy.

  • Warm up your creamy mix: While the potatoes boil, melt the butter with cream in a small saucepan over low heat. Just melt it gently. No need for bubbles or drama here.

  • Mash it up: Use a ricer or trusty potato masher and go to town. Smooth or a little chunky—it’s your call.

  • Stir in the creamy goodness: Slowly add the warm butter-cream mix to the mashed potatoes. It’ll slurp it up like a sponge. Stop when you like the consistency.

  • Finish with flair: If you’re using Parmesan, fold it in now so it melts right in. Then start adding the truffle oil a bit at a time. Taste as you go! Too much and it’ll overpower. Add salt and pepper last, when it’s all come together.

  • Garnish if you’re feeling extra: Chives add fresh contrast. A few paper-thin truffle slices? Straight-up showstopper.

Creamy Truffle Mashed Potatoes

Storage Options

Leftovers (if they happen… suspicious) will keep nicely for 3 to 4 days in the fridge. Just scoop the potatoes into an airtight container, chill them, and reheat gently when ready. A splash of milk or cream stirred in helps loosen them back up without making them runny.

Now for the big freezer question: yes, you can freeze truffle mashed potatoes—but the texture might shift a little. Once thawed, stir in more cream or even a knob of butter to bring back the creamy vibes. Freeze them in small batches, flat in bags or in lidded containers, so they reheat faster and more evenly.

To reheat, you’ve got options. Microwave with a damp paper towel, warm them slowly on the stovetop with a bit of cream, or (hear me out) stick them in a small baking dish, dot with butter, and bake ‘til golden on top. It’s almost like a twice-baked mashed potato… which kinda makes me want to try it with this next time.

Variations and Substitutions

You can absolutely make these your own. If you love truffle but want to experiment with texture or flavors, here are some swaps worth trying.

  • Sweet potatoes: Try swapping in half sweet potatoes for a surprising combo of earthy and sweet. Truffle and sweet? Surprisingly dreamy.

  • Go dairy-free: Use your favorite plant-based milk and butter. Unsweetened oat milk has a creamy vibe that works well here.

  • Add roasted garlic: Mash in a few cloves of roasted garlic for buttery depth. It won’t compete with the truffle—it plays backup vocals.

  • Try different cheeses: Parmesan is lovely, but aged white cheddar or Fontina melt beautifully too. Keep it subtle so the truffle still shines.

  • Herb mix-ins: Chives are classic, but a sprinkle of fresh thyme or even rosemary can add a cool twist. Just chop it fine and don’t overdo it.

  • Use truffle zest instead of oil: It’s less intense and adds a gentle earthiness with more control. Sprinkle it in slowly and taste as you go.

Creamy Truffle Mashed Potatoes

What to Serve with Creamy Truffle Mashed Potatoes

This dish practically begs for a seat next to cozy mains. Think roasted, seared, or slow-cooked things. It holds its own but isn’t looking to steal the show (unless it does).

  • For a comforting weeknight dinner, try these mashed potatoes with something simple like this easy chicken korma. That spiced sauce with the creamy potato base? Yes, please.

  • These would also be stunning next to pan seared salmon with a little fruity sauce action. Earthy truffle and rich, flakey fish is a combo no one warned me about, and I’m kind of obsessed.

  • They’re best friends with roast beef, lamb chops, or braised short ribs. Anything juicy and slow-cooked just sinks into the mash like a warm blanket.

  • I once had mashed potatoes with a crispy breaded pasta (cough looking at you, fried lasagna) and the crunch of one with the creaminess of the other? Weirdly amazing.

  • Or hey, go cozy-vegetarian and top them with garlicky sautéed mushrooms or some tender greens like rainbow chard. Speaking of which, this pan seared cod with rainbow chard would go beautifully with a soft potato sidekick.

Creamy Truffle Mashed Potatoes

Frequently Asked Questions

Can I make these truffle mashed potatoes ahead of time?

Absolutely, and honestly, the flavor deepens a bit as it sits. Just store them in the fridge and reheat gently with a splash of milk or cream. If you’re feeling feisty, stir in an extra dab of butter when warming up because why not?

Is truffle oil really necessary?

If you’re going for that signature earthy aroma, yes—that’s kind of the point here. But in a pinch, you can skip it and use roasted garlic or Parmesan for extra depth. It won’t be *truffle* mashed potatoes anymore, but they’ll still be fabulous.

What’s the best kind of potato for this recipe?

Yukon Golds get my first vote. They’re naturally buttery and mash into a luscious texture. Russets are also legit—they’re fluffier and soak up all the butter and cream like champs. If you mix the two, even better.

Can I freeze leftover truffle mashed potatoes?

You can, just know the texture may go a little haywire after thawing. Freeze flat in bags or in small containers. Reheat with care and add some extra cream or butter to bring back that creamy magic. Truffle does fade a bit, so consider freshening it up with another splash of oil.

Creamy Truffle Mashed Potatoes

Creamy Truffle Mashed Potatoes

Prep Time 10 minutes
Cook Time 25 minutes
Total Time 35 minutes
Creamy, rich, and just a little bit fancy, these truffle mashed potatoes are made with Yukon Golds, butter, cream, and a healthy drizzle of truffle oil. Smooth but never gluey and topped with chives (and shaved truffle, if you like), this is an easy but elegant side dish that feels ultra-special—and is secretly simple enough for a weeknight.
6 servings

Ingredients

  • 3 lbs (1.35 kg) Yukon Gold or Russet potatoes peeled and cut into chunks
  • 1/2 cup (120 ml) heavy cream or whole milk
  • 1/2 cup (115 g) unsalted butter cubed
  • 1/3 cup (25 g) grated Parmesan cheese optional
  • 2 tsp (10 ml) truffle oil or truffle zest more or less to taste
  • kosher salt to taste
  • freshly ground black pepper to taste

Optional Garnishes

  • 2 tbsp (6 g) chopped chives
  • shaved truffle if available

Equipment

  • Large pot
  • Potato Masher or Ricer
  • Small Saucepan

Instructions
 

  1. Place the peeled and cubed potatoes in a large pot and cover with cold water. Add a generous pinch of salt. Bring to a boil, reduce to a simmer, and cook for 15–20 minutes until potatoes are fork tender but not falling apart.
  2. Drain potatoes well and return them to the still-hot (but now empty) pot. Let them sit uncovered for 2–3 minutes to allow excess steam to escape.
  3. While potatoes are boiling, combine cream (or milk) and butter in a small saucepan over low heat. Warm until butter is melted; do not boil.
  4. Mash the hot potatoes using a potato masher or ricer until smooth (or to your preferred texture).
  5. Slowly pour the warm butter-cream mixture into the mashed potatoes, stirring as you go, until the potatoes reach your desired consistency.
  6. If using, fold in the grated Parmesan until melted and combined.
  7. Add truffle oil or truffle zest, starting with 1 teaspoon, and add more to taste. Season well with salt and black pepper. Mix gently to combine.
  8. Transfer to a serving dish and garnish with chopped chives and shaved truffle if desired. Serve hot.

Notes

For the creamiest potatoes, don’t skip letting them dry out briefly after draining. Go slow with the truffle oil—it's powerful! Mash and mix as little as possible to avoid gummy potatoes. Leftovers keep well in the fridge 3–4 days (reheat gently with a splash of milk). See recipe post for freezing tips and variations.

Nutrition

Calories: 300kcal | Carbohydrates: 35g | Protein: 5g | Fat: 17g | Saturated Fat: 10g | Cholesterol: 45mg | Sodium: 335mg | Potassium: 900mg | Fiber: 3g | Sugar: 2g | Vitamin A: 600IU | Vitamin C: 20mg | Calcium: 90mg | Iron: 1.7mg

Red velvet cake meets creamy frosting and green candy coating in these whimsical grinch cake pops—with cream cheese, powdered sugar, and candy hearts.

These little guys are part dessert, part edible art project, and 100% trouble to keep around once the coating sets. The red velvet interior is lush and cocoa-kissed, balanced with a tang from the cream cheese. Once you dip them in a pool of melty green goodness and pop on a tiny red heart? That’s it. You’ve gone full Grinch—but in the fun, “I made festive cake pops” way. They’re great for gifting or displaying on a holiday dessert table… assuming you don’t accidentally “sample” five before guests arrive. No judgment.

Table of Contents

Grinch Cake Pops Recipe

Why You’ll Love this Grinch Cake Pops Recipe

These don’t just look cute—they actually taste like something you’d want a second (or seventh) of. No dry cake middles or waxy tasting coatings here.

  • Ridiculously simple to make: You just squish, smear, melt, and drizzle (basically, childhood crafts with sugar).
  • Almost too charming to eat: The candy heart gives “Grinch with a soul”; it’s strangely heartwarming.
  • Perfect for parties or cookie swaps: They hold up well, don’t need utensils, and disappear faster than you’d expect.
  • Customizable and forgiving: You can tweak the decoration, cake flavor, or even the sticks if you’re improv-loving.
  • Freezer friendly (hello, prep-ahead!): Make them in batches, then dip and decorate when you’re ready to shine.
  • Sweet but balanced: The tangy cream cheese keeps the red velvet from going sugar overload mode.

Grinch Cake Pops Recipe

Ingredient Notes

This one doesn’t ask for anything too wild, but here’s the scoop on what gives these cake pops their cheerful bite and look.

  • Red velvet cake mix: Besides tasting great and looking scandalously pretty, it plays nicely with the green coating.
  • Cream cheese: Adds a velvety richness with a tang that pulls everything back from “too sweet.”
  • Powdered sugar: It sweetens the frosting, but also helps it set up into a sticky, mashable glue for cake crumb binding.
  • Pinch of salt: Just enough to heighten the taste—don’t skip it, even though it looks tiny and harmless.
  • Light green candy melts: The key to that cartoon Grinch hue; Wilton’s vibrant green works well, but if it’s too neon, blend with white.
  • Vegetable shortening: Helps smooth and thin the candy melts without making them too runny (and no seizing, thank you).
  • Cake pop sticks: Look for the 6-inch ones if you want that classic height—not the boba straws we all accidentally buy once.
  • Red candy hearts: You can often find them in Valentine’s Day sprinkle mixes, or use red M&Ms in a pinch.

Grinch Cake Pops Recipe

How To Make This Grinch Cake Pops Recipe

Alright, so let’s dive in. The process is super doable, I promise—you’ll just need a little patience and a willingness to get your hands slightly messy.

  • Bake the cake as instructed: Start by getting that red velvet cake baked and cooled. Let it cool completely before moving on, or your frosting might try to bolt when it meets warm crumbs.

  • Mix the frosting base: In a medium bowl, beat together cream cheese, powdered sugar, and a teeny pinch of salt. You want this smooth and spreadable like fluffy spackle (appetizing comparison, I know).

  • Crumble and mash: Crumble the cooled cake into fine crumbs. Add a scoop of frosting and fold it in gently using a spatula. Keep adding frosting a little at a time until the mixture holds together like playdough. If it’s too dry, more frosting; too wet, more crumbs. You get the picture.

  • Shape into balls: Scoop out tablespoon-sized portions, give them a good roll between your palms until smooth, then set them on a parchment-lined baking sheet.

  • Chill them down: Pop the whole tray into the freezer for 10 minutes, or chill in the fridge for 30. This helps them stay firm enough to stick onto the pops without flailing.

  • Melt the candy coating: Use short bursts in the microwave and stir between rounds. Once fully melted, stir in that teaspoon of shortening. It really helps with that silky dip later.

  • Prep the sticks: Dip the tip of each cake pop stick into your green coating, then insert it halfway into a chilled cake ball. That layer of candy helps “glue” the stick inside.

  • Set the sticks in place: Stick them all back in the freezer for another 10 to 15, just to set that stick so no cakeballs slide off mid-dip (tragic).

  • Dip ’em: Pour your candy melts into a tall glass or deep mug. Dip each pop straight down into the coating, then lift and gently tap off the excess by lightly knocking the stick on the rim. Let it drip down nicely.

  • Decorate and chill: While the candy coating is still wet, press on a red candy heart. Alternatively, wait until dry and drizzle some extra green stripes on with a piping bag if you’re feeling extra.

Grinch Cake Pops Recipe

Storage Options

Ok, let’s talk storage because I know what happens. You make 20 cake pops “for Friday’s party,” and by Thursday night, four are mysteriously gone. So saving a few extras is critical.

In the fridge, cake pops hold up like champs for about 4 to 5 days. Keep them in an airtight container so the coating doesn’t get weird (no breezy fridge air, please). I usually layer mine with parchment if stacking them.

Yes, you can freeze them! Just be sure to freeze before decorating if possible, or wrap them carefully to avoid condensation when defrosting. Once dipped, they’ll still freeze fine, but I recommend unwrapping them right before thawing to avoid splotchy coating.

Let frozen pops sit out at room temp for a good 30 minutes before eating again. Microwaving is a no-go—it’ll zap your hard candy shell into puddle territory.

Variations and Substitutions

This base recipe is pretty flexible. Once you do it once or twice, you’ll probably start dreaming up your own Frankenstein pops (in a good way). Here are a few ideas:

  • Use a different cake flavor: Chocolate or spice cake both work beautifully and pair well with cream cheese frosting too.

  • Try vanilla candy melts instead of green: Dip in white, then pipe green lines, and go full abstract Grinch if the light green melts are elusive.

  • Swap the cream cheese frosting: Not a fan of tangy? Use store-bought vanilla or buttercream for a sweeter punch.

  • Make them mini-sized: Use a small cookie scoop and go for half-tablespoon balls—a little trickier to dip, but highly poppable.

  • Use heart sprinkles or red M&Ms: If you can’t find candy hearts, just grab something heart-ish or red from your sprinkle stash.

  • Skip the pops entirely: No shame. Just form balls and chill. Dip them in the coating, then call them truffles and nobody will ask questions.

Grinch Cake Pops Recipe

What to Serve with Grinch Cake Pops

These cake pops are sweet, festive, and bite-sized, which means they play well with other treats or even savory nibbles, depending on the crowd.

  • If you’re balancing it out with something savory, a plate of copycat Chick-fil-A nuggets on the table always draws a crowd. It’s a nice protein pop between sugar highs.

  • For a full treat table, pair these with homemade cookies, dipped pretzels, or anything peppermint. Bonus points if you’ve got a cocoa bar. The red and green theme? On point.

  • Hosting a grown-up get-together? A platter of these next to something a little unexpected (like pan seared salmon with pomegranate reduction) makes for a weirdly delightful mix of fancy and fun.

  • For kid-heavy parties, just add popcorn, marshmallows, and juice boxes. These pops are already their own entertainment.

Grinch Cake Pops Recipe

Frequently Asked Questions

Why are my cake pops falling off the stick?

This usually means the cake balls were too warm or too moist, or the stick wasn’t properly sealed in. Make sure you chill the cake balls thoroughly before inserting the stick, and dip the tip of the stick in candy coating first to act as edible glue. If things are slipping mid-dip, pop everything back in the freezer for 10 minutes and try again.

How do I get the candy coating super smooth?

The secret weapon here is a little vegetable shortening. It thins out the melts without breaking the consistency. Also, use a tall, narrow glass for dipping instead of a bowl so you can fully submerge the cake pop in one swift movement without having to swirl it around too much.

Can I make these ahead of time?

Yes, absolutely. You can make, shape, and freeze the cake balls up to a month in advance. Just keep them in an airtight container between layers of parchment. You can dip and decorate a day or two ahead as well—just keep them cool and far away from heat/humidity to preserve the coating’s snap and texture.

What if I don’t have candy melts?

You can melt white chocolate and dye it with food coloring, though be sure to use oil-based coloring to avoid seizing the chocolate. Almond bark is another good substitute. Just note: these alternatives can be fussier when it comes to texture, so go slow and add a bit of shortening if it starts thickening too much.

Grinch Cake Pops Recipe

Grinch Cake Pops

Prep Time 35 minutes
Cook Time 25 minutes
Chill Time 20 minutes
Total Time 1 hour 30 minutes
Lush red velvet cake, tangy cream cheese frosting, and a playful green candy coating team up in these whimsical Grinch cake pops. Finished with a cute candy heart, they're almost too charming to eat—almost. Perfect for parties, gifting, or devouring solo.
20 cake pops

Ingredients

Cake

  • 1 box red velvet cake mix plus ingredients per box instructions (usually eggs, oil, water)

Frosting

  • 4 oz (113 g) cream cheese softened
  • 1 cup (120 g) powdered sugar
  • 1 pinch salt

Coating and Assembly

  • 12 oz (340 g) light green candy melts Wilton or similar; blend with white melts if needed for preferred shade
  • 1 tsp (5 ml) vegetable shortening
  • 20 cake pop sticks 6-inch recommended
  • 20 red candy hearts or red M&Ms or heart sprinkles

Equipment

  • Baking pan
  • Mixing bowls
  • Hand mixer or stand mixer
  • Parchment paper
  • Microwave-safe bowl
  • Cake pop sticks
  • Tall glass or mug

Instructions
 

  1. Bake the red velvet cake as instructed on the box. Let it cool completely.
  2. In a bowl, beat together cream cheese, powdered sugar, and salt until smooth and spreadable.
  3. Crumble the cooled red velvet cake into fine crumbs in a large bowl.
  4. Add frosting a scoop at a time and fold gently. Keep adding until the mixture holds together like playdough (not too wet, not too dry).
  5. Scoop out tablespoon-sized portions and roll into smooth balls. Place on a parchment-lined baking sheet.
  6. Chill cake balls in the freezer for 10 minutes (or fridge for 30) to firm up.
  7. Melt the green candy melts in a microwave-safe bowl in short bursts, stirring in between. Once melted, stir in the vegetable shortening until smooth.
  8. Dip the tip of each cake pop stick into the melted candy coating and then insert it halfway into a chilled cake ball. Repeat with all balls.
  9. Freeze the newly-stuck pops for another 10-15 minutes to set the stick.
  10. Pour melted candy melts into a tall glass or deep mug. Dip each cake pop straight down, then lift and tap gently on the rim to remove excess coating.
  11. While the coating is still wet, gently press on a red candy heart. For extra flair, drizzle green stripes with remaining melts once set.
  12. Let pops stand upright (in a styrofoam block or mug) until the coating is fully set. Store in an airtight container in the fridge.

Notes

If you can't find candy hearts, substitute with red M&Ms or any red sprinkle. Use vanilla or buttercream if you don’t like cream cheese. For neat dipping, use a tall, narrow glass for coating. Cake pops can be frozen before or after dipping—just thaw before serving!

Nutrition

Calories: 160kcal | Carbohydrates: 25g | Protein: 2g | Fat: 6g | Saturated Fat: 3g | Cholesterol: 15mg | Sodium: 120mg | Potassium: 45mg | Sugar: 16g | Vitamin A: 110IU | Calcium: 25mg | Iron: 0.6mg

Let's Get Cooking!

100+ Recipes for Busy Nights

In a time crunch? Take a look around and browse plenty of recipes to help you get dinner ready and on the table on those busy nights!

Sweet Recipes

Pumpkin Banana Muffins

Pumpkin Banana Muffins Recipe

Strawberry Pie Bars

Strawberry Pie Bars Easy Oven Recipe

White Chocolate Raspberry Muffins

White Chocolate Raspberry Muffins Recipe

Snickerdoodle Muffins

Snickerdoodle Muffins Recipe for Oven

PIN NOW

Follow KitchenetteBlog on Pinterest

Love cozy recipes that actually make it to the table? On Pinterest, I share new comfort-food ideas every week—desserts, dinners, and those little snack cravings that hit at midnight. Come pin with me and never run out of kitchen inspo.

Savory Recipes

Turkey Tetrazzini

Turkey Tetrazzini Baked Pasta Recipe

Grilled Chicken Panini Sandwich

Grilled Chicken Panini Sandwich Recipe

Sweet Potato Cornbread

Sweet Potato Cornbread Recipe Oven Baked

Classic Waldorf Salad

Waldorf Salad Simple Classic Recipe

Get 5 Recipes to Simplify Your Life!

Delicious, versatile recipes you can make over and over.