Get 5 recipes to simplify your life:

easy, delicious, real food recipes

Latest Recipes

Classic wedge salad gets a creamy, smoky upgrade with crisp bacon, tangy blue cheese crumbles, and chilled iceberg lettuce drizzled in homemade dressing.

A wedge salad feels like the kind of dish you order at a steakhouse when you’re feeling fancy but still want to keep a crunch. It’s bright, cold, creamy, and a little dramatic—with that towering iceberg wedge posing like it knows it’s the center of attention. This version is all about big texture and easy confidence. Savory bacon, juicy tomatoes, and that cool, rich dressing come together in each satisfying bite.

Sometimes I like making it for a lunch that feels like a treat without much work. Other times it’s the perfect sidekick for grilled meats or a bold soup. However you serve it, one thing’s for sure: it doesn’t nibble politely. It crunches, it drips, and it knows it.

Table of Contents

Classic Wedge Salad

Why You’ll Love this Classic Wedge Salad

There’s something so satisfying about assembling this salad. No stress, no fire hazards. Just cold, crispy, creamy goodness.

  • Ridiculously simple to make: Whip up the dressing, sizzle some bacon, and voilà, you’re halfway there.
  • Big on crunch and contrast: That crisp iceberg meets creamy dressing, salty bacon, and juicy tomato in every forkful.
  • Make-ahead friendly: The dressing gets better as it chills, and the components can hang out in the fridge until showtime.
  • Looks super chic on a plate: So sculptural and retro-cool, you barely need a garnish (but we’re still adding chives, of course).
  • Customizable for picky eaters: Not into blue cheese? We can fix that. Prefer less onion? Easy. It plays nice with alterations.
  • Perfect starter or side: It’s sturdy enough to stand up next to a steak or sneak into party platters looking smug.

Classic Wedge Salad

Ingredient Notes

Just a few fridge staples and Boom! We’ve got ourselves a restaurant-worthy situation.

  • Sour cream: Adds that rich, tangy backbone to the dressing. Don’t skip it, unless you’re subbing in whole-milk Greek yogurt.
  • Mayonnaise: It rounds out the creaminess and gives the dressing body. Honestly, it’s what makes the texture dreamy.
  • Buttermilk: Thins it out just slightly while adding a pleasant twang. No buttermilk? Mix regular milk with a splash of lemon juice or vinegar.
  • Red wine vinegar: Gives a sharp edge that wakes up the dressing. You want a touch of tang in every bite.
  • Worcestershire sauce: Hard to spell, easy to love. It adds that subtle savory what is that? depth.
  • Garlic powder: Just enough to suggest garlic without punching you in the tongue.
  • Salt and freshly ground black pepper: Adjust to taste, but don’t be shy—cold dishes appreciate well-seasoned components.
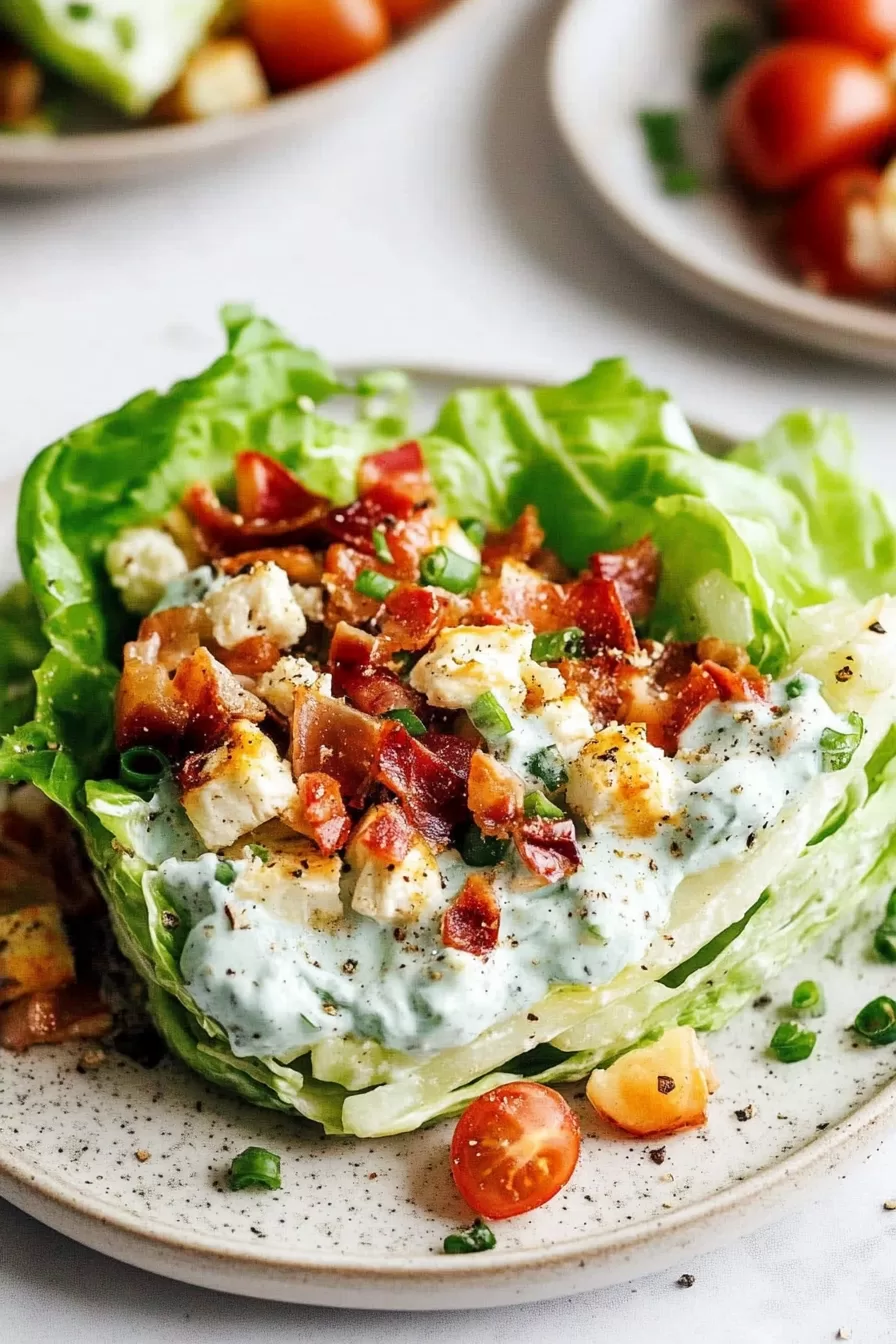
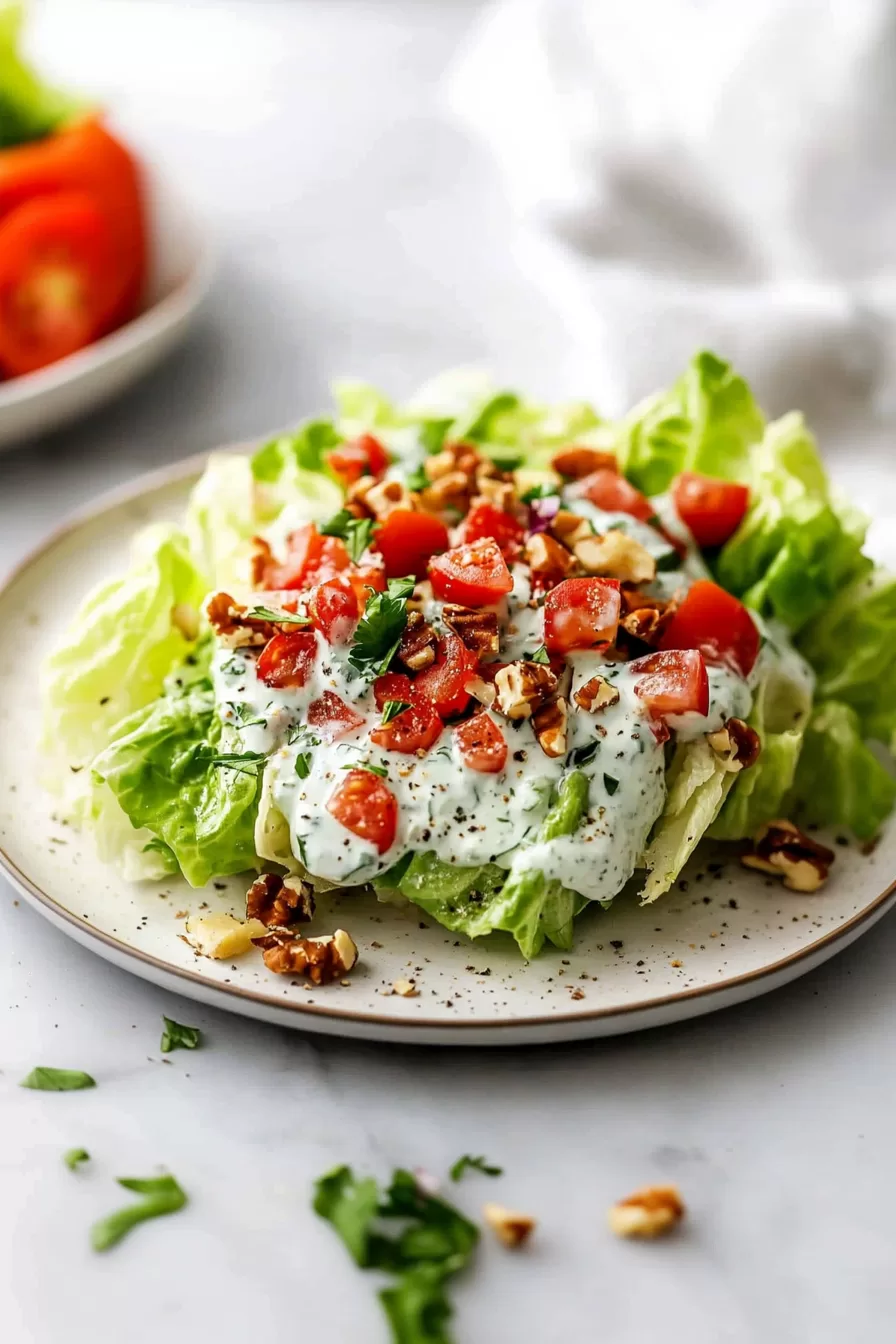
  • Blue cheese (crumbled): Rich, funky, unapologetically bold. If you’re feeling adventurous, try gorgonzola.
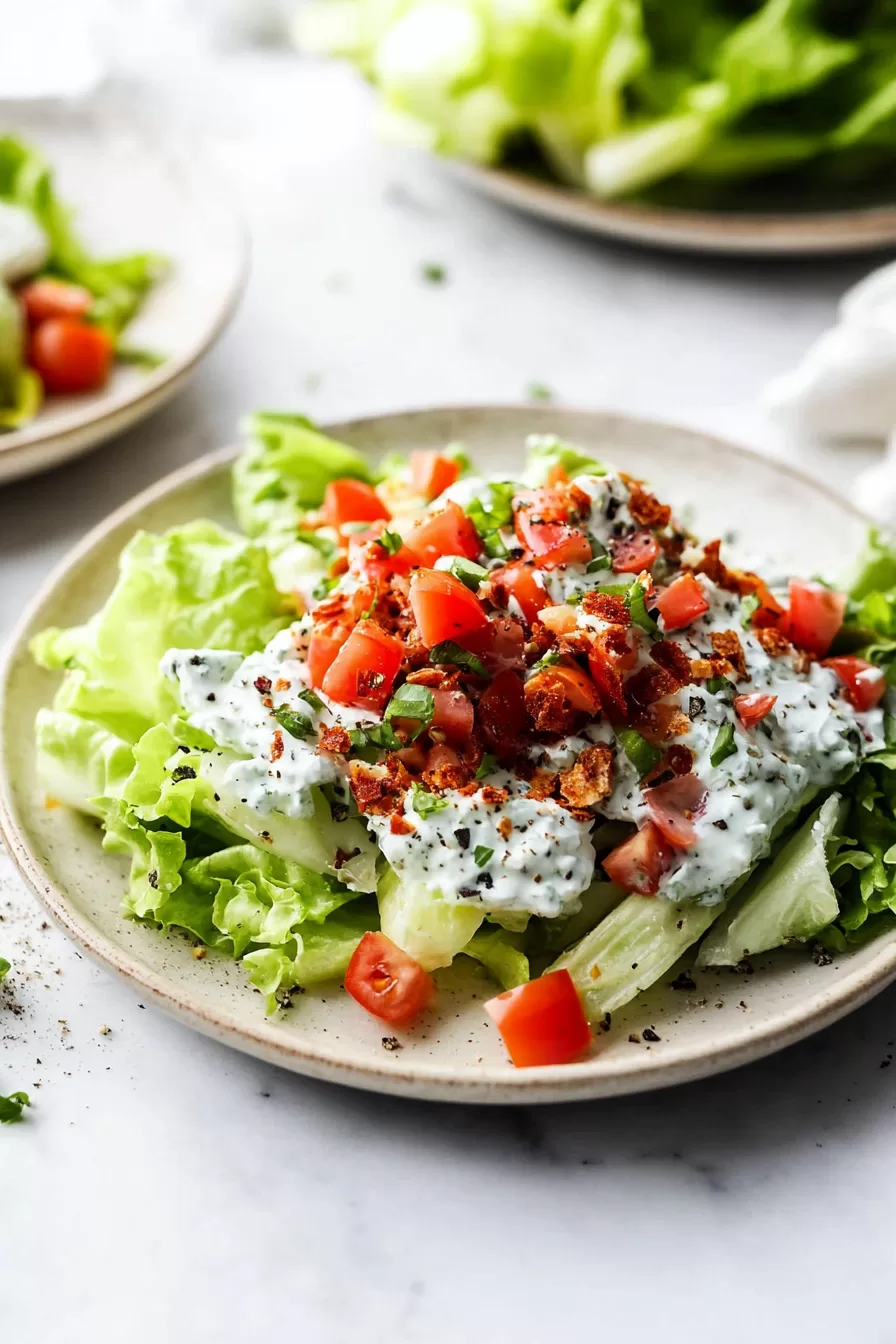
  • Bacon: Crispy, smoky, salty… do you even need convincing?
  • Iceberg lettuce: The classic. Its cool crunch gives serious retro vibes and holds up to all that creamy goo (in a good way).
  • Cherry tomatoes: Sweet little pops of color and juiciness.
  • Red onion: Brings some bite. Slice it thin so it doesn’t steal the scene.
  • Fresh chives: A delicate oniony finish. Also makes the whole thing look unintentionally fancy.

Classic Wedge Salad

How To Make This Classic Wedge Salad

You won’t need any special gadgets or elaborate timing here. It’s all built on simple steps and cozy flavors coming together in satisfying layers.

  • Make the dressing: Grab a medium bowl and whisk together the sour cream, mayonnaise, buttermilk, vinegar, Worcestershire, garlic powder, salt, and pepper until it’s gloriously smooth. Add the blue cheese crumbles and gently fold them in. Then let it nap in the fridge for at least 30 minutes so the flavors get to know each other.

  • Fry the bacon: Lay your bacon slices flat in a cold skillet—resist the urge to crowd. Turn the heat on and let it do its crispy magic. Once it’s golden and shatter-y (yup, that’s a word now), transfer to paper towels to drain.

  • Prep the lettuce: Hack off any wilted outer leaves from the iceberg. Cut it in half, then each half into quarters. Leaving the core in helps keep things together, so don’t be too quick with the knife. Rinse the wedges gently under cold water, letting it flow through the leaves like a tiny vegetable waterfall. Drain them upside down on paper towels while you get your plating act together.

  • Assemble the salad: Place each wedge on a plate like a little iceberg throne. Crumble that bacon and scatter it on top. Follow with cherry tomatoes and thinly sliced red onion. Then (my favorite part) generously ladle that dreamy chilled dressing over the top.

  • Finish with flair: Sprinkle with more blue cheese and those chopped chives. Take a step back and admire your masterpiece. Then dive in before the bacon gets any ideas about disappearing.

Classic Wedge Salad

Storage Options

Alright, so let’s talk about the reality of leftovers.

You can make the dressing ahead and stash it in the fridge for up to 5 days. Use a tightly sealed jar or container to keep it happy. In fact, I suspect it gets better by day two—it’s like all the ingredients decide to stop competing and start collaborating.

Bacon? Crisp it up ahead of time and store it in an airtight container in the fridge. Reheat briefly in a pan or microwave before serving, or just accept its less-crispy-but-still-delicious fate.

Now lettuce… sigh. Iceberg doesn’t do great once dressed. If you’ve already assembled the whole wedge salad and it’s been sitting for a while, the texture might give up on life a bit. Best to only dress what you’ll eat right away.

As for freezing this salad? That’s a solid nope. The lettuce goes all weird and watery, the dairy in the dressing separates, and it’s just not the vibe. Stick to chilling, not freezing.

Variations and Substitutions

There’s no law that says your wedge salad has to follow the traditional script. Let’s bend the rules a bit, shall we?

  • Different cheese: Not into blue cheese? Try crumbled feta or shaved parmesan for a mellower, salt-forward punch.

  • Non-pork bacon: Turkey bacon, pancetta, or even crispy prosciutto chips (yum) can swap in if you don’t do pork.

  • Lettuce alternative: Romaine hearts can work in a pinch if iceberg’s out of stock. You’ll miss some of that classic crunch, but romaine still stands up to the dressing.

  • Spice it up: Add a teeny splash of hot sauce to the dressing or sprinkle on chili flakes for a gentle heat kick.

  • Add avocado: For some silky richness that glides right in with the crunch factor. Plus, hello, bonus nutrients.

  • Go herby: Mix in fresh dill or parsley with the chives if your garden’s feeling generous (or your herb drawer’s overflowing).

Classic Wedge Salad

What to Serve with Classic Wedge Salad

This salad is the cool, collected type that happily sidles up to all kinds of mains without stealing the spotlight.

  • A grilled steak or burger practically begs you to make this salad on the side. That crisp-luxe vibe is the ultimate foil for sizzling meat. And yes, eating them together feels like going to a fancy-ish diner without leaving your house.

  • Pan-seared cod with rainbow chard makes a gorgeous, modern dinner when paired with this wedge. Fish + freshness + crunch = a total win.

  • If you’re making soup for dinner, especially something creamy or sweet like Panera-style autumn squash soup, the wedge adds texture and a little savory contrast.

  • For a cozy but playful combo, make this salad alongside chili cornbread casserole. It’s a balance thing: hot and cheesy meets cold and creamy.

  • Serving brunch for friends? Go rogue and add this salad next to a cheesy egg bake or crisp bagel board. Unexpected, but kind of genius.

Classic Wedge Salad

Frequently Asked Questions

Can I make a wedge salad ahead of time?

Sort of! You can prep all the components in advance—the dressing up to a few days early, the bacon crisped and chilled, tomatoes sliced, etc. But don’t assemble it more than an hour or two ahead; the lettuce can get sad and soggy. For best results, store it all separately and build your beautiful plate when it’s time to serve.

What kind of lettuce works best for a wedge salad?

Iceberg, hands down. It’s super crisp, holds its shape well, and gives you that satisfying crunch you want. You can try romaine in a pinch, but it lacks that signature wedgey structure. You want something you can stab with a fork and hear a little crunch when you bite in.

Is there a way to make it lighter or healthier?

Totally, and without sacrificing too much satisfaction. Use light mayo and sub in Greek yogurt for the sour cream if you want to cut down on fat. You can also use a lighter hand with the bacon or go for a plant-based alternative. It’ll be different, but still totally enjoyable.

What can I use instead of blue cheese?

If blue cheese isn’t your thing (totally fair—it’s a polarizing one), feta is a great alternative. It’s tangy but less assertive. Goat cheese adds creaminess if you like a little funk. Or, if you want to skip the cheese entirely, just lean heavier on the chives and bacon for balance.

Classic Wedge Salad

Classic Wedge Salad

Prep Time 20 minutes
Cook Time 10 minutes
Chill Time for Dressing 30 minutes
Total Time 40 minutes
Classic wedge salad gets a creamy, smoky upgrade with crisp bacon, tangy blue cheese crumbles, and chilled iceberg lettuce drizzled in homemade dressing. Crunchy, cool, and awesomely retro, it’s the showstopper side you never knew you needed.
4 salads

Ingredients

Dressing

  • 1/2 cup (120 g) sour cream
  • 1/4 cup (60 g) mayonnaise
  • 1/4 cup (60 ml) buttermilk (or regular milk + splash lemon juice)
  • 1 tbsp (15 ml) red wine vinegar
  • 1 tsp (5 ml) Worcestershire sauce
  • 1/2 tsp (2 g) garlic powder
  • 1/2 tsp (3 g) salt or to taste
  • 1/4 tsp (1 g) freshly ground black pepper or to taste
  • 1/2 cup (60 g) blue cheese crumbled (plus more for topping)

Salad

  • 1 head iceberg lettuce cold and crisp
  • 6 slices bacon cooked crispy, crumbled
  • 1 cup (150 g) cherry tomatoes halved
  • 1/4 small red onion thinly sliced
  • 2 tbsp (6 g) fresh chives finely chopped

Equipment

  • Mixing bowl
  • Whisk
  • Skillet
  • Knife
  • Cutting board

Instructions
 

  1. Make the dressing: In a medium bowl, whisk together the sour cream, mayonnaise, buttermilk, red wine vinegar, Worcestershire sauce, garlic powder, salt, and pepper until smooth. Fold in the blue cheese crumbles. Cover and refrigerate for at least 30 minutes for the flavors to meld.
  2. Fry the bacon: Lay bacon slices in a cold skillet and cook over medium heat until crispy, turning as needed. Transfer to a paper towel-lined plate to drain, then crumble when cooled.
  3. Prep the lettuce: Discard any wilted outer leaves. Cut the iceberg in half, then into quarters (for four wedges), keeping the core intact to hold shape. Rinse wedges gently under cold water, letting water flow between leaves. Drain upside down on paper towels.
  4. Assemble the salad: Place each lettuce wedge on a plate. Top generously with the chilled dressing, then sprinkle bacon, cherry tomatoes, and red onion evenly over the top.
  5. Finish: Garnish with extra blue cheese crumbles and fresh chopped chives. Serve immediately.

Notes

For a lighter version, swap sour cream for Greek yogurt and use light mayo. The dressing can be made up to 5 days ahead. Store salad components separately and assemble only before serving for the best crunch.

Nutrition

Calories: 350kcal | Carbohydrates: 9g | Protein: 10g | Fat: 31g | Saturated Fat: 9g | Cholesterol: 45mg | Sodium: 870mg | Potassium: 325mg | Fiber: 2g | Sugar: 5g | Vitamin A: 1100IU | Vitamin C: 10mg | Calcium: 120mg | Iron: 1mg

Velvety roasted butternut squash meets pumpkin, cozy spices, and a splash of apple cider in this Panera Autumn Squash Soup copycat. Made with squash, onion, carrot, garlic, and cream, it’s pure fall in a bowl.

This is not one of those soups that just lightly whisper “autumn” at you. No, this one practically jumps out of your pot in a chunky sweater holding a hot cider. It smells like cinnamon met a farmer’s market and decided to become best friends. Whether you’re curling up on the couch or sneaking a spoonful straight from the fridge (no judgment), it’s got that sweet-savory comfort vibe that’s always welcome.

Table of Contents

Panera Autumn Squash Soup

Why You’ll Love this Panera Autumn Squash Soup

It’s cozy, golden, and just the right amount of fancy-feeling without being annoying. (No truffle oil, I promise.)

  • Ridiculously simple to make: You sauté, simmer, blend, and swirl in cream. That’s the whole game plan.
  • Naturally sweet and creamy: The butternut squash and apple cider handle the sweetness without any sugar overload.
  • Lovely textures: Silky smooth soup with a little crunch from pumpkin seeds on top? Chef kiss.
  • Highly customizable: Swap the cream for coconut milk or toss in extra ginger if that’s your jam.
  • Tastes like fall smells: Yep, that mix of cinnamon, nutmeg, and roasted squash is basically autumn candle territory.
  • Easily prepped ahead: Stash it in the fridge or freezer and it still tastes like you made it today.

Panera Autumn Squash Soup

Ingredient Notes

A handful of pantry pals plus some fresh veg and boom—you’re in business. Here’s what makes this soup tick:

  • Butternut squash: Sweet, earthy, and the star of the show. Roasting it adds a toasted caramel note that’s so worth it.
  • Olive oil: You’ll use it for roasting and sautéing; keeps everything lush and round.
  • Yellow onion: Adds a mellow savory base. Red onion works in a pinch but can be a bit punchier.
  • Carrot: Brings color and a little extra sweetness without getting fussy.
  • Garlic: Gotta have it for depth. If you’re a garlic head, a fourth clove is fine (I won’t tell).
  • Fresh ginger: Adds a little zing that makes the overall flavor warm and alive.
  • Cinnamon and nutmeg: These are the cozy spice cabinet MVPs. They lean sweet without being overpowering.
  • Curry powder and turmeric: A tiny bit of warmth and golden color magic.
  • Vegetable broth: Choose a good one! Chicken broth works too, if you want something a bit richer.
  • Apple cider: This is not the time for apple juice. Get the cloudy, tangy one for a bright kick.
  • Pumpkin puree: Not pumpkin “pie filling.” Just pure pumpkin for body and flavor.
  • Heavy cream or coconut milk: Cream for classic richness; coconut milk for a dairy-free twist that’s still dreamy.
  • Honey or maple syrup: A drizzle rounds everything out. Taste before adding the whole amount.
  • Salt and pepper: Adjust these at the end based on your broth and tastebuds.
  • Pumpkin seeds (pepitas): Crunchy salty garnish with some visual flair, highly encouraged.

Panera Autumn Squash Soup

How To Make This Panera Autumn Squash Soup

Let’s cook, shall we? It smells good already and we haven’t even turned on the stove.

  • Roast the squash (if you want to): Toss your peeled and cubed butternut squash with some olive oil, salt, and pepper. Roast it at 400°F for about 25–30 minutes. It gets lightly caramelized and sweet. Totally optional, but very tasty.

  • Sauté the aromatics: In a big soup pot or Dutch oven, warm more olive oil over medium heat. Add chopped onion and carrot and sauté until soft and smelling buttery-sweet, about 5–7 minutes. Then stir in garlic, ginger, and your parade of spices. Keep stirring for 1–2 minutes until everything’s toasty and your kitchen smells like you accidentally fell into a spice market.

  • Simmer everything together: Add the roasted squash (or raw if skipping the roasting—which, again, I see you), vegetable broth, and apple cider. Bring it all to a boil, then drop the heat to low and let it simmer gently for 15–20 minutes. The goal is soft squash and a well-mingled broth.

  • Blend it up: Stir in the pumpkin puree once everything’s tender. Then blend! I love an immersion blender because it’s quick and lazy. If you use a regular blender, be careful transferring and vent the lid slightly so it doesn’t go wild.

  • Stir in cream and sweetener: Now’s when the magic happens. Add your cream or coconut milk and one tablespoon of honey or maple syrup. Stir, then taste. Want more sweetness? Add the second tablespoon. More salt? Go for it. This part is entirely up to you.

  • Final simmer and serve: Let it warm on low for about 5 more minutes so everything cozies up. When it’s silky and homogenous, spoon it into bowls and drizzle with an extra swirl of cream. Sprinkle on some crunchy pepitas and pat yourself on the back.

Panera Autumn Squash Soup

Storage Options

Soup leftovers are basically edible gold. This one keeps like a champ.

In the fridge, it’ll last 4–5 days easily. Just pop it into an airtight container once it cools down. If it thickens too much, add a splash of broth or water when you reheat. Microwave or low heat on the stove both work perfectly.

Now, freezer folks—yes, you can absolutely freeze it. Let it cool completely, then portion into freezer-safe containers (leave a little room at the top). It’ll stay tasty for about 2–3 months. Thaw overnight in the fridge or defrost gently on the stove while whispering sweet nothings, your choice.

The only thing I’d skip freezing is if you’ve already added a lot of cream. Dairy can get a bit weird after freezing. If planning ahead, maybe add the cream after thawing.

Variations and Substitutions

Make it your own, soup rebels. This base is forgiving and friendly to swaps.

  • Coconut milk instead of cream: Adds a light tropical vibe and keeps it dairy-free. Use full-fat for richness.

  • Roast the garlic and onion: If you’ve got time (or forgot them on the baking sheet—oops), it adds extra depth and sweetness.

  • Use roasted delicata or acorn squash: Still sweet and earthy, with a slightly nuttier vibe. Just peel as needed.

  • Extra spice heat: Add 1/4 teaspoon cayenne or a small pinch of chili flakes if you want a bit of a kick.

  • Add cooked lentils or white beans: Bulk it up for a more filling entree version. Blend them right in or stir at the end.

  • Maple syrup instead of honey: Totally seasonal and vegan-friendly with a subtle woodsy note.

Panera Autumn Squash Soup

What to Serve with Panera Autumn Squash Soup

This soup loves company. Whether you’re pulling together a full meal or just want something carby for dipping, here’s what plays nicely.

  • A buttery grilled cheese stuffed with sharp cheddar or gruyere is practically begging to be dunked here. The sweetness of the soup loves the saltiness of melted cheese. Fancy it up with sourdough or serve it panini-style if you’re feelin’ extra.

  • Crusty bread drizzled in olive oil makes a perfect sidekick. Bonus points if it’s warm. If you’ve already got some leftover bacon basil cornbread muffins, they make a cozy, smoky companion.

  • A crunchy green salad balances the richness of the soup. Think arugula, dried cranberries, pepitas, and a punchy vinaigrette with a whisper of mustard or maple.

  • If you want a protein to round out dinner, try some pan-seared salmon with pomegranate reduction. That sweet-tart glaze plays beautifully with the warm, spiced soup.

  • For a little surprise finish, I’m just going to leave this here: peanut butter banana ice cream sandwiches. Because soup and dessert are friends.

Panera Autumn Squash Soup

Frequently Asked Questions

Can I make this soup without roasting the squash?

Totally, yes. Roasting the squash gives you that deeper, caramelized flavor, but if you’re short on time (or oven space), just toss the raw squash cubes right into the pot during the simmering stage. They’ll cook through and blend up beautifully. Quick and cozy either way.

Is this Panera Autumn Squash Soup recipe dairy-free?

It can be! If you skip the heavy cream and swap in full-fat coconut milk, you’ll still get that dreamy, velvety texture without any dairy. And honestly, the coconut adds a lovely touch. Just make sure your broth and sweetener are dairy-free too.

How do I thicken the soup if it’s too thin?

If your soup feels more sippable than scoopable, no worries. Let it simmer uncovered for 5–10 minutes and it’ll reduce naturally. You can also blend in a bit more pumpkin puree or boiled potato for body. Worst-case scenario: toss in a little instant mashed potato. Works like magic, I swear.

Can I use frozen butternut squash in this recipe?

Yep, absolutely. Frozen pre-cut squash is a lifesaver when you’re not up for battling a whole gourd. Just toss it into the pot as-is. No need to thaw unless you plan on roasting it first. Texture might be a smidge softer, but truly, it still tastes fantastic.

Panera Autumn Squash Soup

Panera Autumn Squash Soup (Copycat)

Prep Time 20 minutes
Cook Time 35 minutes
Total Time 55 minutes
Velvety roasted butternut squash meets pumpkin, cozy spices, and a splash of apple cider in this Panera Autumn Squash Soup copycat, made with squash, carrot, onion, garlic, and cream. Pure fall in a bowl!
6 bowls

Ingredients

Soup Base

  • 1 large (1100 g) butternut squash peeled, seeded, and cubed (about 2.5–3 lbs or 6 cups cubed)
  • 3 tbsp (45 ml) olive oil divided, for roasting and sautéing
  • 1 medium (150 g) yellow onion chopped
  • 2 (120 g) carrots peeled and chopped
  • 3 cloves garlic minced (or 4 if extra garlicky)
  • 1 tbsp (15 g) fresh ginger peeled and minced (or 1 tsp ground ginger)

Spices

  • 1 tsp ground cinnamon
  • 1/4 tsp (0.25 tsp) ground nutmeg
  • 1/2 tsp (0.5 tsp) curry powder
  • 1/2 tsp (0.5 tsp) ground turmeric

Liquids & More

  • 3 cups (710 ml) vegetable broth or chicken broth, low sodium preferred
  • 1/2 cup (120 ml) apple cider cloudy, not apple juice
  • 1 cup (230 g) pumpkin puree not pumpkin pie filling
  • 3/4 cup (180 ml) heavy cream or full-fat coconut milk plus more for drizzling, see notes
  • 1-2 tbsp (15-30 ml) honey or maple syrup to taste

Seasonings & Garnish

  • 1 tsp salt to taste
  • 1/2 tsp (0.5 tsp) black pepper to taste
  • pumpkin seeds (pepitas) for garnish

Equipment

  • Baking sheet
  • Large Dutch Oven or Soup Pot
  • Immersion Blender or Regular Blender
  • Knife and cutting board

Instructions
 

  1. Roast the squash (optional, but recommended): Preheat the oven to 400°F (200°C). Toss the cubed butternut squash with 1 tablespoon olive oil, salt, and pepper. Spread on a baking sheet and roast for 25–30 minutes, stirring halfway, until tender and lightly browned. Set aside.
  2. Sauté the aromatics: In a large pot or Dutch oven, heat remaining olive oil over medium heat. Add chopped onion and carrot. Sauté until softened and partly translucent, about 5–7 minutes. Stir in minced garlic, ginger, cinnamon, nutmeg, curry powder, and turmeric. Cook, stirring, for 1–2 minutes until fragrant.
  3. Simmer the soup: Add roasted (or raw) squash, vegetable broth, and apple cider. Bring to a boil, then reduce heat and simmer uncovered for 15–20 minutes or until all vegetables are very soft.
  4. Blend until smooth: Stir in pumpkin puree. Use an immersion blender to blend the soup directly in the pot until silky smooth, or very carefully transfer to a blender in batches.
  5. Add cream and sweetener: Stir in heavy cream or coconut milk and 1 tablespoon honey or maple syrup. Taste and add a second tablespoon of sweetener if you like. Season with more salt and black pepper as needed.
  6. Final simmer and serve: Simmer on low 5 more minutes until hot and homogenous. Ladle into bowls. Drizzle with extra cream and sprinkle with pumpkin seeds. Enjoy!

Notes

For a dairy-free version, use full-fat coconut milk instead of cream. Roasting the squash adds extra flavor and depth, but if short on time, add the raw squash directly to the simmering soup. Soup can be made ahead and stored in the refrigerator for 4–5 days or frozen up to 3 months (add cream after thawing for best texture). Adjust spices and sweetness to taste, and see the blog post for plenty of substitute ideas!

Nutrition

Calories: 240kcal | Carbohydrates: 37g | Protein: 3g | Fat: 10g | Saturated Fat: 5g | Cholesterol: 25mg | Sodium: 700mg | Potassium: 900mg | Fiber: 5g | Sugar: 11g | Vitamin A: 15500IU | Vitamin C: 38mg | Calcium: 100mg | Iron: 2.4mg

Warm chili spices, melty beefy goodness, and a fluffy golden blanket of cornbread—this chili cornbread casserole brings together hearty ground beef, tender beans, diced tomatoes, and a buttery, oven-baked top crust. It smells like cozy meals and tastes like staying in on purpose.

This isn’t a dish that begs for attention—it just quietly delivers. It’s the one-skillet superhero that shows up on a drizzly evening, or when you’ve got exactly 43 minutes to pull together something comforting without emptying the spice cabinet. The chili underneath is rich and tomatoey, balanced with just enough heat (hi there, jalapeño), and the cornbread layer? Lightly sweet, perfectly tender, just enough crunch along the edges. I mean, is there anything more satisfying than breaching a golden crust with a spoon and finding chili waiting beneath?

Table of Contents

Chili Cornbread Casserole

Why You’ll Love this Chili Cornbread Casserole

You don’t need to reinvent dinner to make it interesting. Sometimes, you just need chili topped with cornbread and baked until it smells like heaven.

  • Ridiculously simple to make: You sauté stuff, stir in some cans, whip up a quick batter, then just chuck it in the oven.

  • Comfort food synergy: The bottom’s all saucy, hearty chili, the top’s fluffy, golden cornbread. Each spoonful practically hugs you.

  • Customizable to your heart’s content: Want it spicy, meaty, veggie-packed, or cheesy? Yep, go wild.

  • One skillet, no stress: Less cleanup means more time for, well, eating and skipping the dishes (or bribing someone else to rinse them).

  • Great for feeding people (or feeding yourself over 3 cozy days): Leftovers reheat beautifully.

  • Perfect excuse to use up pantry stuff: Everything from beans to corn to random tomato things.

Chili Cornbread Casserole

Ingredient Notes

All the flavor, none of the weird fuss. Here’s the lowdown on what you’re actually tossing into that skillet.

  • Ground beef: Brings the hearty, meaty backbone. You could swap in ground turkey or plant-based crumbles if you’re feeling it.

  • Onion + bell pepper + jalapeño: These build out the chili’s savory base. Use whatever color bell pepper you’ve got. If you’re spice-sensitive, ditch the jalapeño or just use half.

  • Garlic + spices (chili powder, cumin, smoked paprika): The dream team. The smoked paprika takes you straight into campfire territory, minus the ash.

  • Tomato sauce + diced tomatoes: These give you the tang and sauciness. Fire-roasted tomatoes? Even better.

  • Beans (kidney + black): For texture and oomph. If you only have one kind, don’t overthink it.

  • Corn: A little burst of sweetness that pops against the warm savory spices.

  • Cornmeal + flour combo: Makes a cornbread that’s soft and tender, not gritty. It rises like a dream, thanks to the leaveners.

  • Buttermilk: Adds tang and keeps your cornbread from being dry and sad. No buttermilk? A splash of vinegar in milk saves the day.

  • Eggs + melted butter: Bind and enrich the batter. Also, butter flavor forever.

  • Sugar (optional): Controversial, I know. Use it if you like a barely-sweet top. Skip it if that’s a bridge too dessert-y.

Chili Cornbread Casserole

How To Make This Chili Cornbread Casserole

Alright, apron on, spoon in hand. Here’s how this all comes together with minimal dish juggling.

  • Preheat that oven to 375°F: I know it’s obvious, but let’s not forget. You need it hot and ready before the skillet gets real.

  • Start the chili base: Grab a big oven-safe skillet (a 12-inch cast iron works wonders). Warm your olive oil, toss in the ground beef, onions, bell pepper, and jalapeño if you’re using it. Cook until the beef loses all pink and the veg gets soft. Break it up with a spoon as you go—it’s oddly satisfying.

  • Add flavor town’s finest: Stir in garlic, chili powder, cumin, paprika, salt, and pepper. Give it about a minute to bloom—your kitchen will smell ridiculously good.

  • Tomatoes, beans, corn, go!: Pour in that tomato sauce, the diced tomatoes (juice and all), both beans, and the corn. Mix it up, let it simmer for 10 to 15 minutes so everything gets nice and cozy. Then, take it off the heat.

  • Mix the cornbread batter: While your chili simmers, whisk the cornmeal, flour, baking powder, baking soda, salt, and sugar (if using). In a second bowl, mix the buttermilk, eggs, and melted butter. Pour the wet into dry and stir gently until just combined. Don’t overmix.

  • Assemble and bake: Spoon the cornmeal batter gently over the chili. It won’t be perfect, and that’s perfect. If your skillet isn’t oven-safe, transfer the chili to a 9×13 baking dish first. Then pop it all in the oven.

  • Bake and cool: It takes 25 to 30 minutes until the cornbread is gorgeously golden on top and cooked through. Let it sit for 10 minutes before you dig in (yes, really). That helps the layers settle and avoids tongue lava.

Chili Cornbread Casserole

Storage Options

So, you’ve got leftovers? Perfect. This chili cornbread casserole is one of those magical meals that keeps getting better over the next day or two.

Let the casserole cool completely (don’t skip this or you’ll end up with soggy cornbread). Then cover the skillet or transfer portions into airtight containers. It’ll keep in the fridge for up to 4 days, and honestly, it reheats like a champ. The cornbread gets a little softer, the chili gets deeper flavor—it’s a win-win.

Need to freeze it? Totally doable. I recommend freezing in individually sized portions. Use freezer-safe containers, wrap well, and it’ll hold up for about 2 months. Defrost in the fridge overnight, then reheat in the oven or even microwave if you’re impatient (we’ve all been there).

For reheating, toss it in a 350°F oven for about 15 minutes. Or do the microwave thing, just cover it with a damp paper towel so the cornbread doesn’t dry out and turn into something resembling drywall.

Variations and Substitutions

Think of this base recipe as the cozy flannel shirt of casseroles: reliable, comfy, and ready for accessorizing.

  • No beef, no problem: Swap in ground turkey, chicken, or a plant-based crumble. You can even skip the meat entirely and double up on beans.

  • Add cheese to the topping: A handful of shredded cheddar mixed into the cornbread batter turns it into a melty, cheesy crown. No regrets.

  • Use pepper jack or chipotle instead of jalapeño: For a smoky twist or more bite, play around with spicier ingredients.

  • Skip the sugar in the cornbread: Not into sweet-savory combos? Just leave it out. The cornbread will still be soft and delicious.

  • Try poblano peppers for depth: They’re mild and earthy and make the chili feel just a little more grown-up.

Chili Cornbread Casserole

What to Serve with Chili Cornbread Casserole

Honestly, this is a meal all on its own. But if you’re feeling fancy or feeding more than a couple mouths, these sides work beautifully.

  • A bright, citrusy slaw can bring needed crunch and freshness. Think cabbage, lime juice, and maybe a little cilantro if you’re not one of those “cilantro tastes like soap” people.

  • Need a little green for the table? A quick sautéed veggie like rainbow chard or spinach works wonders. If you’re in the mood for something vibrant, this pan-seared cod with rainbow chard has a great side that could tag nicely alongside.

  • To cool things down (spice-wise), dollop on sour cream and set out avocado slices, extra shredded cheese, or even Greek yogurt if that’s how you roll.

  • Can’t stop the comfort train? Try serving it with this easy homemade honey butter on the side. It tastes absurdly great swiped onto a bite of chili-topped cornbread.

  • And if dessert is happening (it should), balance all that savory with these tiny-but-mighty cannoli bites. They’re crunchy, creamy, and very nibble-friendly.

Chili Cornbread Casserole

Frequently Asked Questions

Can I make this chili cornbread casserole vegetarian?

Absolutely! Just skip the ground beef and either double up on beans or toss in some chopped mushrooms for a meaty bite. The chili part has so much flavor already, you won’t miss the meat one bit. Lentils work too, if you’ve got those handy.

What if I don’t have an oven-safe skillet?

No worries at all. After making the chili part, just pour it into a lightly greased 9×13 baking dish, spoon the cornbread batter on top, and bake as usual. Works exactly the same, and your skillet gets a break.

Can I make this ahead of time?

Yep! You can prep the chili in advance and either refrigerate it overnight or freeze it for longer. Just reheat it lightly before spooning on the cornbread and baking. Assembled the whole dish ahead? Pop it in the fridge and bake within a day—just add a few extra minutes to the bake time from cold.

How do I know when the cornbread is done?

When it’s golden brown on top and a toothpick poked into the center (just the cornbread part) comes out clean, you’re good to go. Try not to overbake—it’ll keep cooking a bit even after it comes out of the oven, so 25–30 minutes is usually perfect.

Chili Cornbread Casserole

Chili Cornbread Casserole

Prep Time 15 minutes
Cook Time 30 minutes
Resting Time 10 minutes
Total Time 55 minutes
Warm chili spices, melty beefy goodness, and a fluffy golden blanket of cornbread—this casserole combines hearty ground beef, tender beans, diced tomatoes, and a buttery, oven-baked crust for the ultimate one-skillet comfort food. With a lightly sweet, perfectly tender cornbread top and rich, tomatoey chili underneath, it’s weeknight magic that gets even better as leftovers.
6 servings

Ingredients

Chili Base

  • 1 lb (450 g) ground beef or ground turkey or plant-based crumble
  • 1 medium onion diced
  • 1 bell pepper any color, diced
  • 1 jalapeño seeded and diced, optional
  • 2 cloves garlic minced
  • 2 tbsp (16 g) chili powder
  • 1 tsp (2 g) ground cumin
  • 1 tsp (2 g) smoked paprika
  • 1 tsp salt plus more to taste
  • 0.5 tsp black pepper
  • 1 can (425 g) tomato sauce 15 oz (425g)
  • 1 can (411 g) diced tomatoes 14.5 oz (411g), with juice
  • 1 can (425 g) kidney beans drained and rinsed
  • 1 can (425 g) black beans drained and rinsed
  • 1 cup (170 g) frozen corn or canned/drained corn
  • 1 tbsp (15 ml) olive oil

Cornbread Topping

  • 1 cup (120 g) fine yellow cornmeal
  • 1 cup (125 g) all-purpose flour
  • 2 tsp (8 g) baking powder
  • 0.5 tsp (3 g) baking soda
  • 0.5 tsp salt
  • 2 tbsp (25 g) sugar optional
  • 1 cup (240 ml) buttermilk see note for substitute
  • 2 large eggs beaten
  • 4 tbsp (56 g) unsalted butter melted and slightly cooled

Equipment

  • 12-inch oven-safe skillet
  • Mixing bowls
  • Whisk
  • Spoon or spatula

Instructions
 

  1. Preheat your oven to 375°F (190°C).
  2. In a large oven-safe skillet (like 12-inch cast iron), heat olive oil over medium heat. Add the ground beef, onion, bell pepper, and jalapeño (if using). Cook until beef is browned and veggies are soft, breaking up meat as it cooks.
  3. Add the garlic, chili powder, cumin, smoked paprika, salt, and pepper. Cook for about 1 minute until fragrant.
  4. Stir in the tomato sauce, diced tomatoes (with juice), kidney beans, black beans, and corn. Simmer everything together for 10–15 minutes, then remove from heat.
  5. In a bowl, whisk together the cornmeal, flour, baking powder, baking soda, salt, and sugar (if using).
  6. In a separate bowl, whisk the buttermilk, eggs, and melted butter. Pour the wet mixture into the dry ingredients and gently stir just until combined—do not overmix.
  7. Spoon the cornbread batter over the simmered chili in the skillet, spreading gently to mostly cover (it’s okay if some chili peeks through).
  8. If your skillet is not oven-safe, transfer chili to a greased 9x13 baking dish, then add cornbread batter on top.
  9. Bake for 25–30 minutes until the cornbread top is deeply golden and a toothpick inserted into the cornbread comes out clean. Cool 10 minutes before serving.

Notes

Ingredient Tips: Use fire-roasted tomatoes for extra flavor. For vegetarian option, skip beef and add extra beans or chopped mushrooms. To make your own buttermilk: combine 1 cup milk with 1 tablespoon lemon juice or vinegar and let sit 5 minutes.
Serving Ideas: Top with sour cream, sliced avocado, chopped cilantro, or shredded cheese. Serve with a fresh slaw or sautéed greens on the side if you like.
Storage: Cool before covering and refrigerating; keeps up to 4 days. Freeze portions for up to 2 months.

Nutrition

Calories: 495kcal | Carbohydrates: 51g | Protein: 27g | Fat: 20g | Saturated Fat: 9g | Cholesterol: 110mg | Sodium: 1170mg | Potassium: 930mg | Fiber: 8g | Sugar: 7g | Vitamin A: 950IU | Vitamin C: 22mg | Calcium: 149mg | Iron: 5mg

Buttery pie crust, creamy ricotta, sweet mascarpone, and mini chocolate chips come together in these cannoli bites. Easy, crisp, and utterly snack-worthy.

Just imagine a cozy afternoon, maybe you’ve brewed a second (okay, third) cup of coffee, and you want something small and sweet—but not “oops I ate the whole cake” sweet. That’s where these bite-sized beauties drift in like dessert angels.

These cannoli bites are kind of like tiny pastry party hats for your mouth. Flaky crust hugs a creamy, lightly sweet center that whispers vanilla and crunches with chocolate chips. They’re basically cannoli, if cannoli wore cocktail dresses and hung out at brunch. Perfect for holidays, casual dinners, or the sort of day when your kitchen becomes your happy place.

Table of Contents

Cannoli Bites

Why You’ll Love this Cannoli Bites Recipe

These aren’t your standard overstuffed pastries, and nobody has to wrestle with bubbling oil. You just bake, mix, and fill. Very hands-on-optional.

  • Ridiculously simple to make: Store-bought crusts mean zero dough drama, plus no frying mess to mop up.
  • Sweet, creamy filling: The mix of ricotta and mascarpone gives that classic tangy-smooth flavor with a luscious texture.
  • Perfectly poppable: Small enough for snacking, pretty enough for parties, and good luck eating just one.
  • Flexible with toppings: Chocolate chips? Lovely. Pistachios? Fancy. Orange zest? Yes, chef. Dress as you wish.
  • Kid and adult approved: They’re allergy-friendly-ish (no nuts unless you add them) and not too sweet—an actual win-win.

Cannoli Bites

Ingredient Notes

Not too many ingredients, and honestly? Most of them might be chilling in your fridge already. Grab these:

  • Refrigerated pie crusts: Seriously, these are our MVPs. No kneading, no fuss. Just unroll, and go. Look for a box with two crusts inside.
  • Light brown sugar: Adds a subtle molasses-y warmth to the crust with just the faintest chewy crunch. You could use dark, but it’ll be bolder.
  • Cinnamon sugar: That cozy fall aroma? This is it. You can make your own mix with 2 parts sugar to 1 part cinnamon if you like.
  • Ricotta cheese: Full-fat, please. Watered-down low-fat versions will make the filling soupy. Drain it well or your cups will weep.
  • Mascarpone cheese: This makes your filling creamy like a dream. It plays nice with ricotta, smoothing out that slightly grainy texture.
  • Powdered sugar: Sweetens things up without giving you gritty vibes. Start with a half cup and taste your way to sweetness glory.
  • Vanilla extract: Just a little boost of classic dessert magic. Pure extract is ideal. None of that “vanillin” business.
  • Mini chocolate chips: Optional, but highly recommended. Tiny bursts of chocolate crunch. Regular chips are too chunky and awkward here.

Cannoli Bites

How To Make This Cannoli Bites Recipe

Okay, apron on (or pajama pants, you do you). Let’s walk through it—no pastry degree required.

  • Preheat the oven to 400°F: First things first, get your oven warming up while you fiddle with the pie crusts. It’s multitasking, not chaos.

  • Sprinkle and roll the crusts: Unroll the pie crusts onto a floured surface so they don’t cling to everything like your last regret. Mix the brown sugar and cinnamon, then sprinkle generously. Now roll gently to press it all in. Think “firm massage,” not steamroller.

  • Cut and press into muffin tins: Use a round 2 to 3-inch cookie cutter to make little disk-shaped hugs. Pop ’em gently into a mini muffin tin—they’ll look like gold coin hammocks.

  • Bake the shells: A light spray of oil helps crisp things up. Bake for 10 to 12 minutes until golden and happy-looking. They’ll firm as they cool, so let them chill completely.

  • Make the filling: Drain your ricotta using cheesecloth or paper towels (I’ve used both—just be gentle). Then whisk it with mascarpone till smooth. Stir in powdered sugar and vanilla. Need more sweetness? Add a touch extra. If it’s looking liquidy, park it in the fridge for 30–60 minutes.

  • Add the chips and fill the cups: Fold in your chocolate chips (or don’t, but chocolate is never a mistake). Pipe or spoon the mixture into your cooled pastry shells.

  • Top and serve: Dust with a flurry of powdered sugar and whatever toppings you like—pistachios, orange zest, candied fruit, go wild.

Cannoli Bites

Storage Options

These cannoli bites are best eaten fresh when the crust is crisp and the filling creamy—that contrast is part of the magic. But you can absolutely make ahead with a few tricks.

If you’re prepping in advance, store the empty pastry shells in an airtight container at room temp for up to 3 days. They might soften slightly, but a quick 2-minute re-warm in the oven will crisp them up again.

As for the filling, keep it refrigerated in an airtight container. It’ll hold up beautifully for about 3 days. Don’t fill the cups until you’re ready to serve, or the crusts start to get soggy (sad trombone sound).

Freezing? Technically, yes, you can freeze the unfilled shells. Not the filling, though—it’ll split and turn grainy. If you need a make-ahead solution, just store components separately then assemble last-minute.

Variations and Substitutions

These are dreamy as written, but you can totally riff on the flavors if your kitchen inspires a detour.

  • Crushed pistachios: Fold into the filling for nutty texture or sprinkle on top for green-and-gold pizzazz. Very festive.
  • Candied orange peel: Stir in a bit or just garnish. It adds a fragrant citrus bite that’s kinda irresistible.
  • Almond extract: Swap a dash in place of vanilla for a deeper, bakery-style sweetness. Think Italian bakery but in your sweatpants.
  • Chocolate pie crusts: If you spy these at the store, try them! The chocolate base is killer with the sweet filling.
  • Swap the chips: Mini white chocolate or toffee bits bring their own brand of flair. Or go rogue and use chopped gingersnap cookies for a little spice.

Cannoli Bites

What to Serve with Cannoli Bites

They’re sweet, a little fancy, and secretly simple. That makes them great sidekicks to all kinds of meals or snack spreads.

  • A platter of cheese and fruit: Think brie, berries, and something salty (hello, olives). A bite of cheese, a sip of wine, a little cannoli cup—balance, baby.
  • After something cozy, like apple pie egg rolls: Pair this soft-on-the-inside, crisp-on-the-outside crew with something creamy and cool for contrast.
  • With espresso or coffee drinks: These aren’t too sugary, so they shine beside a rich cappuccino or cozy chai latte.
  • As dessert at brunch: They slot in perfectly between waffles and mimosas. Make extra—they’ll go fast, like brunch friends always do.
  • Alongside something citrusy and bright: Try pairing with citrus-splashed mains like pan-seared salmon with pomegranate. The sweet and creamy bites mellow out bold, tangy dishes.

Cannoli Bites

Frequently Asked Questions

Can I make cannoli bites ahead of time?

Yes, but with a game plan. Bake the shells and store them in an airtight container at room temp for a couple of days. Keep the filling in the fridge, and only combine when you’re ready to serve. If you fill them too early, the crusts can take on that dreaded soggy-bottom situation. Dust with powdered sugar right before serving to keep the “snowy” look fresh.

Is it okay to use low-fat ricotta in this recipe?

You technically can, but I wouldn’t recommend it. Low-fat ricotta tends to have more moisture, and can make the filling too loose. If that’s all you have, give it some extra draining time in a cheesecloth or clean kitchen towel. The flavor and richness of full-fat really take these to dessert-ville though—just saying.

Can I freeze leftover cannoli bites?

Short answer: not really. You can freeze the pastry shells on their own, yes. Just cool completely, freeze in a single layer, then transfer to a freezer bag. But the filling won’t freeze well—it’ll separate and end up sad-looking. Better to freeze parts and fill last minute than deal with soggy, deflated bites.

What can I use if I don’t have mini muffin tins?

If you’re muffin-tin-less, you can try pressing the pastry rounds into regular muffin cups, though they’ll be more tart-sized than bite-sized. Keep an eye on baking time, and maybe only fill halfway if they puff more. Or bake the circles flat like tart bases, and pipe the filling on top—it’s a little rustic but still super cute.

Cannoli Bites

Cannoli Bites

Prep Time 25 minutes
Cook Time 12 minutes
Chill Time 30 minutes
Total Time 1 hour
Buttery pie crust, creamy ricotta, sweet mascarpone, and mini chocolate chips come together in these cannoli bites. Flaky, easy, and utterly snack-worthy—think classic cannoli, made bite-sized, no frying required!
30 bites

Ingredients

Crusts

  • 2 refrigerated pie crusts
  • 2 tbsp (24 g) light brown sugar
  • 2 tbsp (25 g) cinnamon sugar

Filling

  • 1 cup (240 g) full-fat ricotta cheese well-drained
  • 1 cup (225 g) mascarpone cheese
  • 1/2 cup (60 g) powdered sugar plus more for dusting, to taste
  • 1 tsp (5 ml) vanilla extract
  • 1/2 cup (90 g) mini chocolate chips optional, plus extra for garnish

For topping (optional)

  • powdered sugar for dusting
  • chopped pistachios, orange zest, or candied fruit for garnish

Equipment

  • Mini muffin tin
  • Round cookie cutter, 2-3 inch
  • Mixing bowls
  • Whisk
  • Cheesecloth or paper towels

Instructions
 

  1. Preheat oven to 400°F (205°C). Lightly grease a mini muffin tin.
  2. Unroll the pie crusts on a lightly floured surface. Mix brown sugar and cinnamon sugar, then sprinkle generously over the crusts. Gently roll over with a rolling pin to press the sugar into the dough.
  3. Use a 2- to 3-inch round cookie cutter to cut circles from the crust. Press each circle into a mini muffin cup, shaping gently to fit.
  4. Lightly mist crusts with baking spray. Bake for 10–12 minutes until golden. Allow to cool completely before filling.
  5. Drain ricotta using cheesecloth or paper towels until thick. In a bowl, whisk ricotta and mascarpone until smooth. Mix in powdered sugar and vanilla. Taste and add more sugar if needed. If filling seems soft, chill for 30–60 minutes.
  6. Fold in mini chocolate chips. Spoon or pipe filling into cooled pastry shells.
  7. Top with more chocolate chips, powdered sugar, and optional garnishes (pistachios, orange zest, candied fruit). Serve immediately.

Notes

Store empty baked pastry shells in an airtight container at room temp for up to 3 days. Keep filling chilled; fill shells just before serving for best texture. Freeze empty shells if you like, but don’t freeze the filling.

Nutrition

Calories: 100kcal | Carbohydrates: 10g | Protein: 2g | Fat: 6g | Saturated Fat: 3g | Cholesterol: 14mg | Sodium: 70mg | Potassium: 30mg | Sugar: 5g | Vitamin A: 90IU | Calcium: 40mg | Iron: 0.2mg

Buttery, chewy-centered, sugar-crackled on the outside—these cozy gingersnap cookies bring together bold spices like cinnamon, cloves, and nutmeg with rich molasses and vanilla.

With real butter, molasses, brown sugar, and a heaping spoonful of ginger, the dough practically perfumes your kitchen before it even hits the oven.

Okay, confession time: I sometimes keep “test” dough in the fridge just so I can sneak little bites (I know, I know). These gingersnap cookies are spiced just right—not throat-punch spice, but warm and friendly cozy spice. Their chewy crinkle tops and just-sweet-enough insides are the thing you want beside your coffee mug come 3 p.m. Or, you know, 10:37 a.m. on a Tuesday.

Stash a few in the freezer and thank yourself later.

Table of Contents

Gingersnap Cookies

Why You’ll Love this Gingersnap Cookies Recipe

These cookies are one of those recipes that quietly deliver every time. No drama, no tricks—just a solidly great cookie when you need it.

  • Ridiculously simple to make: You just stir, mix, chill, scoop, and roll. No fancy gadgets, just a spoon and a bowl.
  • Warm and spice-forward: That trio of ginger, cinnamon, and cloves hits your nose before your first bite even happens.
  • Chewy centers with crisp edges: The dream texture that keeps you reaching for one more cookie… then another.
  • Perfectly nostalgic: It’s the kind of cookie that makes your kitchen smell like grandma might walk in with hot cider any second.
  • Freezer-friendly and snack-ready: You can freeze the dough or finished cookies, so future-you is basically a genius.
  • Makes your house smell like you know what you’re doing: That molasses-y, spicy aroma is pure witchcraft (the good kind).

Gingersnap Cookies

Ingredient Notes

Nothing wild here, just pantry staples with a few fragrant power players.

  • All-purpose flour: The classic cookie backbone. Be sure to fluff and spoon when measuring for best results.
  • Ground ginger: The star of the show. Spicy, earthy, and essential—don’t skimp here. Freshly opened spices do make a difference.
  • Cinnamon: Adds that warm, familiar holiday hug. It mellows the ginger and ties things together.
  • Baking soda: Gives the cookies just the right spread and chew factor. No cake-like crumbles here.
  • Salt: Always. Just a touch balances the sweetness and bumps the complexity up a notch.
  • Ground cloves & nutmeg: These two are like the backup singers with serious pipes; you don’t always notice them but you’d miss them if they were gone.
  • Unsalted butter: Softened, not melted. This gives the best creamy base and controls the salt levels.
  • Granulated + brown sugar: Half and half gives us crispy edges (from the white) and soft, rich centers (from the brown).
  • Molasses (unsulphured): This is the deep, dark magic that makes the cookie taste like a proper gingersnap. Brings depth and this unmistakable earthy sweetness.
  • Egg: Holds it all together and adds a little lift.
  • Vanilla extract: Not traditional, but – hear me out – it nudges everything into slightly dessert-y territory, and I like that.

Gingersnap Cookies

How To Make This Gingersnap Cookies Recipe

Yes, you do need to chill the dough (sorry, I don’t make the rules). But otherwise, this is pretty breezy. Here’s how we go from spice-dusted flour to glorious chewy cookie:

  • Whisk your dry ingredients first: In a medium bowl, whisk together your flour, ginger, cinnamon, baking soda, salt, cloves, and nutmeg. This makes sure everything’s evenly distributed—no rogue nutmeg bombs later. Set that bowl aside like the patient person you are.

  • Cream the butter and sugars: In a large bowl (if you’re using a hand mixer, make sure the bowl is on the roomier side to avoid sugar confetti), beat the softened butter with ½ cup granulated sugar and all the brown sugar. Go until it’s light and fluffy—2 to 3 minutes should do it. You want that air whipped in to help with texture.

  • Add the molasses, egg, and vanilla: Turn that mixer down low (trust me) and beat in the molasses. Scrape down the sides—we don’t want streaks. Then toss in the egg and the vanilla extract, mixing until smooth and almost glossy looking.

  • Mix in dry ingredients by hand: Switching to a spoon or spatula, add the dry mix in. Gently stir until it just comes together. It should be dense and a little sticky, like cookie dough with a dark secret.

  • Chill the dough: Cover the bowl and stash it in the fridge for 30 to 60 minutes. You want it firm enough to roll but not a rock.

  • Preheat and prep: Heat the oven to 350°F and line two baking sheets (parchment or silicone mats are a win here—cleaner releases, no burnt bottoms).

  • Roll and sugar-coat: Scoop dough into 1-inch balls (a small cookie scoop helps!). Roll each ball in the remaining granulated sugar like you’re giving it a sparkly sweater.

  • Bake until just right: Bake for 10–12 minutes for chewy cookies. Edges should be set, centers soft and puffed. For crisper cookies, lean closer to 14 minutes.

  • Cool and try not to eat 5 immediately: Let them sit on the baking sheet for 5 minutes before transferring to a wire rack. Their centers finish setting during this window.

Gingersnap Cookies

Storage Options

First off, good luck having leftovers. But if your willpower outpaces mine, here’s what to do.

Baked cookies can be stored in an airtight container at room temp for about 4 to 5 days. They’ll stay chewy, but the crisp edge might fade a little by day 3 (still totally dreamy dunked in tea).

To freeze baked cookies, cool them completely first. Then pop them into a freezer-safe bag or container with parchment between layers. They’ll keep a solid 2 months. Just thaw at room temp—not in the microwave, unless you like rubbery regrets.

Want to freeze the dough instead? I got you. Roll it into balls, toss them in sugar, and freeze in a single layer on a sheet pan. Once firm, transfer to a zip-top bag. When you’re ready to bake, just add a minute or two to the total bake time (no thawing needed).

Variations and Substitutions

Gingersnaps might be classic, but they’re also surprisingly fun to riff on. A few swaps and ideas below if you’re the experimental type.

  • Add candied ginger: Finely chop and fold in 1/4 cup. It adds chewy, spicy-sweet pops that zing through the dough beautifully.
  • Sub maple syrup for molasses: Okay, not exactly traditional, but maple brings a gentler sweetness and soft texture. Tone the spices down just a smidge if you go this route.
  • Toss in dark chocolate chips: It almost shouldn’t work… but it does. Especially with the heat from the ginger.
  • Use coconut sugar: A 1:1 swap for either white or brown sugar gives a deeper caramel-like note with slightly less sweetness.
  • Try gluten-free flour blends: If using a 1:1 all-purpose GF blend, make sure it has xanthan gum. The cookies will be a bit more delicate, but still tasty.

Gingersnap Cookies

What to Serve with Gingersnap Cookies

They hold their own next to pretty much any warm drink, but here are a few delicious pairings to cozy things up.

  • A mug of hot apple cider is spot-on next to these cookies. The apple brings sweetness, the ginger bites back, and somehow you’re in a Hallmark movie—but better dressed.

  • Vanilla bean ice cream turns these into a DIY ice cream sandwich situation. If you’re feeling wild, you could even use the cookies for these peanut butter banana ice cream sandwiches. Seriously—ginger + banana? Surprisingly fabulous.

  • For something savory beforehand, these would make a fun dessert after a fall-on-a-plate type meal—maybe pan seared cod with rainbow chard. Fresh veggies + buttery fish = ideal balance for a rich cookie finish.

  • Holiday brunch? Pair the cookies with a shot (or three) of espresso and a bellini. It’s classy, but still playful. Like a jazz brunch with spice-flecked cookies on the side.

  • You could also crumble them over yogurt or oatmeal in the morning. I won’t tell. Breakfast cookie crumbles are 100% valid choices.

Gingersnap Cookies

Frequently Asked Questions

Can I make gingersnap cookie dough ahead of time?

Absolutely! You can prepare the dough up to 48 hours in advance. Just keep it tightly wrapped in the fridge. When you’re ready to bake, let it sit at room temp for 10–15 minutes so it’s scoopable again. Or—you can roll it into balls, freeze them, and bake straight from frozen with an extra minute or two added to the baking time.

Why did my cookies turn out too puffy or not spread?

This can be a couple things! Most likely, your dough was too cold—or your flour was over-measured. A wee bit too much flour keeps cookies from spreading properly. Try spooning your flour into the measuring cup and leveling off for accuracy. Also, if you reeeally love a flatter cookie, let the dough warm up slightly before baking.

What’s the best molasses to use for gingersnap cookies?

Use unsulphured molasses (like Grandma’s Original). Avoid blackstrap—it’s way too bitter and overpowering in cookies. Unsulphured molasses gives that rich, dark sweetness without making your cookie taste like a campfire. It plays nicely with all the warm spices.

Can I use fresh ginger instead of ground?

You totally can, but it changes the vibe. Fresh ginger gives little juicy heat-bursts, where ground ginger gives even warmth throughout. If you go fresh, grate it finely and use about 1 tablespoon. And maybe cut back just a smidge on the other spices so everything stays balanced.

Gingersnap Cookies

Chewy Gingersnap Cookies

Prep Time 20 minutes
Cook Time 12 minutes
Chill Time 30 minutes
Total Time 1 hour 5 minutes
Buttery, chewy-centered, sugar-crackled on the outside—these cozy gingersnap cookies blend bold spices with rich molasses for a nostalgic treat. Perfectly spiced and freezer-friendly, their chewy crinkle tops and just-sweet-enough insides make the dream coffee companion — or afternoon snack!
24 cookies

Ingredients

Dry Ingredients

  • 2 1/4 cups (280 g) all-purpose flour fluffed and spooned
  • 2 tsp ground ginger freshly opened for best flavor
  • 1 tsp ground cinnamon
  • 2 tsp baking soda
  • 1/2 tsp (0.5 tsp) salt
  • 1/4 tsp (0.25 tsp) ground cloves
  • 1/4 tsp (0.25 tsp) ground nutmeg

Wet Ingredients

  • 3/4 cup (170 g) unsalted butter softened to room temperature
  • 1/2 cup (100 g) granulated sugar plus extra for rolling
  • 1/2 cup (110 g) light or dark brown sugar packed
  • 1/4 cup (80 g) unsulphured molasses
  • 1 large egg room temperature
  • 1 tsp vanilla extract

Equipment

  • Mixing bowls
  • Electric mixer
  • Baking Sheets
  • Parchment paper
  • Wire rack
  • Cookie Scoop

Instructions
 

  1. In a medium bowl, whisk together flour, ground ginger, cinnamon, baking soda, salt, cloves, and nutmeg. Set aside.
  2. In a large bowl, beat the softened butter, 1/2 cup granulated sugar, and brown sugar together with an electric mixer until light and fluffy (2–3 minutes).
  3. Add molasses, egg, and vanilla extract; mix until smooth and well combined. Scrape down the sides as needed.
  4. With a spoon or spatula, add the dry ingredients to the wet and gently stir just until combined. The dough will be dense and a bit sticky.
  5. Cover and chill the dough in the refrigerator for 30–60 minutes, until firm enough to handle.
  6. Preheat oven to 350°F (175°C). Line two baking sheets with parchment paper or silicone mats.
  7. Scoop dough and roll into 1-inch balls. Roll each ball in extra granulated sugar to coat.
  8. Place dough balls at least 2 inches apart on prepared baking sheets. Bake for 10–12 minutes for chewy cookies or up to 14 minutes for crispier edges.
  9. Let cookies cool on the sheet for 5 minutes, then transfer to a wire rack to finish cooling.

Notes

Storage: Store cookies at room temperature in an airtight container for up to 5 days, or freeze (layered with parchment) for up to 2 months.
Freezer option: Freeze unbaked dough balls after rolling in sugar. Bake straight from frozen, adding 1–2 minutes to the bake time.
Variations: Add 1/4 cup chopped candied ginger for extra zing, try a handful of dark chocolate chips, or swap coconut sugar for a richer taste. For gluten-free, use a 1:1 GF flour blend with xanthan gum.

Nutrition

Calories: 130kcal | Carbohydrates: 20g | Protein: 1g | Fat: 5g | Saturated Fat: 3g | Cholesterol: 15mg | Sodium: 110mg | Potassium: 65mg | Sugar: 10g | Vitamin A: 120IU | Calcium: 12mg | Iron: 0.7mg

Creamy, garlicky, and buttery, this mashed rutabaga recipe leans into cozy vibes with just a few simple stars—rutabaga, garlic, butter, and cream. Earthy and ultra-smooth, it’s like mashed potatoes’ humble cousin, but with a little more personality (and fewer carbs).

Think of this as your cool-weather sidekick. When things get chilly and you want something that smells like comfort and tastes like earthy richness, this mashed rutabaga does the job. It’s simple, for sure, but also kind of unexpected. Somehow both rustic and elegant—you could serve it next to roast chicken on a weeknight or slide it onto a holiday table, and it wouldn’t feel out of place either way. Oh, and if you haven’t cooked rutabaga before, don’t worry, we’re not getting fancy. Just peel, cube, boil, mash, and spoon it up warm. Let’s do this.

Table of Contents

Mashed Rutabaga

Why You’ll Love this Mashed Rutabaga

Rutabaga might not win the vegetable popularity contest, but it deserves a little spotlight now and then. Especially mashed up with butter and garlic, trust me.

  • Ridiculously simple to make: You just cube, boil, drain, mash, stir, and ooooh.
  • Creamy and savory without fuss: That quiet flavor lets garlic and butter do their thing without yelling about it.
  • Cozy, comforting texture: Somewhere between mashed potatoes and whipped squash, with a slightly firmer bite.
  • Affordable and underrated: One rutabaga costs pocket change and feeds a surprisingly hearty crowd.
  • Plays well with rich mains: Beef roasts, smoky chicken, or something buttery like pan-seared cod love having this as backup.
  • Reheats beautifully: Yep, it keeps! That creamy texture doesn’t bail after a night in the fridge.

Mashed Rutabaga

Ingredient Notes

Nothing wild here—just a few down-to-earth basics that come together in a deeply satisfying way.

  • Rutabaga: Look for one that feels heavy for its size and has smooth, waxy skin. Peeling it is a bit stubborn (a sharp knife helps). Its flavor is mildly sweet, kind of like a turnip who lifted weights and went to culinary school.

  • Salt: Start with a tablespoon in the boiling water. It won’t taste salty in the end, just balanced.

  • Unsalted butter: Adds richness and that cozy, golden flavor. Salted works in a pinch, just use less additional salt later.

  • Garlic: Don’t skip it! Fresh minced garlic adds a deep, almost nutty background once it mellows into the mash.

  • Heavy cream: Totally optional, but if you like that luxurious, velvety feel, drizzle it in at the end. You can also use half-and-half or even sour cream if that’s what’s hanging out in your fridge.

  • Chopped chives: A little fresh green on top makes the whole thing look intentionally put together, even if you mashed it in pajamas.

Mashed Rutabaga

How To Make This Mashed Rutabaga

We’re not summoning any culinary spirits here, promise. Just soft veggies, warm butter, and a little wrist action.

  • Prep the rutabaga: Peel and cube it into roughly equal-sized chunks. Not too tiny—you’ll risk them turning watery. A sharp knife is your best buddy here; that skin is tougher than expected.

  • Boil until fork-tender: Place the cubes in a large saucepan and cover with cold water. Throw in a tablespoon of salt, bring to a boil, then lower the heat slightly so it doesn’t splash everywhere. Let it simmer for 30 to 40 minutes, until your fork glides in without a fight.

  • Drain and let it steam out: After draining, leave the rutabaga in the pot off-heat for a minute or two. This lets excess moisture sneak out, which helps concentrate the flavor and avoid sogginess.

  • Mash and flavor: Toss in the cubed butter and minced garlic while the rutabaga’s still steamy—it’ll melt right in. Then mash to your liking. Creamy, chunky, rustic, silky… you do you.

  • Adjust with cream and season: If you want it extra smooth, pour in some heavy cream. Then taste and add salt and black pepper until it sings. Maybe hums, actually—it’s rutabaga, not Beyoncé.

  • Serve it up hot: Scoop into a bowl, sprinkle with chopped chives, and bring it to the table still warm. Extra points if you pair it with something sweet and savory, like sugared cranberries or a juicy roast.

Mashed Rutabaga

Storage Options

If you have leftovers (and I kind of hope you do), storing mashed rutabaga is low-effort.

Let it cool completely first, then pop it in an airtight container and stash it in the fridge. It’ll stay happy for up to 4 days. When you’re ready for round two, just reheat it gently on the stove over low heat or in the microwave. Stir in a splash of cream or a knob of butter if it’s looking a little stiff.

Now, you might be wondering, “But can I freeze it?” Absolutely. Mashed rutabaga freezes surprisingly well. Spoon portions into freezer-safe bags, flatten a bit for easier stacking, and freeze for up to a month. Thaw overnight in the fridge, then warm it slowly, stirring well to bring back the soft, creamy texture. No weird freezer ghosts here—promise.

Variations and Substitutions

Rutabaga is flexible enough to welcome in new flavors or swap out ingredients if needed.

  • Add Parmesan or Pecorino: For a craveable umami punch, stir in a few tablespoons of sharp, salty cheese near the end.

  • Swap butter for olive oil: If you’re dairy-free or just feeling the olive-oil mood, use a good, peppery one. It’ll make the flavor a bit earthier.

  • Go herby with thyme or rosemary: Fresh thyme or finely chopped rosemary go surprisingly well with rutabaga’s mellow sweetness. Stir in near the end so they stay fragrant.

  • Use milk instead of cream: It won’t be quite as luxurious, but whole milk or even oat milk does the trick if cream’s not handy.

  • Mix in potatoes: If you’re easing someone into the rutabaga life, mash it 50/50 with Yukon golds. You get the body and creaminess of potato with rutabaga’s depth of flavor.

Mashed Rutabaga

What to Serve with Mashed Rutabaga

This mashed rutabaga slides easily into a lot of meals, especially those that benefit from a warm, savory, starchy sidekick.

  • If you’ve got something buttery and flaky like pan-seared salmon with pomegranate reduction, this mash adds just enough richness without overpowering the delicate flavors. The combo is elegant, but not fussy.

  • Serve it with a roast chicken, especially one that’s heavy on lemon or herbs. The garlicky mash holds its own next to that crispy, juicy bird.

  • Try plopping a pile next to grilled sausage or pork chops and a dollop of that stone-ground mustard you keep forgetting you bought. It’s hearty, satisfying, and unexpectedly cozy.

  • Use it as the base under a stew or mushroom gravy. The root veggie vibe pairs beautifully with earthy sauces and slow-cooked things.

  • For a fun twist, use leftover mash as a spread under toast with a fried egg on top. Total brunch hero move.

Mashed Rutabaga

Frequently Asked Questions

Can you make mashed rutabaga ahead of time?

Totally! You can mash it a day or two in advance, then reheat it gently on the stove or in the microwave. Just keep it covered and refrigerated. When warming it up, stir occasionally and maybe add a splash of cream or extra butter to refresh that silky texture. It’s a low-stress make-ahead side.

What does rutabaga taste like compared to potatoes?

Rutabaga is a bit sweeter and earthier than potatoes, with a firmer texture when mashed. It sits somewhere between a turnip and a sweet potato in flavor. When cooked and mashed, it has a bit more bite than classic mashed potatoes but still feels creamy and comforting.

Do I need to peel rutabaga before cooking?

Yes, absolutely peel it. The outer layer is tough and waxy—it’s usually coated in food-grade wax to preserve freshness. Use a sharp knife instead of a veggie peeler, since that skin can be pretty stubborn. Trust me, once you’re inside, the payoff is well worth it.

Can I use this mash for something other than a side dish?

Oh yes, it’s versatile! Use it as a base under braised meats, dollop it on top of shepherd’s pie, or mix in some flour and egg to make little savory pancakes. Leftovers can even be repurposed into a breakfast bowl with some sautéed greens and a poached egg on top. It’s more useful than you think.

Mashed Rutabaga

Creamy Mashed Rutabaga

Prep Time 10 minutes
Cook Time 40 minutes
Total Time 50 minutes
Creamy, garlicky, and buttery, this mashed rutabaga recipe leans into cozy vibes with just a few simple stars—rutabaga, garlic, butter, and cream. Earthy and ultra-smooth, it’s like mashed potatoes’ humble cousin with a little more personality (and fewer carbs). A rustic-yet-elegant side perfect for both weeknights and holiday feasts.
4 servings

Ingredients

Mashed Rutabaga

  • 2 lb (900 g) rutabaga peeled and cut into 1-inch cubes
  • 1 tbsp (15 ml) salt for boiling water, plus more to taste
  • 3 tbsp (42 g) unsalted butter cubed, plus more for serving (salted OK, use less added salt)
  • 2 cloves garlic minced
  • 1/4 cup (60 ml) heavy cream optional, or sub half-and-half, sour cream, milk, or oat milk
  • black pepper to taste
  • 2 tbsp (6 g) fresh chives chopped, for garnish (optional)

Equipment

  • Large saucepan
  • Colander
  • Potato masher

Instructions
 

  1. Prep the rutabaga: Peel the rutabaga with a sharp knife (the skin is thick and waxy), then cut into 1-inch cubes.
  2. Boil rutabaga: Place cubes in a large saucepan and cover with cold water. Add 1 tablespoon salt. Bring to a boil, then lower to a simmer and cook for 30–40 minutes until fork-tender.
  3. Drain and let steam dry: Drain well and leave rutabaga in the pot, off heat, for 1–2 minutes to let excess moisture evaporate.
  4. Mash and flavor: Add cubed butter and minced garlic. Mash thoroughly using a potato masher or fork to your preferred texture.
  5. Adjust with cream and season: Stir in heavy cream (if using) for extra smoothness. Add salt and black pepper to taste.
  6. Serve: Spoon into a bowl, garnish with chopped chives, and serve warm. Top with extra butter if desired.

Notes

To store, cool completely and refrigerate in an airtight container for up to 4 days. Reheat gently with a splash of cream or butter. Mashed rutabaga also freezes well for up to 1 month. Try stirring in Parmesan, swapping in olive oil for a dairy-free twist, or adding fresh herbs like thyme or rosemary. Mix with mashed potatoes for extra familiar flavor.

Nutrition

Calories: 130kcal | Carbohydrates: 22g | Protein: 2g | Fat: 5g | Saturated Fat: 3.1g | Cholesterol: 15mg | Sodium: 710mg | Potassium: 580mg | Fiber: 4g | Sugar: 6g | Vitamin A: 330IU | Vitamin C: 40mg | Calcium: 85mg | Iron: 0.6mg

Let's Get Cooking!

100+ Recipes for Busy Nights

In a time crunch? Take a look around and browse plenty of recipes to help you get dinner ready and on the table on those busy nights!

Sweet Recipes

Pumpkin Banana Muffins

Pumpkin Banana Muffins Recipe

Strawberry Pie Bars

Strawberry Pie Bars Easy Oven Recipe

White Chocolate Raspberry Muffins

White Chocolate Raspberry Muffins Recipe

Snickerdoodle Muffins

Snickerdoodle Muffins Recipe for Oven

PIN NOW

Follow KitchenetteBlog on Pinterest

Love cozy recipes that actually make it to the table? On Pinterest, I share new comfort-food ideas every week—desserts, dinners, and those little snack cravings that hit at midnight. Come pin with me and never run out of kitchen inspo.

Savory Recipes

Turkey Tetrazzini

Turkey Tetrazzini Baked Pasta Recipe

Grilled Chicken Panini Sandwich

Grilled Chicken Panini Sandwich Recipe

Sweet Potato Cornbread

Sweet Potato Cornbread Recipe Oven Baked

Classic Waldorf Salad

Waldorf Salad Simple Classic Recipe

Get 5 Recipes to Simplify Your Life!

Delicious, versatile recipes you can make over and over.