Get 5 recipes to simplify your life:

easy, delicious, real food recipes

Latest Recipes

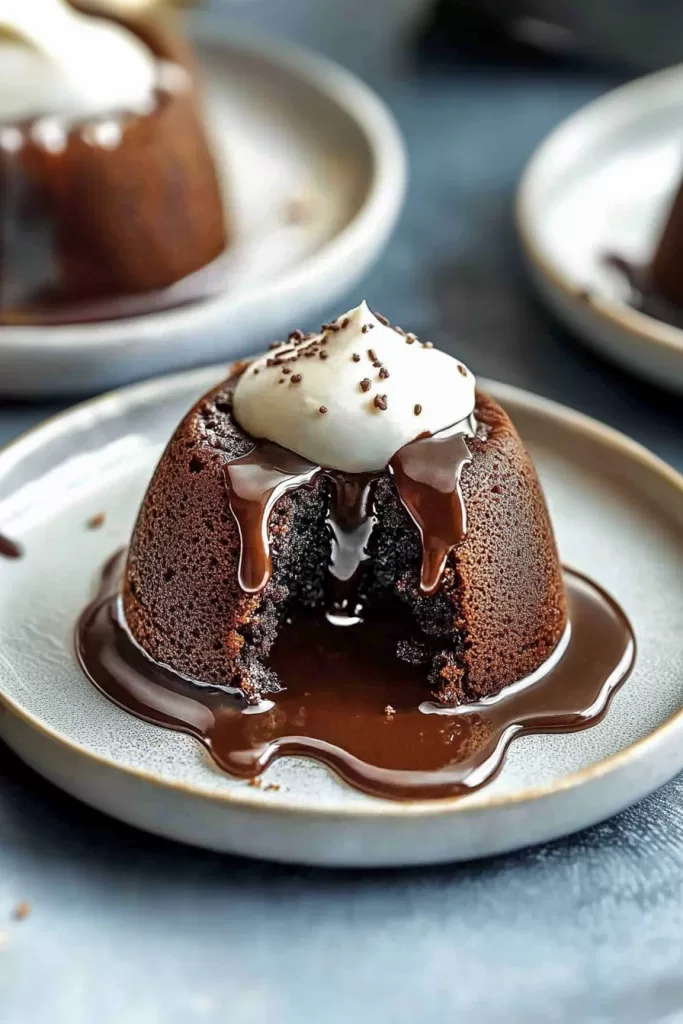
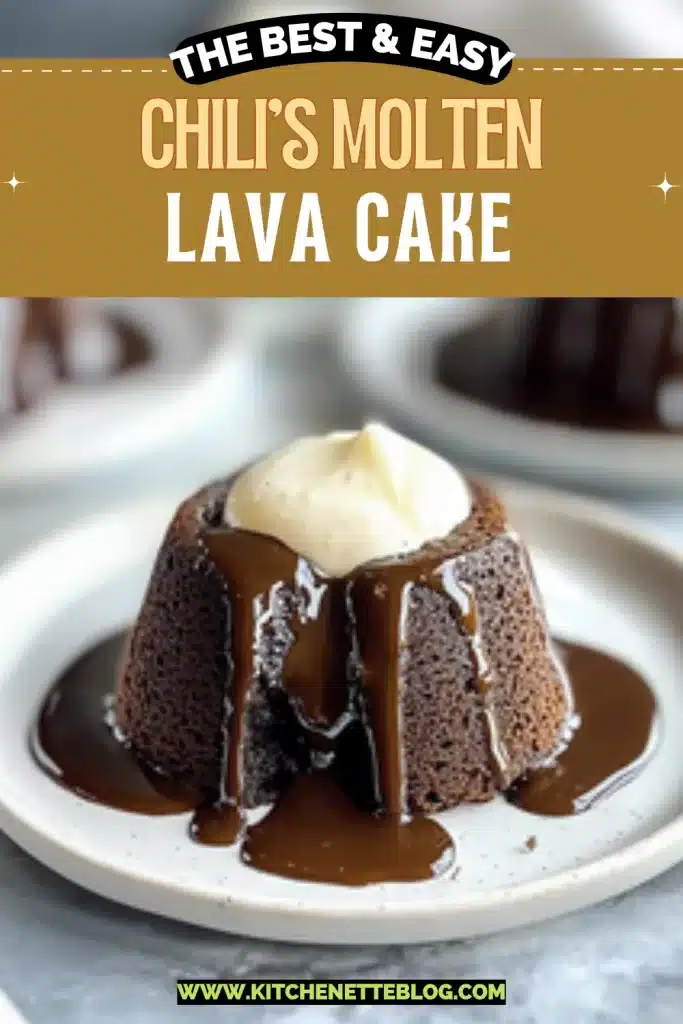
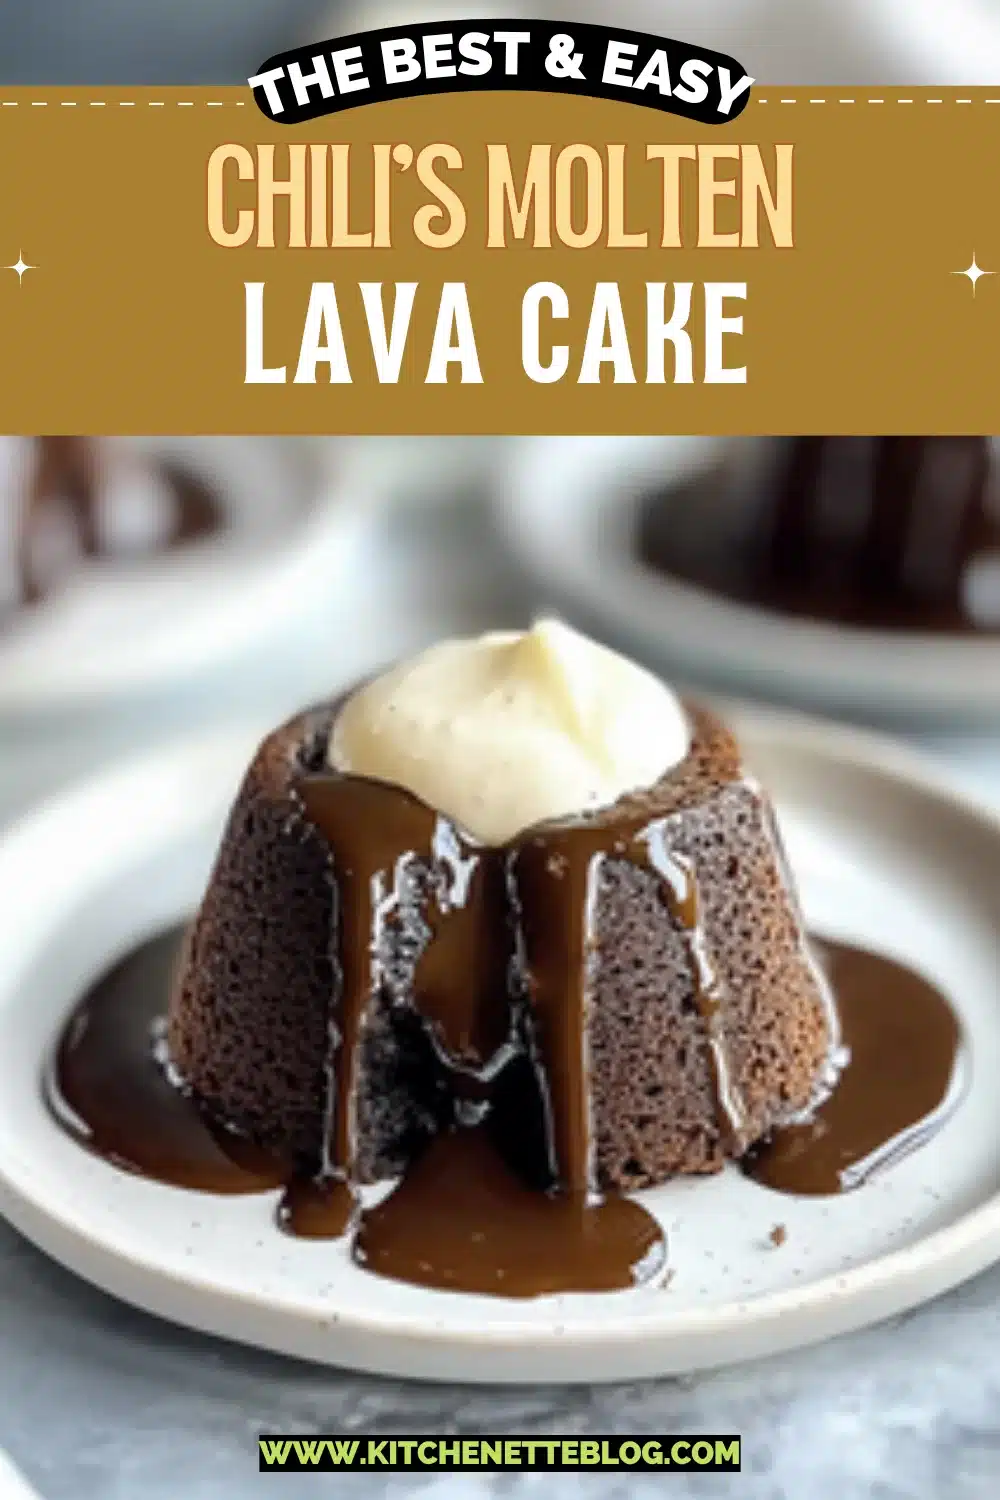
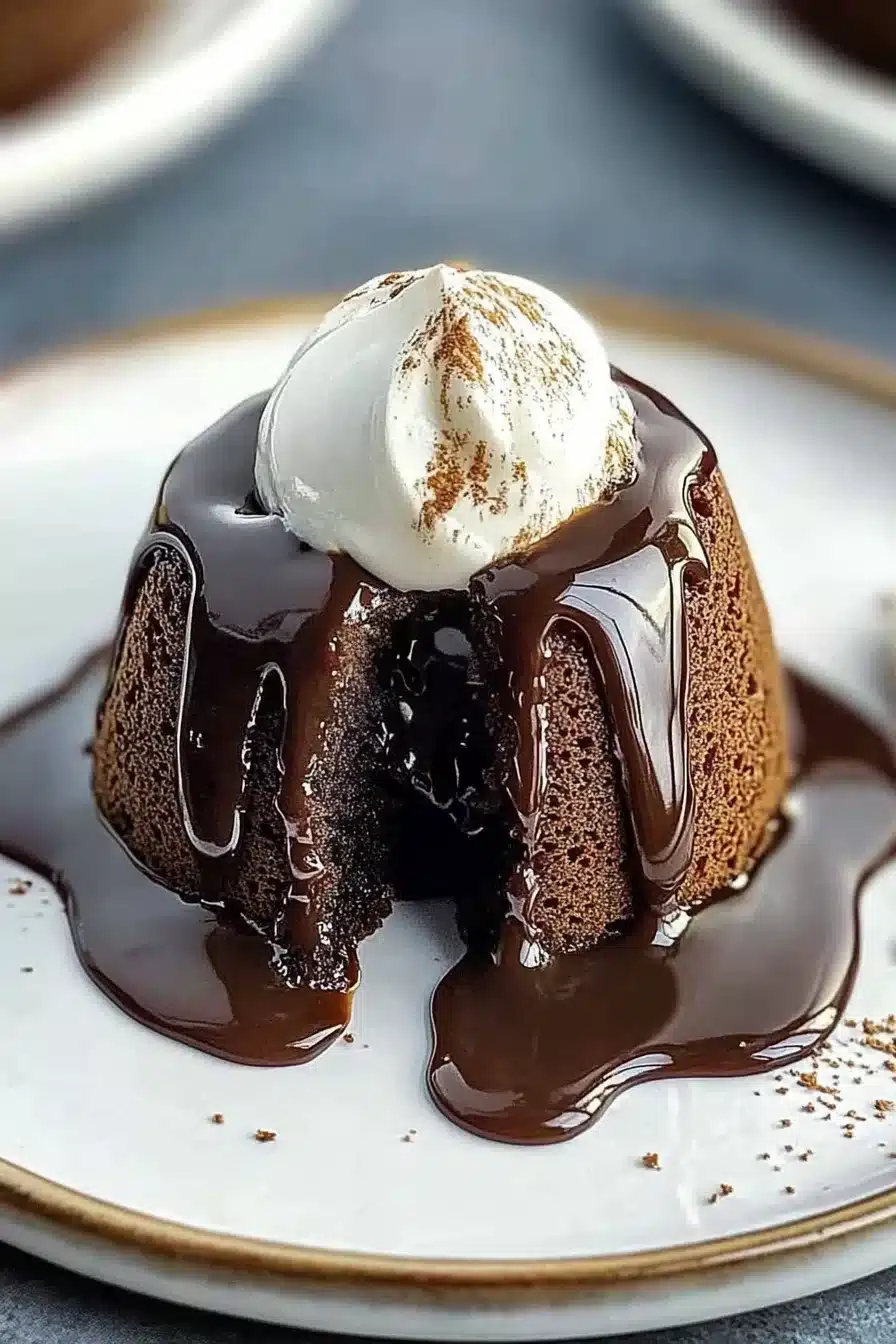
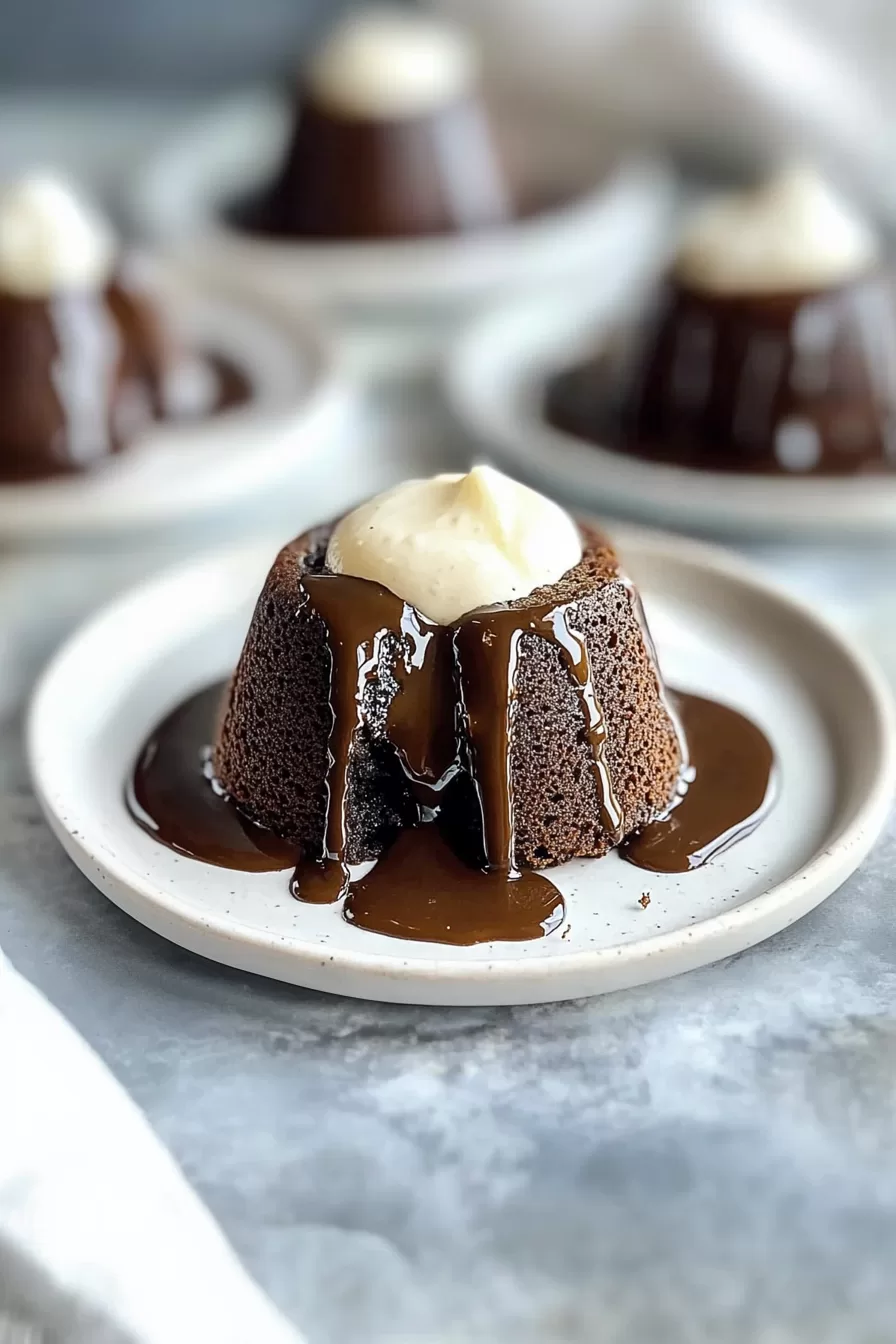
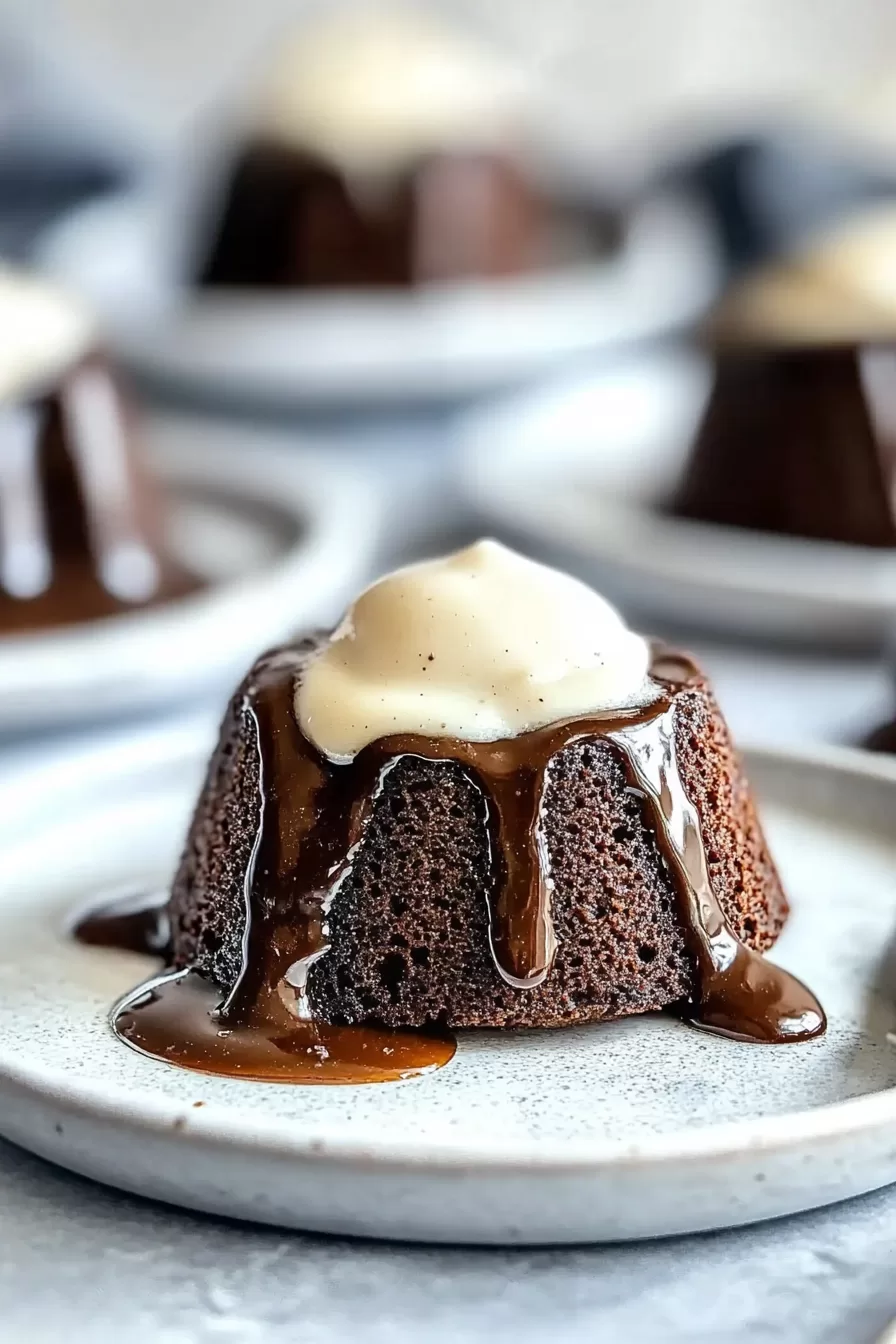
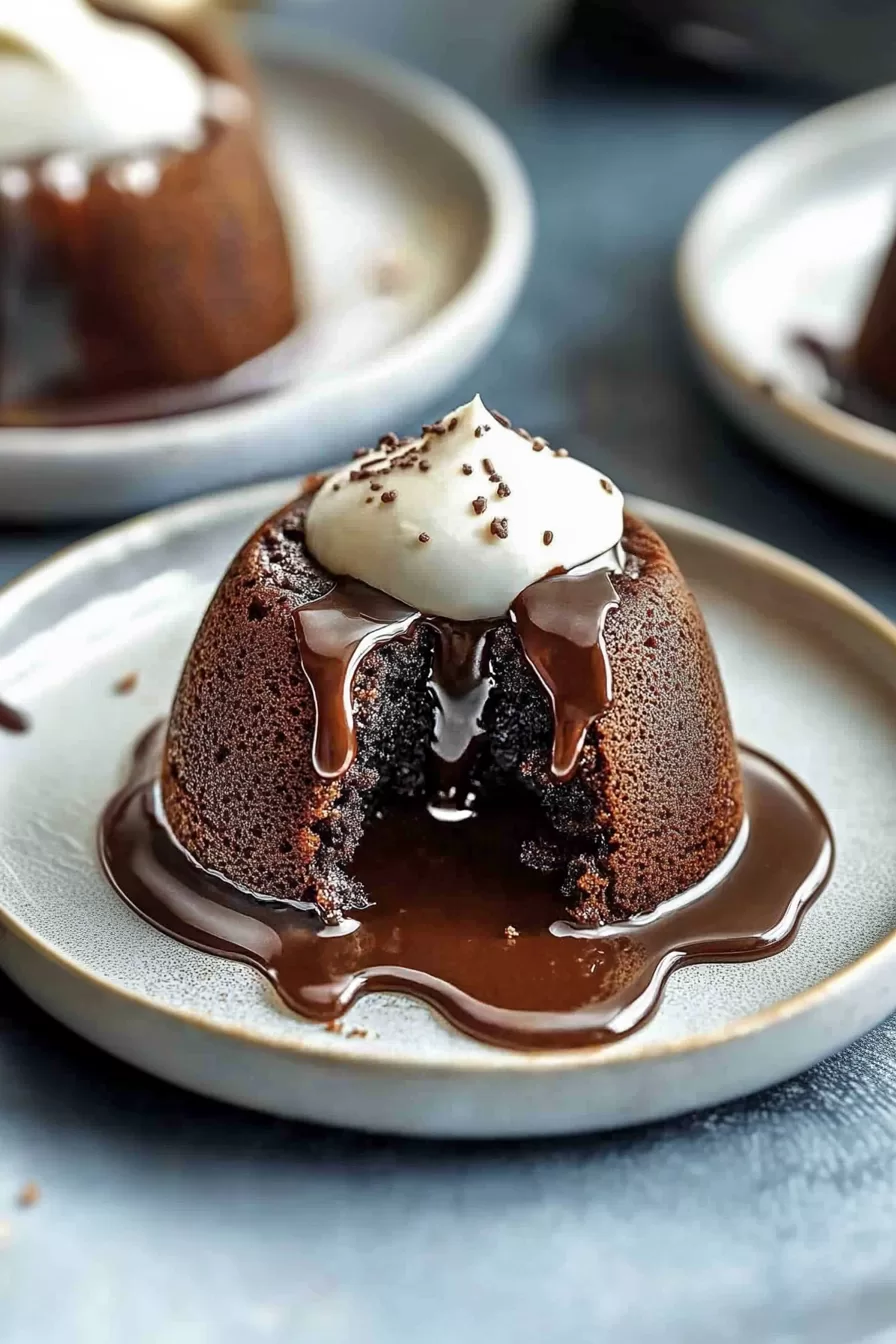
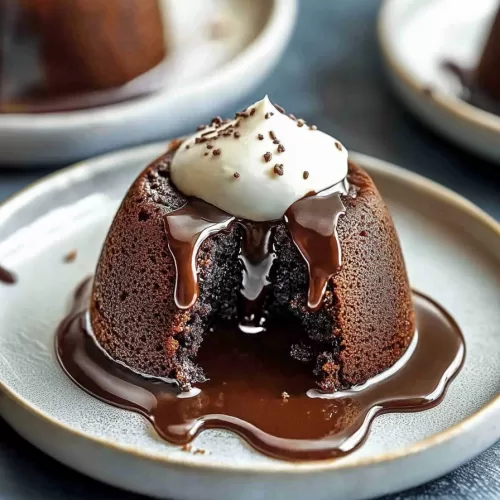
Your favorite restaurant dessert just snuck into your kitchen. This copycat Chili’s molten lava cake gives you gooey melted chocolate, soft cake edges, and creamy vanilla ice cream all in one. With ingredients like chocolate chips, eggs, butter, and a swoosh of caramel, it’s warm, melty, and ready in under 20 minutes.

Alright, so this recipe is kinda evil. In the best way. It lures you in with its soft chocolate aroma as it bakes (that cozy, “Oh yes, it’s happening” smell). Then it seduces you with that fudgy middle, all hot and sleepy, begging for vanilla ice cream. And the magic shell drizzle? Unreasonably good. This isn’t your Tuesday kale salad situation. But it is the “I’ve had a day, and dessert is therapy” situation. Or dinner party finale. Or “just because” Tuesday, honestly. The point is: it’s rich and gooey and chocolate-forward… and shockingly easy.

Table of Contents

Easy Chili’s Molten Lava Cake

Why You’ll Love this Copycat Chili’s Molten Lava Cake

Sometimes you don’t need a reason; you just need cake. But just in case you’re the type to justify things (hi, same), here’s why this little lava situation earns its spot in the dessert rotation.

  • Ridiculously simple to make: You just melt stuff, whisk stuff, scoop stuff, and bake. It’s low effort and high payoff.
  • That gooey molten center: It’s like chocolate pudding wrapped inside a barely set brownie. One spoon in and… oof.
  • Restaurant-level drama at home: Flip it onto a plate, plop on the ice cream, drizzle the magic shell—restaurant vibes achieved.
  • Fully customizable: Add espresso, raspberry sauce, peanut butter, or be wild with mix-ins.
  • Make-ahead friendly: Bake the batter later or freeze extras, and you’re basically your own dessert hero.
  • Looks fancy but isn’t: Everyone’s impressed, and you’re just over here smug with your ramekins.

Easy Chili’s Molten Lava Cake

Ingredient Notes

You don’t need ten types of flour or chocolate flown in from a volcanic hillside. Just a handful of pantry basics, plus your favorite chocolate chips, and we’re off to the races.

  • Milk chocolate chips: These bring the signature sweet creaminess that makes the center ooze rather than bite. You can sub dark, but the vibe will shift.
  • Unsalted butter: It keeps things rich without being salty; grab the real stuff, not margarine.
  • Powdered sugar: Helps create that crackly-soft outer shell while blending smoothly into the batter.
  • Whole eggs + one yolk: This mix helps structure the cake while keeping it creamy in the middle. The extra yolk adds richness.
  • All-purpose flour: Just enough to hold it all together. Don’t overmix—this isn’t muffin batter.
  • Vanilla extract: Adds warmth and depth. If you’ve got the good stuff, go for it.
  • Caramel sauce, ice cream, magic shell topping: These finishers turn a good dessert into dessert theater. Don’t skip ’em unless your spoon is faster than your willpower.

Easy Chili’s Molten Lava Cake

How To Make This Copycat Chili’s Molten Lava Cake

Take a deep breath—it’s cake time and it’s really not complicated. You don’t even need a mixer. Just your whisk, a microwave, and a little bit of patience (or whatever’s left of it).

  • Prep your ramekins: Coat them well with nonstick spray. Seriously, coat like you mean it. This is what lets the cake slip out all smug and perfect later.

  • Melt the chocolate and butter: Microwave until both are smooth and glossy, stirring every 30 seconds. Don’t let it scorch because chocolate gets grumpy when overheated.

  • Whisk in the powdered sugar and salt: Do this while the mixture is still warm. It’ll thicken a bit, which is what you want. Stir until there are no sugar lumps hiding.

  • Add the eggs, yolk, and vanilla: Whisk it gently until smooth. Think chocolate mousse that got ideas.

  • Fold in the flour: Use a spatula here. You don’t want to mix like you’re trying to make bread, just enough to disappear the flour.

  • Spoon the batter into ramekins: Fill about ¾ of the way. Don’t panic if they look a bit underfilled—the magic’s inside.

  • Bake until the edges are set but center jiggles: Around 13 to 15 minutes. Watch them like they’re on a first date—they firm up fast.

  • Plate with flair: Let them cool a minute or two, then run a knife around the edge and flip. Drizzle caramel on the plate first for that fancy-swoop look, top with ice cream, and drizzle magic shell.

Easy Chili’s Molten Lava Cake

Storage Options

Let’s be honest, you probably won’t have leftovers. But on the off-chance you baked ahead or showed more restraint than most of us:

If the cakes are unbaked (just the filled ramekins), you can wrap them in plastic and refrigerate for up to 2 days. Want them hot on demand? Perfect. Just keep them cold, bake when ready, and maybe add an extra minute or two of cook time from the fridge.

Baked-but-uneaten cakes do OK in the fridge for a couple of days. The centers won’t be molten anymore, but they’ll still taste like a decadent snack. Reheat in a 350°F oven for 5-ish minutes, loosely covered. Microwave’s alright too, though it might cook the center through (which is fine if you like more of a brownie vibe).

And yes, you can freeze them (baked or unbaked). Wrap well, then reheat directly from frozen (you’ll need to add a few more minutes to the bake time if unbaked).

Variations and Substitutions

Alright, let’s say you want to mix it up. Maybe you’re in a mood. Maybe you’re just out of chocolate chips. Here’s how to play:

  • Dark or semi-sweet chocolate chips: Sub in if you like a less sweet, punchier chocolate. You may want to slightly reduce the sugar if you’re going full dark.

  • Flavored extracts: Swap vanilla for peppermint around the holidays, or almond if you’re feeling fancy and sophisticated.

  • Stuff the center with extras: Before baking, press a square of chocolate, caramel candy, or even a peanut butter cup into the center. It gets melty and sneaky-good.

  • Gluten-free version: Use a 1:1 gluten-free flour blend. Lava status may vary slightly, but it works well if you don’t overbake.

  • Dairy-free/oil swap: Use a vegan butter and check those chips! Some varieties are dairy-free. Coconut oil can work in a pinch.

  • Add espresso powder: Just a smidge (¼ teaspoon or so) in with the flour adds deep, moody coffee notes.

Easy Chili’s Molten Lava Cake

What to Serve with Copycat Chili’s Molten Lava Cake

Now, no one’s stopping you from eating this in your pajamas straight off the plate. But if you want to elevate the whole situation—or build out a menu—here’s where your lava cake can live its best life.

  • Pour-over coffee or bold espresso: That curl of steam, the bitter contrast—coffee is the peanut butter to lava’s jelly. Especially if you used milk chocolate.

  • A big scoop of vanilla bean ice cream (with legit flecks!): The hot-and-cold contrast is what this dessert dreams of. And don’t hold back on the size of that scoop.

  • Something refreshing before, like a light lemony fish dish: Pair lava with something bright to balance things out, like pan-seared cod or a crisp salad starter.

  • Whipped cream with espresso powder: A dollop of slightly sweetened cream with a dusting of coffee powder makes this feel very pro. Optional, but lovely.

  • A second dessert, if you’re feeling wild: Something frozen and fruity like these peanut butter banana ice cream sandwiches is absurdly indulgent but, hey… dessert is freedom.

Easy Chili’s Molten Lava Cake

Frequently Asked Questions

Can I make these lava cakes ahead of time?

Yes, and it’s actually smart! You can prep the batter and fill the ramekins, then cover and refrigerate them for up to two days. Just pop them into a preheated oven straight from the fridge when you’re craving dessert, and maybe add an extra minute or two of bake time. The texture stays lovely and you get that perfect molten center.

What if I don’t have ramekins?

No ramekins? No problem. You can use a muffin tin (just spray really well), but you’ll need to shorten the bake time slightly and be very gentle when removing them. Alternatively, oven-safe mugs work too—just be mindful of thickness and adjust baking time as needed.

How do I know when they’re done baking?

You want the edges set and pulling slightly from the sides, but the center should still jiggle a bit when you nudge the ramekin. That’s the sweet spot. If the whole top looks dry and firm, it may be overbaked. Still tasty, but less molten.

Can I use dark chocolate instead of milk chocolate?

Absolutely—you rebel, you. Dark chocolate will give a richer, less sweet flavor, which some folks love. If you go that route, you may want to add a bit more sugar (like a tablespoon or two), or just embrace the more intense vibe. Either way, it’ll still be fabulous.

Easy Chili’s Molten Lava Cake

Copycat Chili’s Molten Lava Cake

Prep Time 5 minutes
Cook Time 15 minutes
Total Time 20 minutes
This warm, gooey chocolate dessert brings the restaurant favorite to your kitchen. With simple ingredients and melty chocolate, it bakes in under 20 minutes, ready to top with ice cream, caramel, and chocolate shell for true drama at home.
4 cakes

Ingredients

Lava Cake Batter

  • 1 cup (170 g) milk chocolate chips
  • 1/2 cup (113 g) unsalted butter cut into pieces
  • 1 cup (120 g) powdered sugar
  • 1/4 tsp (1 g) salt
  • 2 large eggs
  • 1 large egg yolk
  • 1 tsp (5 ml) vanilla extract
  • 1/4 cup (32 g) all-purpose flour

For Serving

  • caramel sauce for drizzle
  • vanilla ice cream
  • magic shell chocolate topping

Equipment

  • Ramekins
  • Microwave-safe bowl
  • Whisk
  • Spatula
  • Oven

Instructions
 

  1. Preheat oven to 425°F (220°C). Generously spray 4 ramekins (6-ounce) with nonstick spray and set on a baking sheet.
  2. Add milk chocolate chips and butter to a microwave-safe bowl. Microwave in 30-second bursts, stirring after each, until melted and smooth (about 1–1 1/2 minutes total).
  3. Immediately whisk in powdered sugar and salt until blended and no lumps remain. Mixture will thicken.
  4. Add eggs, egg yolk, and vanilla extract. Whisk gently until smooth and glossy.
  5. Sprinkle flour on top and fold in gently with a spatula just until no dry patches remain.
  6. Spoon batter into prepared ramekins, filling each about 3/4 full.
  7. Bake in preheated oven for 13–15 minutes, until the sides are set and the center still jiggles when you nudge the ramekin.
  8. Cool cakes just 2 minutes. Run a knife around the edges, then invert onto serving plates.
  9. Drizzle caramel onto plates for swoosh effect, place cake on top, add a scoop of vanilla ice cream, and finish with a drizzle of chocolate shell.

Notes

Batter can be made ahead and stored in greased ramekins, covered, in the fridge for up to 2 days before baking. Baked cakes can be reheated in a 350°F oven for 5 minutes; center may not be molten but will still taste wonderful. Feel free to swap in dark or semi-sweet chips or add a chocolate square or peanut butter cup in the center before baking.

Nutrition

Calories: 510kcal | Carbohydrates: 57g | Protein: 6g | Fat: 29g | Saturated Fat: 16g | Cholesterol: 170mg | Sodium: 172mg | Potassium: 200mg | Fiber: 2g | Sugar: 46g | Vitamin A: 600IU | Calcium: 100mg | Iron: 2mg

Tender beef, rustic potatoes, and an herby broth that fills the kitchen with the coziest aroma—this old fashioned beef stew comes together with chuck roast, carrots, celery, and a splash of red wine. No frills, just deep comfort in every bite.

If you’ve been craving something hearty and soul-warming, this is it. A steaming bowl of fall-apart beef, silky carrots, and those little bits of onion that practically melt? Yep, that’s what’s simmering here.

There are certain days when all you want is a meal that hugs you back. This is that kind of dish. The kind that simmers away quietly while you half-watch a show and sneak pieces of bread from the cutting board. The broth gets this velvety texture thanks to a quick cornstarch trick (you’ll see), and the smell alone may cause spontaneous swooning.

Also, let’s be honest, anything that lets you toss everything in one big pot and then gives you time to mentally drift while it bubbles? Yes please. This traditional-style stew nails that. It works great as a Sunday dinner, but really, Wednesday nights become 57% better too.

Table of Contents

Traditional Beef Stew Recipe

Why You’ll Love this Old Fashioned Beef Stew

No dramatic backstories here, just straight-up comfort food with real staying power. This stew doesn’t try to be flashy—it just tastes like it’s been missing from your life. Or at the very least, from your dinner rotation.

  • Hearty and comforting: Every spoonful is rich, beefy, and perfect for fall, winter… or any day your socks feel like slippers.

  • Deep flavor in one pot: Between the seared beef, red wine, and cozy herbs, it tastes like you cooked all day—even if you didn’t.

  • Leftovers might be better: I don’t make the rules, but something about letting this stew rest overnight turns it magical.

  • No fancy ingredients: It’s meat, potatoes, mirepoix, herbs. You’ve got most of it already hiding in your crisper drawer or pantry.

  • Customizable without drama: You can swap potatoes, ditch the celery, add peas—whatever. This stew forgives.

  • Perfect excuse for carbs: A crusty roll dunked into this broth? Oh yes. Or try it with bacon basil cornbread muffins if you’re feeling bold.

Traditional Beef Stew Recipe

Ingredient Notes

No long shopping lists or obscure ingredients here. Just a few humble pantry staples that rise to greatness when simmered together.

  • Beef chuck roast or stew meat: Chuck roast gives you the best texture—tender and juicy after a slow simmer. Stew meat works in a pinch, though quality can vary.

  • Salt and black pepper: Season generously at the start. It builds a solid flavor base from the first sear.

  • Vegetable oil: For browning the meat. Don’t skip the sear—it’s what gives that deep, rich flavor.

  • Red wine: Adds a little tang and a lot of complexity. Something dry and not too fancy. Cabernet or Merlot work beautifully.

  • Beef broth: Low sodium is best so you can control the saltiness. Homemade earns you bonus points but store-bought totally works.

  • Worcestershire sauce: Just a splash perks everything up. It’s like umami magic.

  • Dried herbs (rosemary, parsley): These give background earthiness. Fresh is great too, just double the quantity.

  • Potatoes: Go for Yukon gold or red potatoes for the perfect soft-but-not-mushy texture.

  • Carrots, celery, onion: The classic trio that adds sweetness, texture, and that good stew base flavor.

  • Cornstarch and cold water: This little slurry thickens the broth just right—glossy, not gloopy.

Traditional Beef Stew Recipe

How To Make This Old Fashioned Beef Stew

Pull out your biggest Dutch oven or heavy-bottomed pot and let’s get this magical pot of coziness going. It’s mostly simmering, promise.

  • Season and sear the beef: Generously salt and pepper the cubed beef, then sear in hot oil until all sides are browned. Don’t crowd the pan—work in batches. You want crusty brown edges, not steam.

  • Deglaze with red wine: After the meat’s done, pour in the wine (cue the sizzle!) and scrape up those browned bits with a wooden spoon. This step adds deep, rich flavor. Smells great already, right?

  • Simmer with broth and spices: Pour in the beef broth, Worcestershire sauce, and sprinkle in rosemary, parsley, and more black pepper. Return the seared beef to the pot, bring everything to a simmer, then cover and cook for an hour on low.

  • Prep your veggies: While it bubbles away, chop your potatoes, carrots, celery, and onion into hearty chunks. Keep them around the same size so they cook evenly.

  • Add veggies and cornstarch slurry: After the first hour of simmering, toss in the vegetables and stir in the cornstarch slurry (just cornstarch mixed with cold water—easy). Give it a good stir to evenly distribute everything.

  • Final simmer: Cover and cook another hour, stirring gently now and then. The meat should be fork-tender, and the veggies should still hold their shape but be soft and comforting.

  • Taste and serve: Give it a taste and adjust salt and pepper if needed. Spoon into bowls while it’s piping hot, ideally with something carb-y nearby.

Traditional Beef Stew Recipe

Storage Options

This stew stores like a champ, honestly. In fact, it might even taste better the next day, once the flavors have cozied up overnight.

Pop any leftovers into an airtight container and stash them in the fridge. It’ll keep for up to 4 days, though let’s be real—mine barely makes it to day two. Reheat gently on the stovetop or in the microwave with a splash of broth or water if it thickens too much.

Want to freeze it? Go for it! Just make sure it’s completely cool first. Freeze in individual portions if you’re clever (easier for weeknight rescue missions) or in one big batch. It’ll last in the freezer for up to 3 months. To reheat, thaw overnight in the fridge, then warm it back up on the stove. Simple.

Variations and Substitutions

If you’re anything like me, you’re already plotting what else you can toss in that pot next time. Good news: this old fashioned beef stew loves a good remix.

  • Sweet potatoes instead of Yukon: They add a cozy sweetness and keep their shape beautifully, especially if you’re aiming for a slightly different vibe.

  • Frozen peas added at the end: Toss them in for the last 5 minutes. Bright green pops and an extra veg boost.

  • Use mushrooms for extra depth: If you’re a fungi fan, sauté some first, then stir them in with the broth. They’ll soak up that savory goodness like sponges.

  • Swap red wine for balsamic vinegar: Just a tablespoon or two will do. You’ll get lovely tang and sweetness without the alcohol.

  • Make it gluten-free: It already kind of is, but double-check your Worcestershire and broth just to be safe.

  • Turn leftovers into a second dish: Toss the stew over egg noodles the next night. Like a stew-meets-pasta hybrid. Totally reminds me of this taco pasta situation.

Traditional Beef Stew Recipe

What to Serve with Old Fashioned Beef Stew

Now that you’ve got this bubbling pot of beefy wonder, let’s talk about what goes alongside it. Because you’re going to want something to catch all that amazing broth.

  • Crusty bread or rolls: Nothing fancy, just something warm and carb-y to mop up the goodness. I like it toasted with a swipe of butter so it half-melts into the stew.

  • Cornbread muffins: A little sweet, a little savory. If you’re up for it, these bacon-basil ones work absurdly well.

  • A crisp green salad: Something acidic and snappy for contrast—think vinaigrette-loaded greens to cut through that rich stew.

  • Buttered egg noodles: Tossed with a little parsley? Yes please. Slide the stew right on top and live your best life.

  • Roasted Brussels sprouts or green beans: If you’re after a cooked veg side, go for something with texture. Crispy edges, a bit of bite, to balance out the stew’s softness.

Traditional Beef Stew Recipe

Frequently Asked Questions

Can I make this beef stew in advance?

Oh absolutely, and you should. This stew actually tastes even better after a night in the fridge. The flavors deepen, the meat gets even more tender, and you don’t have to do virtually anything except reheat and eat. Just store it in an airtight container and warm it on the stovetop when you’re ready. Maybe add a splash of broth to loosen it up.

What if I don’t have a Dutch oven?

No worries. Any large pot with a thick bottom will do just fine. The key is to use something that holds heat well and allows for a nice sear on the beef. Avoid thin, cheap pots if you can—they can cause hot spots and uneven cooking. And if you’ve got an oven-safe pot, you could even simmer this in the oven at 325°F instead of on the stove.

Does the wine cook off completely?

Yup, it does. By the time the stew simmers away for two hours, all the alcohol has cooked off—what’s left is just a subtle depth and richness. If you prefer to skip it, a mix of beef broth and a splash of balsamic vinegar or red grape juice can add some similar complexity without the wine.

Can I use another cut of beef?

You can! Chuck roast is the go-to because it softens beautifully over low heat, but other cuts like bottom round or even brisket will work. Just expect a slight difference in texture or cook time. Avoid lean cuts like sirloin though—they’ll dry out quickly and lose that melt-in-your-mouth vibe.

Traditional Beef Stew Recipe

Old Fashioned Beef Stew

Prep Time 20 minutes
Cook Time 2 hours
Total Time 2 hours 20 minutes
Tender beef, rustic potatoes, and an herby broth—this old fashioned beef stew is comfort food at its finest. Chuck roast, carrots, celery, and a splash of red wine simmer together in one pot, filling the kitchen with the coziest aroma. Hearty, satisfying, and perfect for chilly nights.
6 bowls

Ingredients

Main Stew Ingredients

  • 2.5 lbs (1.1 kg) beef chuck roast cut into 1.5-inch cubes
  • 1.5 tsp (9 g) salt more to taste
  • 1 tsp (2 g) black pepper freshly ground, plus more for serving
  • 2 tbsp (30 ml) vegetable oil
  • 1 cup (240 ml) dry red wine such as Cabernet or Merlot (optional, see notes)
  • 4 cups (950 ml) low sodium beef broth
  • 1 tbsp (15 ml) Worcestershire sauce
  • 1 tsp (1 g) dried rosemary or 2 tsp fresh, chopped
  • 1 tsp (1 g) dried parsley or 2 tsp fresh, chopped

Vegetables

  • 1.5 lbs (680 g) Yukon gold potatoes cut into 1-inch chunks
  • 4 (240 g) carrots peeled, cut into hearty rounds or chunks
  • 3 (110 g) celery stalks chopped
  • 1 (150 g) yellow onion chopped

To Thicken

  • 2 tbsp (16 g) cornstarch
  • 3 tbsp (45 ml) cold water

Equipment

  • Dutch Oven
  • wooden spoon
  • Cutting board
  • Chef’s knife
  • Measuring cups
  • Measuring spoons
  • Medium Bowl

Instructions
 

  1. Generously season the cubed beef with salt and black pepper. Heat the vegetable oil in a large Dutch oven over medium-high heat. Add the beef in batches, searing until all sides are browned. Set browned beef aside as you work through the batch.
  2. Once all beef is browned, carefully pour the red wine into the pot. Scrape up the browned bits on the bottom with a wooden spoon. Simmer for 2-3 minutes until slightly reduced.
  3. Add the beef broth, Worcestershire sauce, dried rosemary, dried parsley, and a few more cracks of black pepper. Stir to combine. Return browned beef and any accumulated juices to the pot.
  4. Bring to a simmer, then reduce heat to low. Cover and cook for 1 hour.
  5. While the stew simmers, chop potatoes, carrots, celery, and onion into hearty, even-sized chunks.
  6. After the first hour, add the potatoes, carrots, celery, and onion to the pot.
  7. In a small bowl, combine the cornstarch and cold water to create a slurry. Stir this mixture into the stew.
  8. Cover again and simmer for another hour, stirring gently occasionally, until the beef is fall-apart tender and the vegetables are soft but still hold their shape.
  9. Taste and adjust seasoning with additional salt and pepper if needed. Serve hot, ideally with crusty bread or a carb of your choice.

Notes

Variations:
Try sweet potatoes instead of Yukon golds, or add mushrooms with the broth step for extra depth. To make it alcohol-free, use more broth and a tablespoon of balsamic vinegar.
Storage:
Stew keeps well in the fridge up to 4 days and may taste even better after a night. Freeze for up to 3 months—thaw overnight in the fridge and reheat gently.

Nutrition

Calories: 420kcal | Carbohydrates: 30g | Protein: 40g | Fat: 15g | Saturated Fat: 5g | Cholesterol: 105mg | Sodium: 970mg | Potassium: 1200mg | Fiber: 4g | Sugar: 4g | Vitamin A: 8500IU | Vitamin C: 25mg | Calcium: 60mg | Iron: 5.3mg

Creamy and saucy with just the right kick, this taco pasta blends lean ground beef, tomatoes, peppers, salsa, and cheese into one dreamy pot.

Everything about this has that warm, dinnertime aroma—the kind that makes people wander into the kitchen asking “What’s that smell?” And you’ll probably answer with your mouth full.

This recipe lands firmly in the “comfort food but with a little flair” zone. Like mac and cheese took a vacation to the Southwest and came back with spicy secrets and a tan. You cook the pasta right in the same pot as all the goodness (the meat, the sauce, those whispery diced tomatoes with green chilies), so not only does it taste rich and layered, but hey—fewer dishes too.

It’s a weeknight dinner ringer, date-night casual, even kinda party-worthy if you ask me. You can top it or not, smother it or scoop it. Zero wrong moves.

Table of Contents

Creamy Taco Pasta

Why You’ll Love this Creamy Taco Pasta

This one isn’t about reinventing pasta night. It just zhuzhes it up a bit. Slightly spicy, ultra creamy, endlessly cozy.

  • Ridiculously simple to make: You brown things, you dump things, you stir and try not to eat straight from the pot.
  • Creamy with a little kick: The heavy cream smooths it all out while the salsa and chilies keep things zippy.
  • Full of textures and colors: Tender pasta shells scoop up all the beefy, cheesy goodness—and bell peppers offer tiny pops of crunch.
  • One pot situation: Your future self will thank you when it’s dish-washing time.
  • Customizable toppings galore: Avocados, jalapeños, sour cream, chips—make it as chill or extra as you like.
  • Leftovers behave nicely: Heat it up tomorrow and it’s still creamy, cheesy, and satisfying.

Creamy Taco Pasta

Ingredient Notes

Nothing fancy hiding here—just stuff you probably recognize. But a few little tweaks can make it really sing.

  • Lean ground beef: 93% lean or higher keeps it meaty without turning into an oil slick. Turkey works too; no judgment.
  • Taco seasoning mix: Use your favorite packet or make your own if you’re fancy like that. I’m not stopping you.
  • Onion and garlic: A classic aromatic duo—they’re background heroes, making the whole pot smell like dinner.
  • Red bell pepper: Adds color and little bites of sweet crunch. Orange or yellow absolutely work too.
  • Diced tomatoes with green chilies: Don’t drain ‘em! That spicy-tangy liquid adds something special to the sauce.
  • Salsa: Medium or mild—your call. Chunky, smooth, smoky, whatever makes your taco-loving heart happy.
  • Beef broth: Gives body to the sauce and depth you don’t always get from just water.
  • Heavy cream: Brings the luscious. Adds that silky, spoon-coating richness.
  • Medium pasta shells: Perfect shape for catching all the saucy bits. Penne or rotini are also acceptable members of the noodle squad.
  • Cheddar + Monterey Jack: Tangy plus melty = flavor and stretch. Sub in pepper jack if you want heat.

Creamy Taco Pasta

How To Make This Creamy Taco Pasta

Alright, let’s make some happiness in a pot. This isn’t one of those recipes that keeps you on edge. You just follow along and breathe in the good smells.

  • Brown the beef: Get your pot hot over medium-high heat, then crumble in the ground beef. Let it sizzle and cook through, breaking it up with a wooden spoon. Drain the extra grease if there’s too much hanging around.

  • Soften the veg: Toss in the diced onion and chili-colored bell pepper. Stir it around for 5-ish minutes until everything starts to soften and the kitchen smells real good.

  • Add flavor bombs: Stir in the taco seasoning and minced garlic. Smell that? That’s dinner magic. Give it about a minute to bloom—don’t let the garlic burn or get whiny.

  • Pour in the liquidity party: Add the undrained diced tomatoes with chilies, salsa, broth, and heavy cream. Stir everything together like you mean it. Now crank the heat to bring it to a boil.

  • Add the pasta, you beautiful shells: Dump them right in and make sure they sink under all that saucy mix. Turn the heat down, cover, and let it simmer about 12–15 minutes. Stir every now and then so nobody sticks to the bottom or throws a tantrum.

  • Cheese and final cheers: Take the pot off the heat and stir in your shredded cheddar and Monterey Jack. Keep stirring until it’s fully melty and the sauce gets that smooth, creamy cling. Salt and pepper to taste (don’t skip this—it can make or break the balance).

Creamy Taco Pasta

Storage Options

This stuff holds up surprisingly well, which is always nice when you accidentally make a vat instead of just dinner.

Store the cooled taco pasta in an airtight container in the fridge. It’ll stay cozy there for about 3 to 4 days. Reheat gently on the stove or microwave with a splash of milk, cream, or even broth to wake the sauce back up. Without that bit of liquid, it can thicken up and start to feel a little clingy in a clingwrap sort of way.

Now, you technically can freeze it—yes, even with the cream and cheese—but go in knowing that reheated dairy sauces can turn slightly grainy or separate. If that doesn’t bother you, by all means go for it. Just double bag it in a freezer-safe container and tuck it away for up to 2 months. When ready, thaw overnight in the fridge and reheat low and slow.

Variations and Substitutions

You can tweak this creamy taco pasta to suit your vibe, diet, or whatever’s in your fridge at 6:17 p.m. on a Tuesday.

  • Ground turkey or chicken: Totally works instead of beef and lightens things up a bit while still tasting like dinner.
  • Different cheese blends: Try pepper jack for spice or even a smoky gouda for fun. Cheese is a choose-your-own-adventure.
  • Add black beans or corn: Bulk it up with a can of black beans (drained) or frozen corn for texture and extra fiber.
  • Go gluten-free: Use your favorite GF pasta (elbow or rotini shapes hold up nicely) and a gluten-free taco seasoning.
  • Vegetarian version: Swap the meat for lentils or plant-based crumbles. Just keep the seasoning party going strong.

Creamy Taco Pasta

What to Serve with Creamy Taco Pasta

Taco pasta is already kinda a full meal, but nothing wrong with rounding it out a little. Balance the richness, add some fresh crunch, or hey, maybe dessert?

  • A crisp side salad with a tangy vinaigrette helps cut through all that creamy-cheesy business. Bonus points if you toss in avocado or tortilla strips for flair.

  • Chips and guac are never not welcome. Scoop a bite of pasta with a chip? I won’t stop you. Honestly, I support it.

  • A fizzy drink like sparkling lime water or a light beer adds refreshment and contrast, especially if you went spicy with the seasonings.

  • Want dessert? Cherry cheesecake bars hit that creamy-sweet note without being too fussy. A solid sweet drop after a savory meal.

  • Or for a cozy weekend finish, you could serve this followed by a slice of Italian cream sheet cake. Now that’s a sit-back-and-sigh kind of night.

Creamy Taco Pasta

Frequently Asked Questions

Can I make this creamy taco pasta ahead of time?

Totally. Cook it up, let it cool, and stash it in the fridge. The flavors even deepen a bit overnight. Just warm it up gently with a splash of broth or cream to loosen up the sauce again. Great for quick lunches later in the week or feeding people you like.

Is there a way to make this less spicy?

Sure is. Use mild salsa, a can of regular diced tomatoes instead of the kind with green chilies, and skip any spicy toppings. You’re still gonna get flavor from the taco seasoning and aromatics without making your tongue break into a sweat.

Can I use a different kind of pasta?

Yep. Medium shells are nice because they cuddle the sauce, but elbow macaroni, penne, or even rotini would work. Just keep an eye on the cooking time—smaller shapes may be done a bit faster.

What toppings go best with taco pasta?

Oh, where to start? Sour cream for that cooling swirl. Jalapeños if you like a spicy contrast. Avocados are creamy and dreamy. A sprinkle of fresh cilantro lifts everything up. Honestly, a few crushed tortilla chips on top wouldn’t be mad either.

Creamy Taco Pasta

Creamy Taco Pasta

Prep Time 10 minutes
Cook Time 25 minutes
Total Time 35 minutes
Creamy and saucy with just the right kick, this taco pasta blends lean ground beef, tomatoes, peppers, salsa, and cheese into one dreamy pot. One-pot, cozy, a little spicy, and big on flavor—perfect for weeknights or, honestly, anytime you need cheesy-pasta joy.
6 servings

Ingredients

Main Ingredients

  • 1 lb (450 g) lean ground beef 93% lean or higher (ground turkey works too)
  • 1 small onion diced
  • 1 red bell pepper diced (orange or yellow works too)
  • 3 cloves garlic minced
  • 1 package (28 g) taco seasoning about 1 oz (or 3 tbsp homemade)
  • 1 can (283 g) diced tomatoes with green chilies 10 oz, undrained
  • 1 cup (240 ml) salsa medium or mild, any style
  • 2 cups (480 ml) beef broth
  • 1/2 cup (120 ml) heavy cream
  • 12 oz (340 g) medium pasta shells or penne or rotini
  • 1 cup (115 g) cheddar cheese shredded
  • 1 cup (115 g) Monterey Jack cheese shredded (or pepper jack for heat)
  • kosher salt and black pepper to taste

Toppings (Optional)

  • sliced jalapeños
  • diced avocado
  • sour cream
  • chopped cilantro
  • crumbled tortilla chips

Equipment

  • Large pot or Dutch oven
  • wooden spoon
  • Knife
  • Cutting board
  • Measuring cups
  • Colander

Instructions
 

  1. Brown the beef: Heat a large pot or Dutch oven over medium-high heat. Add ground beef and cook until browned, breaking it up with a wooden spoon. Drain excess grease if needed.
  2. Soften the veg: Add diced onion and bell pepper. Cook, stirring, for about 5 minutes until starting to soften.
  3. Add flavor bombs: Stir in taco seasoning and minced garlic. Cook for 1 minute until fragrant.
  4. Pour in the liquids: Add the undrained diced tomatoes with chilies, salsa, beef broth, and heavy cream. Stir well. Bring to a boil.
  5. Add the pasta: Stir in the pasta shells. Reduce heat to a simmer, cover, and cook 12–15 minutes, stirring occasionally, until pasta is tender and most liquid is absorbed.
  6. Add cheese and finish: Remove pot from heat. Stir in cheddar and Monterey Jack cheese until melted and creamy. Season with salt and black pepper to taste.
  7. Serve hot, topped with any (or all!) of your favorite toppings: avocado, jalapeños, sour cream, cilantro, or tortilla chips.

Notes

Feel free to swap in ground turkey or chicken, use different cheeses, or add black beans or corn to bulk it up. Store leftovers in the fridge for 3–4 days or freeze for up to 2 months (sauce may separate a bit upon reheating). For gluten-free, use your favorite GF pasta and seasoning.

Nutrition

Calories: 560kcal | Carbohydrates: 48g | Protein: 29g | Fat: 27g | Saturated Fat: 15g | Cholesterol: 115mg | Sodium: 1180mg | Potassium: 957mg | Fiber: 4g | Sugar: 7g | Vitamin A: 1100IU | Vitamin C: 35mg | Calcium: 310mg | Iron: 4mg

Buttery noodles meet creamy cheese and a hearty meat sauce in this cozy, craveable million-dollar spaghetti bake. It’s loaded with ground beef, green onions, and melted cheese—yes, that molten, golden-bubbly kind.

The whole kitchen ends up smelling like someone invited lasagna, Alfredo, and spaghetti to a dinner party where stretchy pants are 100% required.

If you’re the kind of person who stands in front of the fridge thinking, “I want something warm, cheesy, and just a little bit indulgent,” then let me introduce you to classic million-dollar spaghetti. It’s not fancy, and that’s why it wins. We’ve got perfectly al dente noodles layered with a tangy, beefy tomato sauce and a swoon-worthy cheese blend. Smooth cream cheese. Rich ricotta. Tangy sour cream. All melty, all mingled together.

Serve it on a weeknight when you want to feel fancy without actually putting on jeans. Or stash it in your freezer and thank yourself later.

Table of Contents

Classic Million Dollar Spaghetti

Why You’ll Love this Classic Million Dollar Spaghetti

No frills here, just practical magic. It’s a casserole, but extra. A little ridiculous, in a good way.

  • Ridiculously simple to make: You just boil, smush, layer, and bake. There’s nothing overly chef-y involved.
  • Cozy comfort in every bite: It’s like a blanket for your taste buds, with that molten cheese keeping everything warm and snuggly.
  • Surprisingly light-feeling: Thanks to the reduced-fat cream cheese, sour cream, and ricotta, you get the richness without feeling like you ate a brick.
  • Preps like a champ: You can make it ahead, freeze it, reheat it, eat it cold… okay, maybe not that last one. (But I won’t judge.)
  • Feeds a crowd without stress: Great for family dinners, potlucks, or whenever someone asks, “What’s for dinner?” with the panic in their eyes.
  • Leftovers, oh the leftovers: They might be even better the next day. No one ever said no to cheesy pasta on a Wednesday.

Classic Million Dollar Spaghetti

Ingredient Notes

Let’s break down the cast of characters making this spaghetti worth its dramatic name.

  • Spaghetti: Regular boxed spaghetti works just fine. Cook it al dente since it’ll keep baking in the oven.
  • Ground beef: Classic, beefy flavor. You could go lean (90/10) or toss in a blend with a bit more fat if you’re feeling saucy.
  • Onion: Diced small so it melds into the meat. Adds sweetness and depth without getting in your face.
  • Garlic: Use fresh cloves if you can. That waft of garlic while it hits the hot pan? Pure joy.
  • Spaghetti sauce: Use your favorite jarred kind or even homemade if you have one. Just make sure it’s not too watery.
  • Salt and pepper: The support crew. Don’t skip them, or everything tastes kinda flat.
  • Cream cheese: Softened ahead of time so it blends easily. Adds a rich, slightly tangy note.
  • Ricotta cheese: Helps the filling feel creamy and soft without being too runny. Use reduced-fat to balance things out.
  • Sour cream: Yes, sour cream. It adds the kinda can’t-put-your-finger-on-it zing that keeps each bite interesting.
  • Green onions: They add brightness and a little crunch, plus they look cute on top. Don’t forget the garnish!
  • Cheddar-Monterey Jack cheese blend: The melt factor here is serious. That slightly golden crust on top? Chef’s-kiss.

Classic Million Dollar Spaghetti

How To Make This Classic Million Dollar Spaghetti

Get ready for a series of very rewarding steps. It sounds like a production, but honestly, it’s downright therapeutic.

  • Boil the spaghetti: Just cook it in salted water until al dente. You want it to still have some bite since it’ll bake more later. Once it’s cooked, drain it, give it a tiny toss with oil if it’s sticking, and set it aside.

  • Brown the beef with aromatics: In your biggest skillet, let the onion and garlic dance around in the heat with the ground beef. You’re looking for everything to be browned and fragrant. Once done, drain off the grease (we’re not making soup here).

  • Make the sauce sing: Stir in your spaghetti sauce, salt, and pepper. Let everything simmer gently for about 20 minutes so the flavors can get to know each other. Go ahead and taste it—chef’s prerogative.

  • Mix the cheese layer: While the sauce is simmering, mash together that softened cream cheese, ricotta, and sour cream. Then fold in the chopped green onions (save a few for garnish or random snacking).

  • Layer it up: In a lightly greased 11×7 baking dish (or similar size, no one’s measuring), lay down your cooked spaghetti. Spread the cheesy mixture on top—don’t stress about getting it perfectly even. Then pour the meaty sauce over that and sprinkle your shredded cheese over the whole thing.

  • Bake until bubbly: Cover it with foil and bake in a 350°F oven for about 25 minutes. Then uncover for another 5 to 10, just until that top starts to lightly brown and bubble. That’s the sweet spot.

  • Garnish and serve: Toss some more green onions on top (or parsley if you’re fancy) and dig in while it’s hot and gooey.

Classic Million Dollar Spaghetti

Storage Options

So you’ve made your classic million dollar spaghetti and now you’ve got more than you can tackle in one sitting. Welcome to one of spaghetti casserole’s best traits: leftovers.

Pop whatever remains into an airtight container and stash it in the fridge for up to 4 days. The layers hold up beautifully, and dare I say, might even get better overnight. Something magical happens when the flavors have time to cozy up together.

Now the big question—can you freeze it? Yes, my friend, you absolutely can. You can freeze it baked or unbaked. Just use a freezer-safe dish (foil pans work great), wrap it tightly in plastic and then foil, and you’re looking at up to 3 months of future dinner joy. If you’re freezing it after baking, let it cool completely before freezing.

To reheat, thaw overnight in the fridge, then warm it in a 350°F oven, covered, until bubbly. Or zap individual portions in the microwave—still tasty, just a little less crisp on top.

Variations and Substitutions

There’s no wrong way to million-dollar your spaghetti. You can switch things up depending on mood, fridge contents, or general sense of chaos.

  • Swap the meat: Ground turkey or chicken works great. Or use Italian sausage for a spicier, more savory twist.
  • Go veggie: Skip the meat completely and bulk up the sauce with mushrooms, chopped spinach, or zucchini. Bonus points if you sauté them first.
  • Use cottage cheese: Don’t want to mess with ricotta? Cottage cheese works in a pinch and gives that same creamy, tangy layer.
  • Kick up the heat: Add crushed red pepper to the sauce or mix in some spicy tomato sauce if you’re into that kind of party.
  • Make it gluten-free: Easy peasy, just sub in your favorite gluten-free spaghetti noodles. Everything else is naturally GF!
  • Add herbs or extras: A sprinkle of Italian seasoning in the meat sauce, fresh basil layered in, or a few cloves of roasted garlic can all boost flavor like nobody’s business.

Classic Million Dollar Spaghetti

What to Serve with Classic Million Dollar Spaghetti

You’ve got your main dish baked and bubbling—so what rounds out the table?

  • If you’re going full comfort mode, try serving it with a side of crispy oven sweet potato hash browns. That combo of salty, creamy, and sweet? I swear it works.

  • A simple green salad with a zippy vinaigrette does wonders for balancing all that cheese and meat. Something crunchy, lemony, maybe with a few shaved radishes if you’re feeling whimsical.

  • Garlic bread, obviously. Bonus points for double-carbing. (And yes, it’s absolutely okay to dip it in the leftover sauce.)

  • For a refreshingly light end, grab a few peanut butter & banana ice cream sandwiches from the freezer. Something cool and sweet after a warm, cheesy dinner? Always brilliant.

  • And finally, a tall glass of something fizzy—sparkling water, soda, or even a chilled red wine. Whatever says “I did the thing, now I get to sit.”

Classic Million Dollar Spaghetti

Frequently Asked Questions

Can I make this ahead of time?

Absolutely! You can assemble the whole thing up to a day in advance, cover it tightly, and pop it in the fridge until you’re ready to bake. If it’s cold from the fridge, you might need to bake it an extra 5 to 10 minutes. You can also freeze it unbaked—see the storage section for those details.

What’s the best kind of spaghetti sauce to use?

Honestly, use what you enjoy. A basic marinara works beautifully, but if you have a favorite spicy tomato basil or a garlic-lover’s version, feel free to toss that in instead. Just make sure it’s not too watery or it’ll get runny in the bake.

Can I use full-fat dairy instead of reduced-fat?

For sure. If you’re not watching your fats, using the full-fat versions of ricotta, sour cream, and cream cheese will make it extra decadent. It’ll be richer and creamier, and I won’t judge you one bit—it’s called million-dollar for a reason.

How do I prevent the cheese from sticking to the foil while baking?

This trick saves you: spray the bottom of your foil with a quick shot of nonstick spray before covering the dish. That way, when the cheese bubbles up, it doesn’t glue itself to the foil like a melted cheese bandit. You’re welcome.

Classic Million Dollar Spaghetti

Classic Million Dollar Spaghetti

Prep Time 20 minutes
Cook Time 35 minutes
Total Time 55 minutes
Buttery noodles meet creamy cheese and a hearty meat sauce in this cozy, craveable million-dollar spaghetti bake. It’s loaded with ground beef, green onions, and melted cheese—yes, that molten, golden-bubbly kind.
Al dente spaghetti is layered with tangy beefy tomato sauce and a swoon-worthy cheese blend: cream cheese, ricotta, and sour cream, all melty and mingled together. It’s the perfect make-ahead casserole for busy weeknights or impromptu gatherings. Cozy, practical, and crowd-pleasing—just how you want comfort food to be!
8 servings

Ingredients

For the Pasta

  • 12 oz (340 g) spaghetti

For the Meat Sauce

  • 1 lb (450 g) ground beef
  • 1 onion diced
  • 3 cloves garlic minced
  • 24 oz (680 g) spaghetti sauce your favorite jarred or homemade
  • salt and pepper to taste

For the Cheese Layer

  • 4 oz (115 g) cream cheese softened (reduced-fat, if desired)
  • 1 cup (250 g) ricotta cheese reduced-fat, if desired
  • 1/2 cup (120 g) sour cream reduced-fat, if desired
  • 4 green onions thinly sliced, divided (plus more for topping)

For Topping

  • 2 cups (200 g) Cheddar–Monterey Jack cheese blend shredded, or any melty cheese blend
  • fresh parsley or more green onions optional, for serving

Equipment

  • Large pot
  • Large skillet
  • Mixing bowls
  • 11x7 inch baking dish
  • Foil

Instructions
 

  1. Boil the spaghetti: Cook the spaghetti in salted water until just al dente. Drain and toss with a little oil to prevent sticking. Set aside.
  2. Brown the beef with aromatics: In a large skillet over medium heat, cook the ground beef with diced onion and garlic until browned and fragrant. Drain excess grease.
  3. Make the meat sauce: Add spaghetti sauce to the beef mixture along with salt and pepper to taste. Simmer for about 20 minutes to blend the flavors. Taste and adjust seasoning.
  4. Mix the cheese layer: In a bowl, mash together the softened cream cheese, ricotta, and sour cream until smooth. Fold in most of the chopped green onions, reserving some for garnish.
  5. Layer the casserole: Lightly grease an 11x7-inch baking dish. Layer the cooked spaghetti on the bottom, then spread the cheese mixture on top of the noodles. Spoon the meat sauce over the cheese layer. Sprinkle the shredded cheese blend evenly over the top.
  6. Bake: Cover dish with foil and bake in a preheated 350°F (175°C) oven for 25 minutes. Remove foil and bake an additional 5–10 minutes, until the top is golden and bubbly.
  7. Garnish and serve: Let cool for a few minutes, then top with extra green onions or parsley. Slice and serve hot.

Notes

Storage: Refrigerate leftovers in an airtight container for up to 4 days. To freeze, wrap cooled casserole or assembled unbaked casserole tightly and freeze for up to 3 months. Thaw overnight in the fridge before reheating, covered, in a 350°F oven until bubbling.
Variations: Swap the beef for ground turkey, chicken, or Italian sausage. Make it meatless by sautéing mushrooms or spinach. Cottage cheese can substitute ricotta. Use gluten-free noodles if needed. Add red pepper flakes for heat or Italian seasoning for extra flavor!
Foil tip: Spray the underside of your foil with nonstick spray before covering to prevent the cheese from sticking.

Nutrition

Calories: 525kcal | Carbohydrates: 41g | Protein: 30g | Fat: 25g | Saturated Fat: 13g | Cholesterol: 94mg | Sodium: 898mg | Potassium: 614mg | Fiber: 3g | Sugar: 8g | Vitamin A: 820IU | Vitamin C: 6mg | Calcium: 370mg | Iron: 3.2mg

Golden and crispy on the outside, soft and savory inside, these sweet potato hash browns mix shredded sweet potato, egg, flour, and a few cozy spices. Pan-fried to perfection in a sizzle of oil for that irresistible crunch.

If you’re like me and believe breakfast potatoes should be their own food group, this one’s for you. These sweet potato hash browns are smoky-sweet with just enough salt and crisp. You can eat them solo with a runny egg or pile them up next to something fancy—maybe even that one friend who puts hot sauce on everything. They’re a tiny bit earthy, a lot comforting, and wildly easy to make.

Table of Contents

Homemade Sweet Potato Hash Browns

Why You’ll Love this Sweet Potato Hash Browns Recipe

Let’s be honest—it doesn’t take much to fall in love with anything potato-adjacent. But this mashup? It’s got charm.

  • Crispy-edged perfection: The outside gets gloriously golden while the inside stays soft and tender. Like a cozy blanket with a satisfying crunch.
  • Just enough spice: Paprika and onion powder bring a quiet little kick that compliments, not competes.
  • Fewer ingredients, more win: Just one bowl, no fuss. That sweet potato does a lot of heavy lifting here.
  • Good leftovers (if you have any): Reheat in a skillet the next day for second-morning magic.
  • Weekday to weekend friendly: You can absolutely throw these together between coffee sips, or serve them at brunch next to a just-pulled espresso.

Homemade Sweet Potato Hash Browns

Ingredient Notes

Nothing wild or unpronounceable in this lineup—just the essentials and a few pantry favorites.

  • Sweet potato: Big and firm, peeled and shredded. It’s the base, the star, the main character. Look for ones without too many nubby ends so grating is easier.
  • Egg: Helps glue everything together. If your sweet potato is super moist, the egg keeps things from falling apart mid-flip.
  • All-purpose flour: Just enough to bind without turning it into a fritter. You can sub with a gluten-free flour if you’re that kind of person.
  • Paprika: Adds smoky warmth. Smoked paprika makes it deeper, but regular works just fine too.
  • Onion powder: A little savory friend that rounds things out without actual onion tears.
  • Salt & black pepper: Season boldly—sweet potatoes are sweet. You want that balance.
  • Vegetable oil: For maximum crispy edges. You’ll want a neutral cooking oil with a decent smoke point. No olive oil here.

Homemade Sweet Potato Hash Browns

How To Make This Sweet Potato Hash Browns Recipe

Let’s make magic in a pan. Yes, there’s a little grating. Yes, it’s worth it.

  • Grate the sweet potato: Peel it first, then either go the box grater route or use the food processor (game-changer if you’re doing a big batch). You want thin strips, not mush.

  • Squeeze out the moisture: This part matters! Dump the shredded sweet potato into a colander and press with paper towels like your crispiness depends on it. Because… it kind of does.

  • Mix everything together: Toss your squeezed shreds into a bowl with the flour, egg, paprika, onion powder, salt, and pepper. Give it a mix until it all sticks together and smells cozy and slightly spiced.

  • Heat your skillet: Pour in the oil and give it a couple of minutes over medium heat until it gently sizzles when something touches it. Cast iron is your bestie here for even browning.

  • Form your patties: Scoop about 1/3 cup of the mix per hash brown and drop it into the pan. Gently flatten with a spatula—not squish like a pancake, just enough to hold shape.

  • Fry to golden glory: Cook them for around 3 to 4 minutes per side until nicely browned with crispy edges that tap just right on the spatula.

  • Drain & serve: Set them on a paper towel-lined plate as they come out. Try not to eat half of them standing over the stove (or do, no judgment).

Homemade Sweet Potato Hash Browns

Storage Options

Okay, let’s talk leftovers—assuming these sweet potato hash browns make it to leftovers.

Once they cool, pop them in an airtight container and store them in the fridge for up to 4 days. Lay them flat in a single layer with parchment or paper towel between layers to avoid soggy situations.

Freezer? Totally works. Just freeze them first on a baking sheet (uncrowded) until firm, then transfer to a zip-top bag. Reheat straight from frozen in a 375°F oven for 10 to 12 minutes or until hot and crispy again. Or toss them in a hot skillet with a little oil for crackly edges.

Microwave reheating isn’t ideal unless you really enjoy chewy hash browns with droopy vibes—which I personally do not recommend.

Variations and Substitutions

Want to tweak this up a little? I got you. Here are some easy swaps and zhuzh-it-up options.

  • Chickpea flour: Sub the all-purpose flour if you want a slightly nutty, vegan-friendly binder that also happens to be gluten-free.
  • Add finely chopped herbs: Parsley, thyme, or chives play beautifully with the earthiness of the sweet potato and bump up the freshness.
  • Spice it up: A little cayenne or chipotle powder sneaked into the mix adds some subtle fire (do test as you go).
  • Shred in zucchini or carrot: If you’ve got bits and bobs of veg to use up, you can mix them in. Just squeeze out extra water before adding.
  • Top with cheese: Yep, you can mix in a tiny handful of sharp cheddar or parmesan. Just don’t go overboard or it’ll melt into a whole different thing (delicious, but no longer a hash brown).

Homemade Sweet Potato Hash Browns

What to Serve with Sweet Potato Hash Browns

These hash browns are pretty open-minded. They’ll sidle up happily to breakfast basics, lunchy layers, and even some dinner mains.

  • Sunny-side eggs and avocado: The yolk runs into the crispy edges, the avocado cools it all down, and suddenly it’s brunch in your kitchen.

  • With a bowl of cozy soup: You’ll get bonus points if it’s something like this potato soup. Sweet potato plus creamy soup? Textural dream.

  • Next to simply seared fish: Something light and buttery like this pan-seared cod hits the contrast game hard. Soft flaky fish, crispy hash brown? Yes, please.

  • Topped with a dollop of sour cream or Greek yogurt: If you’re into savory-sweet dynamics, this creamy topper gives it… how do I say… deviled egg energy? But better.

  • Stuffed in a breakfast wrap: Eggs, greens, hot sauce, and a crumbled sweet potato hash brown wrapped up tight makes for a dreamy to-go situation.

Homemade Sweet Potato Hash Browns

Frequently Asked Questions

Can I make sweet potato hash browns ahead of time?

Totally. You can prep the mixture a few hours ahead, just store it covered in the fridge. When ready, heat your pan and cook as usual. I wouldn’t wait more than a day though—sweet potatoes can get a little watery once shredded. If that happens, just give the mix another squeeze or a small sprinkle of flour before frying.

Do I have to peel the sweet potato?

You don’t absolutely *have* to, but I recommend it. The peel has a rougher texture that doesn’t cook down as nicely as the flesh. If you’re going for rustic vibes or simply feeling lazy (no shame), you can leave it on—just wash it well and expect a slightly chewier finish.

Can I bake instead of fry them?

You definitely can, though the texture will be a little different. Place patties on a parchment-lined baking sheet, brush lightly with oil, and bake at 400°F for about 20–25 minutes, flipping halfway. They won’t get quite as crispy as pan-fried, but it’s still tasty and easier to batch.

How do I keep them from getting soggy?

The best trick? Squeeze *as much* moisture out of the shredded sweet potato as possible before mixing. I mean really press it with paper towels or even use a clean dish towel. Also, make sure your oil is hot enough before dropping them in—lukewarm oil equals greasy hash browns. And don’t overcrowd the pan, or the steam will bring sogginess into the mix.

Homemade Sweet Potato Hash Browns

Crispy Sweet Potato Hash Browns

Prep Time 10 minutes
Cook Time 15 minutes
Total Time 25 minutes
Golden, crispy-edged sweet potato hash browns pan-fried for peak crunch and coziness. Just a handful of pantry staples bring out the smoky, savory, and satisfying side of sweet potato for breakfast or anytime.
4 servings

Ingredients

Hash Browns

  • 1 large sweet potato peeled and shredded (~1 1/2 cups packed)
  • 1 egg
  • 2 tbsp (16 g) all-purpose flour can substitute with gluten-free or chickpea flour
  • 1/2 tsp (2 g) paprika smoked or regular
  • 1/2 tsp (2 g) onion powder
  • 1/2 tsp (2 g) salt more to taste
  • 1/4 tsp (1 g) black pepper
  • 3 tbsp (45 ml) vegetable oil for frying, more as needed

Equipment

  • Box grater or food processor
  • Mixing bowl
  • Colander
  • Skillet (cast iron recommended)
  • Spatula

Instructions
 

  1. Peel and shred the sweet potato using a box grater or food processor.
  2. Place the shredded sweet potato in a colander and squeeze out as much moisture as possible using paper towels or a clean dish towel.
  3. In a large mixing bowl, combine the squeezed sweet potato, flour, egg, paprika, onion powder, salt, and pepper. Mix until well combined and sticky.
  4. Heat the vegetable oil in a large skillet over medium heat until shimmering.
  5. Scoop about 1/3 cup of the mixture per hash brown into the skillet. Flatten each gently with a spatula.
  6. Fry for 3–4 minutes per side until deeply golden and crispy. Work in batches to avoid overcrowding.
  7. Transfer cooked hash browns to a paper towel-lined plate. Serve warm.

Notes

Storage: Keep any leftovers in an airtight container in the refrigerator for up to 4 days. Reheat in a skillet or in the oven at 375°F to crisp them up again. To freeze, lay hash browns flat on a baking sheet to freeze solid, then transfer to a freezer bag. Bake from frozen for 10–12 minutes at 375°F or re-crisp in a skillet.
Variations: Sub chickpea flour for gluten-free, add chopped herbs, a pinch of cayenne, or blend in shredded zucchini or carrot (squeeze extra water out first). For a cheesy version, add a little shredded cheddar or parmesan.

Nutrition

Calories: 150kcal | Carbohydrates: 18g | Protein: 3g | Fat: 7g | Saturated Fat: 1g | Cholesterol: 35mg | Sodium: 310mg | Potassium: 260mg | Fiber: 2g | Sugar: 3g | Vitamin A: 9500IU | Vitamin C: 2mg | Calcium: 25mg | Iron: 0.7mg

Luscious layers of silky cream cheese swirled with buttery graham crackers and topped off with sweet-tart cherries—these cherry cheesecake bars are a dessert-daydream made with cream cheese, graham crumbs, and cherry pie filling.

Creamy, crunchy, jammy, and cool from the fridge… they’re part cheesecake, part bar, 100% snackable. Casual enough for a Tuesday, dressed up enough for a potluck.

Sometimes you want a real, grown-up dessert… without needing to channel your inner patisserie fairy. That’s where these easy cherry cheesecake bars come in, all dressed in fruity red with a thick swirl of nostalgia. Picture cream cheese whipped smooth and luscious, a tiny vanilla hum in each bite. The simple graham crust gets toasted just enough to give it a little caramel-y snap, and then—just when you think things couldn’t get better—along comes that ruby red cherry glaze.

These live happily in the “super chill but secretly fancy” dessert category. Eat ‘em cold, share ‘em warm (people fight me on this), maybe even crumble a piece onto ice cream sandwiches.

Table of Contents

Easy Cherry Cheesecake Bars

Why You’ll Love this Easy Cherry Cheesecake Bars

It’s got cherry, it’s got cheesecake, and it’s in bar form. I mean… that kind of sells itself? Still, here are a few more reasons to fall for these creamy cuties:

  • Ridiculously simple to make: You just squish, smear, whisk, pour, cool. The oven does the hard work while you “supervise.”
  • Creamy and tangy with a crunch: That contrast between the velvety cheesecake, the zingy cherries, and crisp graham cracker crust is pure snack magic.
  • Perfect make-ahead dessert: They get better after chilling, which means you can prep them the night before and avoid the pre-party scramble.
  • Totally portable: These cut clean (thanks, parchment paper overhang!) and travel like absolute champs. Picnics, potlucks, Thursdays… you name it.
  • Cherry on top? Literally: That glossy finish isn’t just for looks. It adds a bright, fruity pop to balance the rich filling.

Easy Cherry Cheesecake Bars

Ingredient Notes

These bars use baking cabinet regulars, plus a couple hardworking fridge stars. Here’s what’s doing the heavy lifting:

  • Graham cracker crumbs: Make your own by blitzing full crackers in a food processor, or grab a box of pre-crushed if you’re feeling breezy. Either way, it gives you that sweet, toasty base.
  • Granulated sugar: Just enough to sweeten both the base and the cheesecake layer without overdoing it.
  • Unsalted butter: Melted into the crust for richness and structure. If you only have salted, go easy on the added salt later.
  • Cream cheese: Two full bricks. No skimping here. Let it come to room temp so you don’t end up fighting a lumpy filling (it’s not a good time).
  • Eggs: They bind it all into a smooth, sliceable custard. Room temperature is best for even mixing.
  • Vanilla extract: A couple of teaspoons add that cozy, bakery-style flavor that brings it all together.
  • Salt: Just a pinch to balance the sweetness and keep things interesting.
  • Cherry pie filling: Canned and proud. It’s glossy, sweet, and gives you those whole cherries in syrupy goodness. If you’re feeling adventurous, you could try a homemade cherry compote, but this shortcut hits all the right notes.

Easy Cherry Cheesecake Bars

How To Make This Easy Cherry Cheesecake Bars

Okay. Let’s crank up the oven and get a little messy in the best way. Bars like these don’t ask for perfection—just a little stirring, spreading, and slicing.

  • Preheat and prep the pan: Set your oven to 325°F. Line a 9×13-inch pan with parchment paper, leaving a bit of overhang on the sides. This is like your dessert-lifting sling, trust me.

  • Make the crust: Mix the graham cracker crumbs, sugar, and melted butter together until it looks like damp sand. Press that firmly and evenly into your pan using your fingers or the bottom of a measuring cup. Bake it for 10 minutes just to set and toast the crust slightly. Let it cool while you whip up the filling.

  • Mix the cheesecake batter: Beat the softened cream cheese with the sugar until it’s smooth and fluffy—this takes about two minutes with an electric mixer. Then add the eggs one at a time, mixing gently after each (keep it low speed unless you want whipped cheesecake). Add vanilla and salt. That’s it. Don’t overmix or it’ll puff weird when baking.

  • Pour and level: Scrape that custardy goodness over the crust and spread it gently with a spatula. Give the pan a gentle wiggle to even things out.

  • Bake the bars: Pop the pan in and bake for 35 to 40 minutes. Check early; the edges should look set, while the center will still jiggle just a little (like Jell-O vibes, not waves of chaos).

  • Chill, then cherry: Let it cool completely on the counter first, then stash it in the fridge for at least 4 hours or overnight. When it’s nice and cold, spoon the cherry pie filling over the top and spread it out to the edges.

  • Lift, cut, devour: Use those parchment flaps to lift the whole block out of the pan. Cut into squares (or triangles, I don’t make the rules), and serve them chilled.

Easy Cherry Cheesecake Bars

Storage Options

These cherry cheesecake bars actually thrive in the fridge—no joke. After baking and cooling fully, store them covered in the fridge for up to 5 days. Use a lidded container or just wrap the whole pan in plastic (bonus points if you leave the parchment in place).

Thinking long-term? Yes, you can freeze them. But wait to add the cherry topping until after thawing, or it gets weird and watery. Wrap the unsliced, cooled bars tightly in plastic and then foil, or place slices in airtight containers. Freeze for up to 2 months. To thaw, just pop the container in the fridge overnight.

Don’t microwave them to thaw—this isn’t that kind of dessert. Let time do the work, and you’ll be rewarded with creamy, dreamy bars that feel freshly made.

Variations and Substitutions

Got creative ideas floating around already? Bring ’em on. These bars are friendly to freestyling.

  • Different crust base: Try crushed vanilla wafers, Biscoff cookies, or gingersnaps for a fun flavor twist on the classic graham.
  • Low-sugar version: Use reduced-sugar pie filling and cut the crust sugar by half. The cheesecake itself is still plenty rich and satisfying.
  • Swap cherry for blueberry or apple: Feel free to swap in other canned pie fillings—peach is sneaky good, and blueberry is a close second favorite.
  • Gluten-free option: Use gluten-free graham-style crackers and double check that your pie filling doesn’t sneak in any weird thickener.
  • Add citrus zest: A touch of lemon or orange zest in the filling perks everything up and pairs beautifully with the cherry layer.
  • Chocolate crust upgrade: Feeling bold? Crush up chocolate graham crackers or Oreo-type cookies for a deeper, dessert-ier vibe.

Easy Cherry Cheesecake Bars

What to Serve with Easy Cherry Cheesecake Bars

These bars are already stars, but if you’re building out a menu or plating for a special dinner, a few thoughtful sides help round it out.

  • A hot mug of coffee (or iced cold brew if it’s summer): Something about bitter coffee with sweet cherry and cream cheese just hits differently. It’s that whole bakery-counter fantasy without the price tag.

  • A fresh fruit platter: Keep it light with sliced peaches, grapes, or berries. That breezy balance makes these bars feel a little less indulgent (just go with it).

  • A savory bite on the side: If it’s a party, serve these after something sharp and salty like homemade ranch dip and veggies or crunchy crackers. Creamy on creamy is a mood.

  • A soft sheet cake: Who says you can’t double up on desserts? Consider following up with a light slice of chocolate chip sheet cake if you’re aiming for a buffet dessert table.

  • Sparkling water with lime or berries: Even if you’re just chilling at home, something fizzy lifts the mood and cuts the richness between bites.

Easy Cherry Cheesecake Bars

Frequently Asked Questions

Can I use a different fruit topping instead of cherry?

Absolutely! Any canned pie filling works well here. Blueberry, apple, raspberry, even lemon—go wild. Just pick one with chunks of fruit for best texture. You can also make a quick homemade compote or fruit jam if you’d prefer that rustic homemade touch. Just make sure it’s thick, not runny, so it doesn’t melt all over the cheesecake when sliced.

How do I know when the cheesecake layer is done baking?

It should look mostly set around the edges, while the center still has a little wobble if you gently shake the pan. That soft jiggle’s your best baking friend. Skip overbaking, or it’ll crack and dry. It firms up in the fridge as it cools, so don’t stress if it seems soft out of the oven. It’s part of the magic.

Can I make these bars ahead of time?

You absolutely should. These bars are perfect for making the night before. Chill them overnight and add the cherry topping just before serving (or earlier if you don’t mind a bit of syrup soaking in). They actually taste better after a good rest in the fridge, and they cut much neater, too.

How do I get nice clean slices?

Cold cheesecake is your best bet. Use a sharp knife and wipe it clean between each cut—warm it under hot water and dry it for really clean lines. Cutting straight down without wiggling keeps the edges tidy. The parchment overhang also helps you lift the whole block out so you’re not mangling it in the pan.

Easy Cherry Cheesecake Bars

Easy Cherry Cheesecake Bars

Prep Time 20 minutes
Cook Time 40 minutes
Chilling Time 4 hours
Total Time 5 hours
Luscious layers of silky cream cheese swirled with buttery graham crackers and topped off with sweet-tart cherries—these cherry cheesecake bars are a perfectly snackable dessert. Creamy, crunchy, jammy, and cool from the fridge—they’re part cheesecake, part bar, and 100% irresistible. Make them ahead, cut them clean, share them at potlucks or picnics, or savor straight from the fridge at midnight.
12 bars

Ingredients

For the Crust

  • 2 cups (200 g) graham cracker crumbs
  • 1/3 cup (67 g) granulated sugar
  • 1/2 cup (115 g) unsalted butter melted

For the Cheesecake Layer

  • 16 oz (450 g) cream cheese softened to room temperature (2 bricks)
  • 2/3 cup (135 g) granulated sugar
  • 2 large eggs room temperature
  • 2 tsp (10 ml) vanilla extract
  • 1/4 tsp (1.5 g) salt

For the Topping

  • 21 oz (595 g) cherry pie filling canned

Equipment

  • 9x13-inch Baking Pan
  • Parchment paper
  • Mixing bowls
  • Electric mixer
  • Spatula

Instructions
 

  1. Preheat your oven to 325°F (163°C). Line a 9x13-inch pan with parchment paper, leaving an overhang for easy removal.
  2. In a mixing bowl, combine graham cracker crumbs, 1/3 cup sugar, and melted butter. Stir until it resembles damp sand.
  3. Press the mixture firmly into the bottom of the prepared pan. Bake for 10 minutes, then set aside to cool slightly.
  4. In a clean bowl, beat the softened cream cheese and 2/3 cup sugar together until smooth and creamy (about 2 minutes with an electric mixer).
  5. Add eggs one at a time, mixing on low speed after each addition just until combined. Do not overmix.
  6. Mix in vanilla extract and salt until just combined.
  7. Pour the cheesecake filling over the cooled graham crust. Spread evenly with a spatula and gently tap the pan to smooth the top.
  8. Bake for 35–40 minutes, until the edges are set but the center is slightly jiggly. Avoid overbaking.
  9. Let the bars cool completely at room temperature, then chill in the fridge at least 4 hours or overnight.
  10. Once chilled, spread cherry pie filling over the cheesecake layer, smoothing it gently to the edges.
  11. Lift the bars out of the pan using the parchment overhang, cut into squares, and serve chilled.

Notes

Storage: Cover and store in the refrigerator for up to 5 days. For longer storage, freeze un-topped bars for up to 2 months. Thaw in the fridge, then top with cherry filling just before serving.
Variations: Swap the crust for crushed vanilla wafers, gingersnaps, or chocolate cookies; substitute different canned pie fillings; add lemon or orange zest to the cheesecake layer for brightness; or make it gluten-free with appropriate graham-style crackers.
For clean slices, use a sharp knife wiped clean between cuts, and cut the bars while well chilled.

Nutrition

Calories: 340kcal | Carbohydrates: 41g | Protein: 4g | Fat: 18g | Saturated Fat: 10g | Cholesterol: 65mg | Sodium: 250mg | Potassium: 81mg | Fiber: 1g | Sugar: 24g | Vitamin A: 610IU | Vitamin C: 2mg | Calcium: 45mg | Iron: 1.1mg

Let's Get Cooking!

100+ Recipes for Busy Nights

In a time crunch? Take a look around and browse plenty of recipes to help you get dinner ready and on the table on those busy nights!

Sweet Recipes

Pumpkin Banana Muffins

Pumpkin Banana Muffins Recipe

Strawberry Pie Bars

Strawberry Pie Bars Easy Oven Recipe

White Chocolate Raspberry Muffins

White Chocolate Raspberry Muffins Recipe

Snickerdoodle Muffins

Snickerdoodle Muffins Recipe for Oven

PIN NOW

Follow KitchenetteBlog on Pinterest

Love cozy recipes that actually make it to the table? On Pinterest, I share new comfort-food ideas every week—desserts, dinners, and those little snack cravings that hit at midnight. Come pin with me and never run out of kitchen inspo.

Savory Recipes

Turkey Tetrazzini

Turkey Tetrazzini Baked Pasta Recipe

Grilled Chicken Panini Sandwich

Grilled Chicken Panini Sandwich Recipe

Sweet Potato Cornbread

Sweet Potato Cornbread Recipe Oven Baked

Classic Waldorf Salad

Waldorf Salad Simple Classic Recipe

Get 5 Recipes to Simplify Your Life!

Delicious, versatile recipes you can make over and over.